---
description: This section describes new Payload Types
---
# 1. Payload Type Development
## Creating a new Mythic agent
You want to create a new agent that fully integrates with Mythic. Since everything in Mythic revolves around Docker containers, you will need to ultimately create one for your payload type. This can be done with docker containers on the same host as the Mythic server or with an external [VM/host machine](payload-type-development/payload-type-info/turning-a-vm-into-a-container).
## 1.0 - What are we creating and how does it fit in?
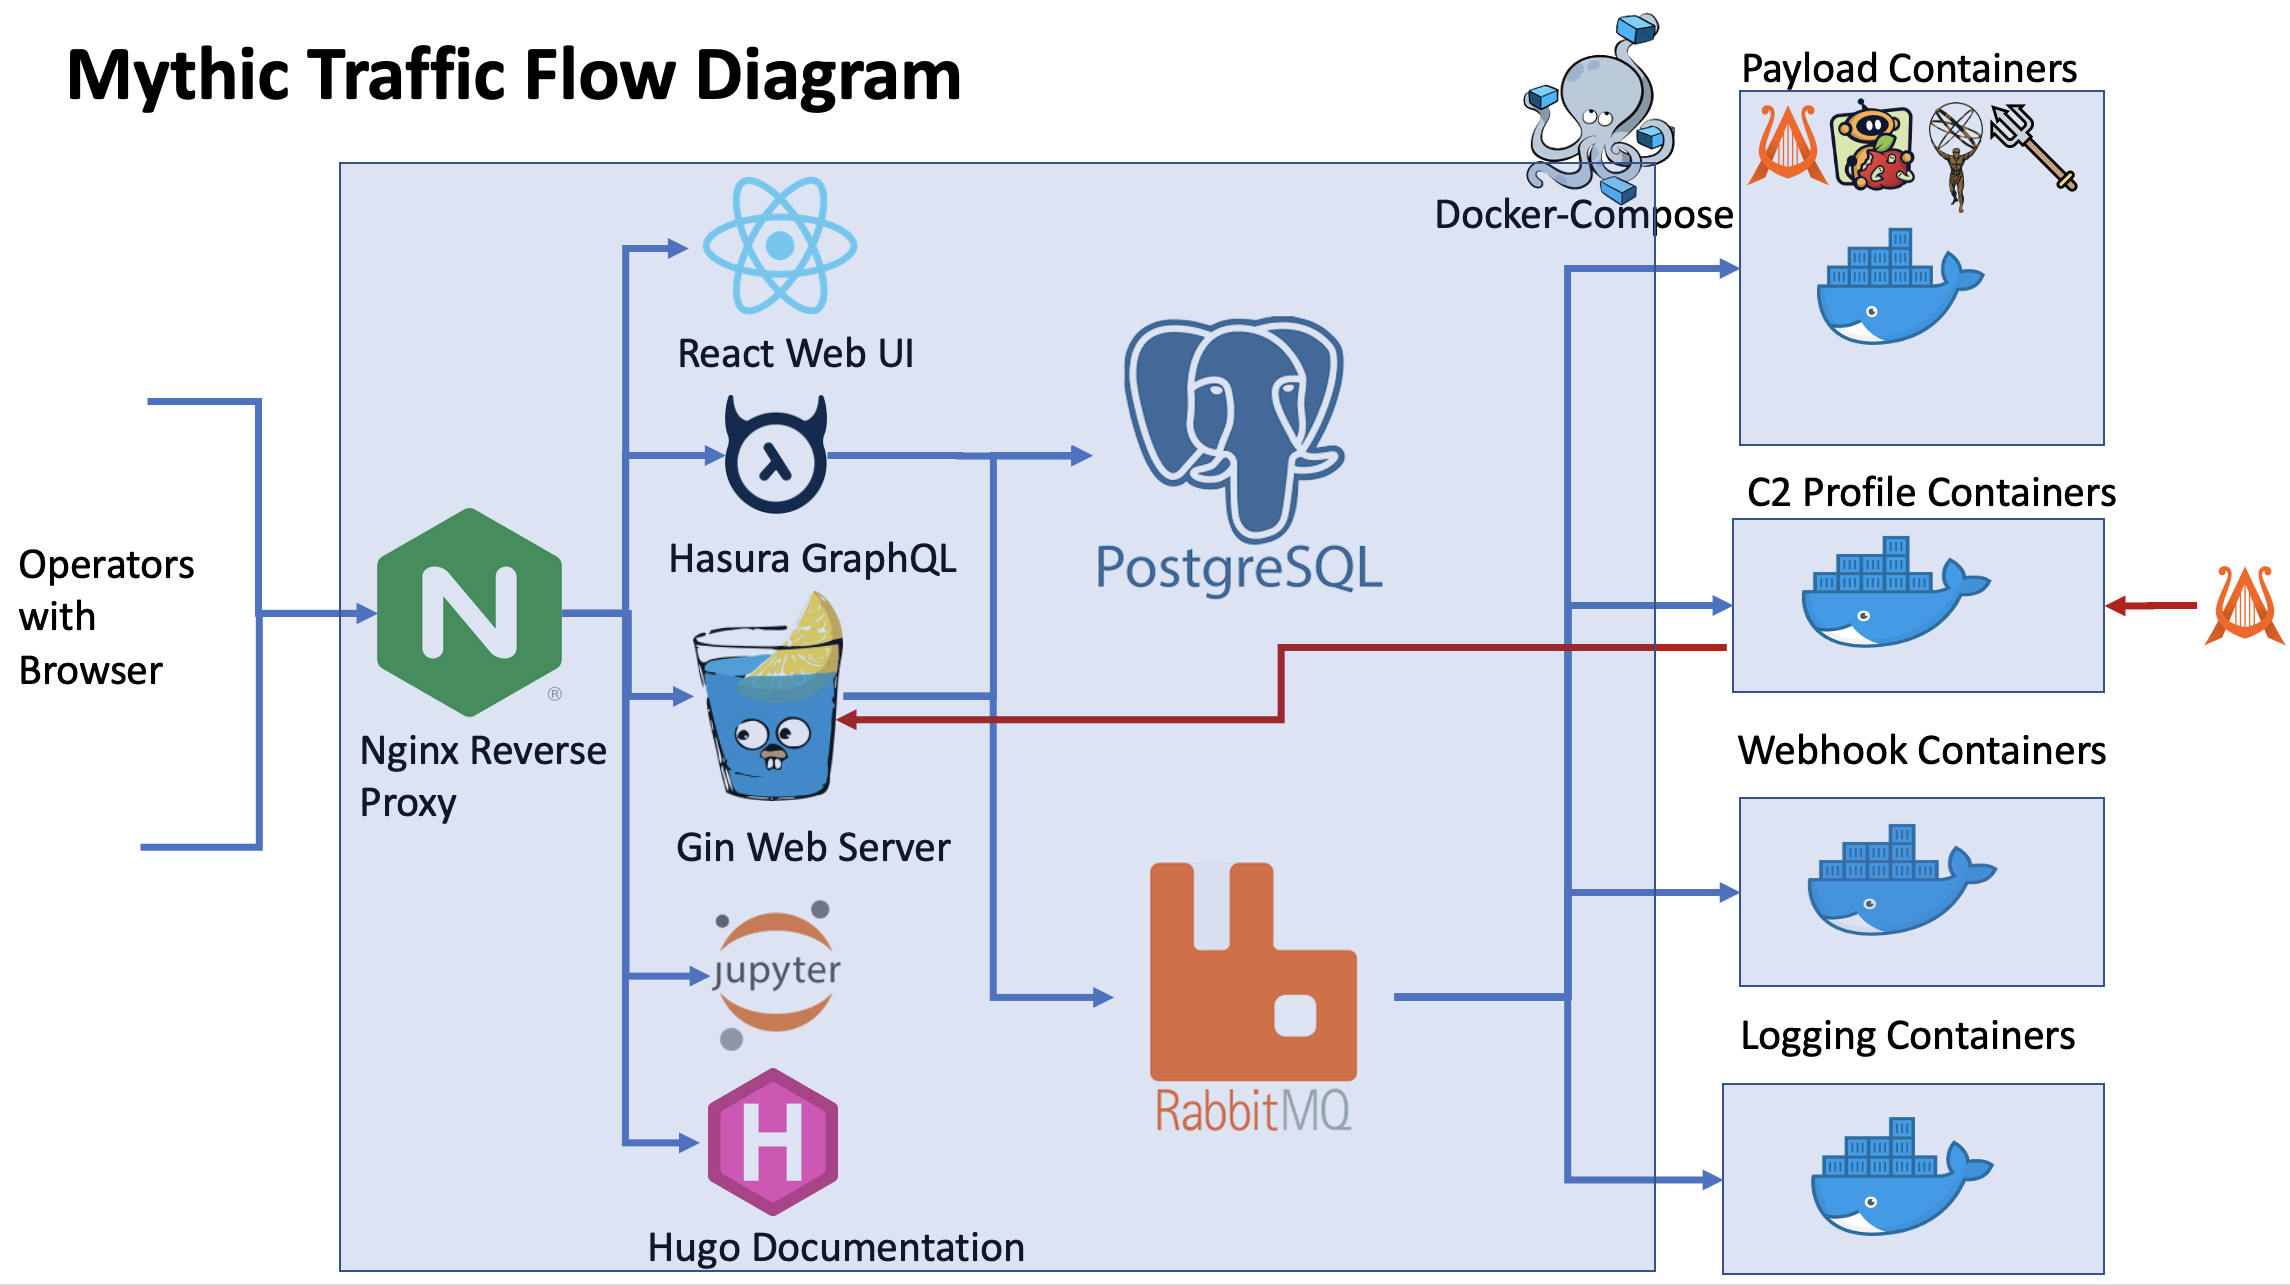
What does Mythic's setup look like? We'll use the diagram below - don't worry though, it looks complicated but isn't too bad really:
Mythic itself is a `docker-compose` file that stands up a bunch of microservices. These services expose various pieces of functionality like a database (`PostgreSQL`), the web UI (`React Web UI`), internal documentation (`Hugo Documentation`), and a way for the various services to communicate with each other (`RabbitMQ`). Don't worry though, you don't worry about 99% of this.
Mythic by itself doesn't have any agents or command-and-control profiles - these all are their own Docker containers that connect up via `RabbitMQ` and `gRPC`. This is what you're going to create - a separate container that connects in (the far right hand side set of containers in the above diagram).
### 1.1 Where do things live?
When you clone down the Mythic repo, run `make` to generate the `mythic-cli` binary, and then run `sudo ./mythic-cli start`, you are creating a `docker-compose` file automatically that references a bunch of `Dockerfile` in the various folders within the `Mythic` folder. These folders within `Mythic` are generally self-explanatory for their purpose, such as `postgres-docker` , `rabbitmq-docker`, `mythic-docker`, and `MythicReactUI`.
When you use the `mythic-cli` to install an agent or c2 profile, these all go in the `Mythic/InstalledServices` folder. This makes it super easy to see what you have installed.
Throughout development you'll have a choice - do development remotely from the Mythic server and hook in manually, or do development locally on the Mythic server. After all, everything boils down to code that connects to `RabbitMQ` and `gRPC` - Mythic doesn't really know if the connection is locally from Docker or remotely from somewhere else.
## 2.0 Starting with an example
The first step is to clone down the example repository [https://github.com/MythicMeta/ExampleContainers](https://github.com/MythicMeta/ExampleContainers). The format of the repository is that of the [External Agent](https://github.com/MythicMeta/Mythic_External_Agent) template. This is the format you'll see for all of the agents and c2 profiles on the [overview](https://mythicmeta.github.io/overview/) page.
Inside of the `Payload_Type` folder, there are two folders - one for GoLang and one for Python depending on which language you prefer to code your agent definitions in (this has nothing to do with the language of your agent itself, it's simply the language to define commands and parameters). We're going to go step-by-step and see what happens when you install something via `mythic-cli`, but doing it manually.
### 2.1 Copy the folder
Pick whichever service you're interested in and copy that folder into your `Mythic/InstalledServices` folder. When you normally install via `mythic-cli`, it clones down your repository and does the same thing - it copies what's in that repository's `Payload_Type` and `C2_Profiles` folders into the `Mythic/InstalledServices` folder.
### 2.2 Update the docker-compose
Now that a folder is in the `Mythic/InstalledServices` folder, we need to let the `docker-compose` file _know_ that it's there. Assuming you copied over `python_services`, you then need to run `sudo ./mythic-cli add python_services`. This adds that `python_services` folder to the `docker-compose`. This is automatically done normally as part of the install process.
As part of updating `docker-compose`, this process adds a bunch of environment variables to what will be the new container.
### 2.3 Building the image and running the container
Now that `docker-compose` knows about the new service, we need to build the image that will be used to make the agent's container. We can use `sudo ./mythic-cli build python_services`. This tells `docker` to look in the `Mythic/InstalledServices/python_services` folder for a `Dockerfile` and use it to build a new image called `python_services`. As part of this, Mythic will automatically then use that new image to create a container and run it. If it doesn't, then you can create and start the container with `sudo ./mythic-cli start python_services`.
Again, all of this happens automatically as part the normal installation process when you use `sudo ./mythic-cli install`. We're doing this step-by-step though so you can see what happens.
### 2.4 Check the Mythic UI
At this point, your new example agent should be visible within Mythic. If it's not, we can check logs to see what the issue might be with `sudo ./mythic-cli logs python-services` (this is a wrapper around `sudo docker logs python-services` and truncates to the latest 500 lines).
### 2.5 Reminder
Steps 2.1-2.4 all happen automatically when you install a service via `mythic-cli`. If you don't want to install via `mythic-cli` then you can do these steps manually like we did here.
## 3.0 Examining the pieces
Now that you've seen the pieces and steps for installing an existing agent, it's time to start diving into what's going on within that `python_services` folder.
### 3.1 Dockerfile
The only thing that absolutely **MUST** exist within this folder is a `Dockerfile` so that `docker-compose` can build your image and start the container. You can use anything as your base image, but Mythic provides a few to help you get started with some various environments:
* `itsafeaturemythic/mythic_go_base` has GoLang 1.21 installed
* `itsafeaturemythic/mythic_go_dotnet` has GoLang 1.21 and .NET
* `itsafeaturemythic/mythic_go_macos` has GoLang 1.21 and the macOS SDK
* `itsafeaturemythic/mythic_python_base` has Python 3.11 and the `mythic_container` pypi package
* `itsafeaturemythic/mythic_python_go` has Python 3.11, the `mythic_container` pypi package, and GoLang v1.21
* `itsafeaturemythic/mythic_python_macos` has Python 3.11, the `mythic_container` pypi package, and the macOS SDK
This allows two payload types that might share the same language to still have different environment variables, build paths, tools installed, etc. Docker containers come into play for a few things:
* Sync metadata about the payload type (this is in the form of python classes or GoLang structs)
* Contains the payload type code base (whatever language your agent is in)
* The code to create the payload based on all of the user supplied input (builder function)
* Sync metadata about all of the commands associated with that payload type
* The code for all of those commands (whatever language your agent is in)
* Browser scripts for commands (JavaScript)
* The code to take user supplied tasking and turn it into tasking for your agent
#### Using the default container base
Start your `Dockerfile` off with one of the above images:
```
From itsafeaturemythic/mythic_python_base:latest
```
On the next lines, just add in any extra things you need for your agent to properly build, such as:
```
RUN pip install python_module_name
RUN shell_command
RUN apt-get install -y tool_name
```
{% hint style="info" %}
This happens all in a script for docker, so if a command might make a prompt for something (like apt-get), make sure to auto handle that or your stuff won't get installed properly
{% endhint %}
The latest container versions and their associated `mythic_container` PyPi versions can be found here: [#current-payloadtype-versions](payload-type-info/container-syncing#current-payloadtype-versions "mention"). The `mythic_python_*` containers will always have the latest `PyPi` version installed if you're using the `:latest` version.
If you're curious what else goes into these containers, look in the `docker-templates` folder within the Mythic repository.
### 3.2 Required Folder Structure
{% hint style="info" %}
The `Mythic/InstalledServices/[agent name]` folder is mapped to `/Mythic` in the docker container. Editing the files on disk results in the edits appearing in the docker container and visa versa.
{% endhint %}
Within the `Dockerfile` you will then need to do whatever is needed to kick off your main program that imports either the MythicContainer PyPi package or the MythicContainer GoLang package. As some examples, here's what you can do for Python and GoLang:
{% tabs %}
{% tab title="Python" %}
`Mythic/InstalledServices/[agent name]/main.py` <-- if you plan on using Python as your definition language, this `main.py` file is what will get executed by Python 3.11 assuming you use the Dockerfile shown below. If you want a different structure, just change the `CMD` line to execute whatever it is you want.
```
FROM itsafeaturemythic/mythic_python_base:latest
RUN python3 -m pip install donut-shellcode
WORKDIR /Mythic/
CMD ["python3", "main.py"]
```
At that point, your `main.py` file should import any other folders/files needed to define your agent/commands and import the `mythic_container` PyPi package.
Any changes you make to your Python code is automatically reflected within the container. Simply do `sudo ./mythic-cli start [agent name]` to restart the container and have python reprocess your files.
If you want to do local testing without `docker`, then you can add a `rabbitmq_config.json` in the root of your directory (i.e. `[agent name]/rabbitmq_config.json`) that defines the environment parameters that help the container connect to Mythic:
{% endtab %}
{% tab title="GoLang" %}
Things are a little different here as we're compiling binaries. To keep things in a simplified area for building, running, and testing, a common file like a `Makefile` is useful. This `Makefile` would be placed at `Mythic/InstalledServices/[agent name]/Makefile`.
From here, that make file can have different functions for what you need to do. Here's an example of the `Makefile` that allows you to specify custom environment variables when debugging locally, but also support Docker building:
```
BINARY_NAME?=main
DEBUG_LEVEL?="warning"
RABBITMQ_HOST?="127.0.0.1"
RABBITMQ_PASSWORD?="password here"
MYTHIC_SERVER_HOST?="127.0.0.1"
MYTHIC_SERVER_GRPC_PORT?="17444"
WEBHOOK_DEFAULT_URL?=
WEBHOOK_DEFAULT_CHANNEL?=
WEBHOOK_DEFAULT_FEEDBACK_CHANNEL?=
WEBHOOK_DEFAULT_CALLBACK_CHANNEL?=
WEBHOOK_DEFAULT_STARTUP_CHANNEL?=
build:
go mod tidy
go build -o ${BINARY_NAME} .
cp ${BINARY_NAME} /
run:
cp /${BINARY_NAME} .
./${BINARY_NAME}
run_custom:
DEBUG_LEVEL=${DEBUG_LEVEL} \
RABBITMQ_HOST=${RABBITMQ_HOST} \
RABBITMQ_PASSWORD=${RABBITMQ_PASSWORD} \
MYTHIC_SERVER_HOST=${MYTHIC_SERVER_HOST} \
MYTHIC_SERVER_GRPC_PORT=${MYTHIC_SERVER_GRPC_PORT} \
WEBHOOK_DEFAULT_URL=${WEBHOOK_DEFAULT_URL} \
WEBHOOK_DEFAULT_CHANNEL=${WEBHOOK_DEFAULT_CHANNEL} \
WEBHOOK_DEFAULT_FEEDBACK_CHANNEL=${WEBHOOK_DEFAULT_FEEDBACK_CHANNEL} \
WEBHOOK_DEFAULT_CALLBACK_CHANNEL=${WEBHOOK_DEFAULT_CALLBACK_CHANNEL} \
WEBHOOK_DEFAULT_STARTUP_CHANNEL=${WEBHOOK_DEFAULT_STARTUP_CHANNEL} \
./${BINARY_NAME}
```
{% hint style="info" %}
Pay attention to the `build` and `run` commands - once you're done building your code, notice that it's copied from the current directory to `/` in the Docker Image. This is because when the container starts, your source code is mapped into the Docker image, thus discarding any changes you made to that directory while building. This is also why the `run` function copies the binary back into the current directory and executes it there. The reason it's executed this way instead of from `/` is so that pathing and local folders are located where you expect them to be in relation to your binary.
{% endhint %}
To go along with that, a sample Docker file for Golang is as follows:
```
FROM itsafeaturemythic/mythic_go_base:latest
WORKDIR /Mythic/
COPY [".", "."]
RUN make build
CMD make run
```
It's very similar to the Python version, except it runs `make build` when building and `make run` when running the code. The Python version doesn't need a `Makefile` or multiple commands because it's an interpreted language.
{% endtab %}
{% endtabs %}
{% hint style="warning" %}
If your container/service is running on a different host than the main Mythic instance, then you need to make sure the `rabbitmq_password` is shared over to your agent as well. By default, this is a randomized value stored in the `Mythic/.env` file and shared across containers, but you will need to manually share this over with your agent either via an environment variable (`MYTHIC_RABBITMQ_PASSWORD` ) or by editing the `rabbitmq_password` field in your rabbitmq\_config.json file. You also need to make sure that the `MYTHIC_RABBITMQ_LISTEN_LOCALHOST_ONLY` is set to `false` and restart Mythic to make sure the `RabbitMQ` port isn't bound exclusively to 127.0.0.1.
{% endhint %}
{% hint style="info" %}
The containers will automatically sync all of their information with the Mythic server when they start, so the first time the Mythic server gets a message from a container it doesn't know about, it'll ask to sync. Similarly, as you do development and restart your Payload Type container, updates will automatically get synced to the main UI.
{% endhint %}
### 3.3 Folder name
The folder that gets copied into `Mythic/InstalledServices` is what's used to create the `docker` image and container names. It doesn't necessarily have to be the same as the name of your agent / c2 profile (although that helps).
{% hint style="warning" %}
Docker does not allow capital letters in container names. So, if you plan on using Mythic's `mythic-cli` to control and install your agent, then your agent's name can't have any capital letters in it. Only lowercase, numbers, and \_. It's a silly limitation by Docker, but it's what we're working with.
{% endhint %}
### 3.4 main.py and main.go
The example services has a single container that offers multiple options (Payload Type, C2 Profile, Translation Container, Webhook, and Logging). While a single container can have all of that, for now we're going to focus on just the payload type piece, so delete the rest of it.
For the `python_services` folder this would mean deleting the `mywebhook`, `translator`, and `websocket` folders. For the `go_services` folder, this would mean deleting the `http`, `my_logger`, `my_webhooks`, `no_actual_translation` folders. For both cases, this will result in removing some imports at the top of the remaining `main.py` and `main.go` files.
{% tabs %}
{% tab title="Python" %}
For the `python_services` folder, we'll update the `basic_python_agent/agent_functions/builder.py` file. This file can technically be anywhere that `main.py` can reach and import, but for convenience it's in a folder, `agent_functions` along with all of the command definitions for the agent. Below is an example from that builder that defines the agent:
```python
#from mywebhook.webhook import *
import mythic_container
import asyncio
import basic_python_agent
#import websocket.mythic.c2_functions.websocket
#from translator.translator import *
#from my_logger import logger
mythic_container.mythic_service.start_and_run_forever()
```
{% endtab %}
{% tab title="Golang" %}
```go
package main
import (
basicAgent "GoServices/basic_agent/agentfunctions"
//httpfunctions "GoServices/http/c2functions"
//"GoServices/my_logger"
//"GoServices/my_webhooks"
//mytranslatorfunctions "GoServices/no_actual_translation/translationfunctions"
"github.com/MythicMeta/MythicContainer"
)
func main() {
// load up the agent functions directory so all the init() functions execute
//httpfunctions.Initialize()
basicAgent.Initialize()
//mytranslatorfunctions.Initialize()
//my_webhooks.Initialize()
//my_logger.Initialize()
// sync over definitions and listen
MythicContainer.StartAndRunForever([]MythicContainer.MythicServices{
//MythicContainer.MythicServiceC2,
//MythicContainer.MythicServiceTranslationContainer,
//MythicContainer.MythicServiceWebhook,
//MythicContainer.MythicServiceLogger,
MythicContainer.MythicServicePayload,
})
}
```
{% endtab %}
{% endtabs %}
### 3.5 Agent Definition
Check out the [Payload Type](payload-type-development/payload-type-info) page for information on what the various components in the agent definition means and how to start customizing how your agent looks within Mythic.
## 4.0 Making your agent Installable
To make your agent installable via `mythic-cli`, the repo/folder needs to be in a common format. This format just makes it easier for `mythic-cli` to add things to the right places. This is based on the External Agent format here ([https://github.com/MythicMeta/Mythic\_External\_Agent](https://github.com/MythicMeta/Mythic_External_Agent)). If you're creating a new payload type, then add your entire folder into the `Payload_Type` folder. Similarly, when you get around to making documentation for your agent, you can add it to the documentation folder. If there's things you don't want to include, then in the `config.json` file you can mark specific sections to exclude.
### 4.1 Mythic's Overview
If you want your new C2 profile or Agent to show up on the overview page ([https://mythicmeta.github.io/overview/](https://mythicmeta.github.io/overview/)) then you need to reach out to `@its_a_feature_` on twitter or `@its_a_feature_` in the Bloodhound slack to get your agent added to the agents list here ([https://github.com/MythicMeta/overview/blob/main/agent\_repos.txt](https://github.com/MythicMeta/overview/blob/main/agent_repos.txt)). You could also make a PR to that file if you wanted too.
Having your agent hosted on the `https://github.com/MythicAgents` organization means that it's easier for people to find your agent and we can collect stats on its popularity. For an example of what this means, check out the overview page and see the biweekly clone stats as well as the green chart icon for a historic list of view/clones of the repo.
If you don't want to have your agent hosted on the MythicAgents organization, but still want to make it available on that site, that's fine too. Just let me know or update the PR for that file appropriately.
### 4.2. Agent Capabilities
In addition to simply hosting the agent/c2 profile, there's now a sub-page that shows off all of the agent's capabilities so it's easier to compare and see which ones meet your needs. That page is here ([https://mythicmeta.github.io/overview/agent\_matrix.html](https://mythicmeta.github.io/overview/agent_matrix.html)) and is populated based on a `agent_capabilities.json` file in the root of your repository. This is just a `json` file that gets ingested at midnight every day and used to update that matrix. The format is as follows:
{% @github-files/github-code-block url="https://github.com/MythicAgents/poseidon/blob/master/agent_capabilities.json" %}
The `os` key provides all the operating systems your agent supports. These are the things that would be available after installing your agent for the user to select when building a payload. The `languages` key identifies what languages your agent supports (typically only one, but could be multiple). The `features` section identifies which features your agent supports. For the `mythic` sub-key, the options are at the bottom of the matrix page, along with their descriptions and links to documentation for if you want to implement that feature in your agent. The `custom` sub-key is just additional features that your agent supports that you want to call out. The `payload_output` key identifies which output formats your agent supports as well as the `architectures` key identifying which architectures your agent can be built for. The `c2` key identifies which C2 Profiles your agent supports and the `supported_wrappers` key identifies which `wrapper` payloads your agent supports. As you might expect, the `mythic_version` is which Mythic version your agent supports and the `agent_version` is the current agent version in use.