Loading...
Loading...
Loading...
Loading...
Loading...
Loading...
Loading...
Loading...
Loading...
Loading...
Loading...
Loading...
Loading...
Loading...
Loading...
Loading...
Loading...
Loading...
Loading...
Loading...
Loading...
Loading...
Loading...
Loading...
Loading...
Loading...
Loading...
Loading...
Loading...
Loading...
Loading...
Loading...
Loading...
Loading...
Loading...
Loading...
Loading...
Loading...
Loading...
Loading...
Loading...
Loading...
Loading...
Loading...
Loading...
Loading...
Loading...
Loading...
Loading...
Loading...
Loading...
Loading...
Loading...
Loading...
Loading...
Loading...
Loading...
Loading...
Loading...
Loading...
Loading...
Loading...
Loading...
Loading...
Loading...
Loading...
Loading...
Loading...
Loading...
Loading...
Loading...
Loading...
Loading...
Loading...
Loading...
Loading...
Loading...
Loading...
Loading...
Loading...
Loading...
Loading...
Loading...
Loading...
Loading...
Loading...
Loading...
Loading...
Loading...
Loading...
Loading...
Loading...
Loading...
Loading...
Loading...
Loading...
Loading...
Loading...
Loading...
A cross-platform, post-exploit, red teaming framework designed to provide a collaborative and user friendly interface for operators.
Mythic is a multiplayer, command and control platform for red teaming operations. It is designed to facilitate a plug-n-play architecture where new agents, communication channels, and modifications can happen on the fly. Some of the Mythic project's main goals are to provide quality of life improvements to operators, improve maintainability of agents, enable customizations, and provide more robust data analytic capabilities to operations.
Fundamentally, Mythic uses a web-based front end (React) and Docker containers for the back-end. A GoLang server handles the bulk of the web requests via GraphQL APIs and WebSockets. This server then handles connections to the PostgreSQL database and communicates to the other Docker containers via RabbitMQ. This enables the individual components to be on separate physical computers or in different virtual machines if desired.
A helpful view of the current state of the C2 Profiles and Agents for Mythic can be found here:
A reverse Nginx proxy provides a single port to connect through to reach back-end services. Through this reverse proxy, operators can connect to:
React UI
Hugo documentation container (documentation on a per-agent and per-c2 profile basis)
Hasura GraphQL console (test GraphQL queries, explore/modify the database)
Jupyter Notebook (with Mythic Scripting pre-installed and pre-created examples)
Data modeling, tracking, and analysis are core aspects of Mythic's ability to provide quality of life improvements to operators. From the very beginning of creating a payload, Mythic tracks the specific command and control profile parameters used, the commands loaded into the payload and their versions, who created it, when, and why. All of this is used to provide a more coherent operational view when a new callback checks in. Simple questions such as “which payload triggered this callback”, "who issued this task", and even “why is there a new callback” now all have contextual data to give answers. From here, operators can start automatically tracking their footprints in the network for operational security (OpSec) concerns and to help with deconflictions. All agents and commands can track process creates, file writes, API calls, network connections, and more. These artifacts can be automatically recorded when the task is issued or even reported back by agents as they happen.
Mythic also incorporates MITRE ATT&CK mappings into the standard workflow. All commands can be tagged with ATT&CK techniques, which will propagate to the corresponding tasks issued as well. In a MITRE ATT&CK Matrix view (and ATT&CK Navigator view), operators can view coverage of possible commands as well as coverage of commands issued in an operation. Operators can also provide comments on each task as they operate to help make notes about why a task was important. Additionally, to make deconfliction and reporting easier, all commands, output, and comments can be globally searched through the main web interface.
Check out the code on GitHub: https://github.com/its-a-feature/Mythic
Join the #Mythic channel in the BloodHound public slack
Reach out on Twitter: @its_a_feature_
By default, the server will bind to 0.0.0.0 on port 7443 with a self-signed certificate(unless otherwise configured). This IP is an alias meaning that it will be listening on all IPv4 addresses on the machine. Browse to either https://127.0.0.1:7443 if you’re on the same machine that’s running the server, or you can browse to any of the IPv4 addresses on the machine that’s running the server.
Browse to the server with any modern web browser. You will be automatically redirected to the /login url. This url is protected by allowed_ip_blocks .
The default username is mythic_admin and the default password is randomized. The password is stored in Mythic/.env after first launch, but you can also view it with sudo ./mythic-cli config get MYTHIC_ADMIN_PASSWORD. You can opt to set this before you initially start if you want (or you can change this later through the UI) by setting that environment variable before staring Mythic for the first time.
Mythic uses JSON Web Tokens (JWT) for authentication. When you use the browser (vs the API on the command line), Mythic stores your access and refresh tokens in a cookie as well as in the local session storage. This should be seamless as long as you leave the server running; however, the history of the refresh tokens is saved in memory. So, if you authenticate in the browser, then restart the server, you’ll have to sign in again.
If you're using Chrome and a self-signed certificate that's default generated by Mythic, you will probably see a warning like this when you try to connect:
This is fine and expected since we're not using a LetsEncrypt or a proper domain certificate. To get around this, simply click somewhere within the window and type thisisunsafe. Your browser will now Temporarily accept the cert and allow you through.
At some point in the future, your browser will decide to remind you that you're using a self-signed certificate. Mythic cannot actually read this error message due to Chrome's security policies. When this happens, simply refresh your page. You'll be brought back to the same big warning page as the image above and you can type thisisunsafe again to continue your operations.
Mythic is meant to be used by multiple operators working together to accomplish operations. That typically means there's a lead operator, multiple other operators, and potentially people that are just spectating. Let's see how operators come into play throughout Mythic.
Every user has their own password for authenticating to Mythic. On initial startup, one account is created with a password specified via the MYTHIC_ADMIN_PASSWORD environment variable or by creating a Mythic/.env file with MYTHIC_ADMIN_PASSWORD=passwordhere entry. This account can then be used to provision other accounts (or they can be created via the scripting ability). If the admin password isn't specified via the environment variable or via the Mythic/.env file, then a random password is used. This password is only used on initial setup to create the first user, after that this value is no longer used.
Every user's password must be at least 12 characters long. If somebody tries to log in with an unknown account, all operations will get a notification about it. Similarly, if a user fails to log into their account 10 times in a row, the account will lock. The only account that will not lock out is that initial account that's created. Instead, that account will throttle authentication attempts to 1 a minute.
There are a few different kinds of operator permissions throughout Mythic.
Admin - This is a global setting that grants users the ability to see all operations, unlock all callbacks, and interact with everything in Mythic. The only account that has this initially is the first account created and only Admin accounts can grant other admin accounts this level of permission. Similarly, only admin accounts can remove admin permissions from other admin accounts.
Operation Admin - This is the lead of a specific operation. The operation admin can unlock anybody else's callback, can bypass any opsec check, and has full rights over that operation.
Operator - This is the normal permissions for a user. They can be added to operations by Admins or by the Operation Admin, and within an operation, they can bypass opsec checks for operators and only unlock the callbacks they locked.
Spectator - This account permission has no permissions to make any modifications within Mythic for their operation. They can still query and see all tasks/responses/artifacts/etc within an operation, but they cannot issue tasks, lock callbacks, create payloads, etc.
You might run into the situation where you need to add people to your server, but don't want to pre-create accounts and passwords for each person (and hope they change their password). Instead, you can generate an invite link for each operator. The creation and use of each one is tracked within Mythic's operational event log in the UI, so you know exactly who created each link and which new user was created as a result.
Invite links are disabled by default, but they can be enabled via the .env config (MYTHIC_SERVER_ALLOW_INVITE_LINKS) or via the global settings in the UI via an admin. Each link can be used only once and you can track un-used links in the UI as well. This information isn't stored in the database, so these invite links are deleted/unusable after a server restart.
From the operator settings page, there's an option to view invite links that have been generated but not used. These can be deleted so that they can't be used at all in case you want to revoke an invite link that was sent out.
Bot accounts are unique accounts that cannot log in directly to Mythic, but can have APITokens and perform actions. Bot accounts are automatically created for each operation when a new operation is created, but can also be created by admin accounts.
Bot accounts can be assigned to operations and given different roles/blocks lists just like other operators in an operation.
Mythic uses docker containers to logically separate different components and functions. There are two main categories:
Mythic's main core. This consists of docker containers stood up with docker-compose:
mythic_server - An GoLang gin webserver instance
mythic_postgres - An instance of a postgresql database
mythic_rabbitmq - An instance of a rabbitmq container for message passing between containers
mythic_nginx - A instance of a reverse Nginx proxy
mythic_graphql - An instance of a Hasura GraphQL server
mythic_jupyter - An instance of a Jupyter notebook
mythic_documentation - An instance of a Hugo webserver for localized documentation
Installed Services
Any folder in Mythic/InstalledServices will be treated like a docker container (payload types, c2 profiles, webhooks, loggers, translation containers, etc)
To stop a specific container, run sudo ./mythic-cli stop {container name} .
If you want to reset all of the data in the database, use sudo ./mythic-cli database reset.
If you want to start/restart any specific payload type container, you can do sudo ./mythic-cli start {payload_type_name} and just that container will start/restart. If you want to start multiple, just do spaces between them: sudo ./mythic-cli start {container 1} {container 2}.
All of Mythic's containers share a single docker-compose file. When you install an agent or C2 Profile this docker-compose file will automatically be updated. However, you can always add/remove from this file via mythic-cli and list out what's registered in the docker-compose file vs what you have available on your system:
This makes it easy to track what's available to you and what you're currently using.
Operators connect via a browser to the main Mythic server, a GoLang gin web server. This main Mythic server connects to a PostgreSQL database where information about the operations lives. Each of these are in their own docker containers. When Mythic needs to talk to any payload type container or c2 profile container, it does so via RabbitMQ, which is in its own docker container as well.
When an agent calls back, it connects through these c2 profile containers which have the job of transforming whatever the c2 profile specific language/style is back into the normal RESTful API calls that the Mythic server needs.
./mythic-cli add apfell
[+] Successfully updated docker-compose.yml
/mythic-cli remove http
[+] Successfully updated docker-compose.ymlHow to install Mythic and agents in an offline environment
Install Mythic following the normal installation
With Mythic running, install any other agents or profiles you might need/want.
sudo ./mythic-cli install github https://github.com/MythicAgents/Apollo3. Export your docker containers. Make sure you also save the tags.
docker save $(docker images -q) -o mythic_images.tar
docker images | sed '1d' | awk '{print $1 " " $2 " " $3}' > mythic_tags4. Download donut from pypi. (this is apollo specific, so there might be others depending on your agent)
mkdir Payload_Types/apollo/depends
pip3 download donut -d Payload_Types/apollo/dependsDownload Apollo dependencies (apollo specifically installs these dynamically within the Docker container at build-time, so pre-fetch these)
wget https://www.nuget.org/api/v2/package/Fody/2.0.0 -O Payload_Types/apollo/depends/fody.2.0.0.nupkg
wget https://www.nuget.org/api/v2/package/Costura.Fody/1.6.2 -O Payload_Types/apollo/depends/costura.fody.1.6.2.nupkg5. Tar Mythic directoy.
tar cfz mythic.tar.gz /Mythic6. Push mythic_images.tar, mythic_tags, and mythic.tar.gz to your offline box.
7. Import docker images and restore tags.
docker load -i mythic_images.tar
while read REPOSITORY TAG IMAGE_ID; do echo "== Tagging $REPOSITORY $TAG $IMAGE_ID =="; docker tag "$IMAGE_ID" "$REPOSITORY:$TAG"; done < mythic_tags8. Extract Mythic directory.
tar xfz mythic.tar.gz
cd mythic9. Update Apollo's Dockerfile (at the time of use, it might not be 0.1.1 anymore, check Container Syncing the latest). This is apollo specific, so you might need to copy in pieces for other agents/c2 profiles depending on what components they dynamically try to install.
from itsafeaturemythic/csharp_payload:0.1.1
COPY ["depends/donut-0.2.2.tar.gz", "donut-0.2.2.tar.gz"]
COPY ["depends/costura.fody.1.6.2.nupkg", "costura.fody.1.6.2.nupkg"]
COPY ["depends/fody.2.0.0.nupkg", "fody.2.0.0.nupkg"]
RUN /usr/local/bin/python3.8 -m pip install /donut-0.2.2.tar.gz
RUN mkdir /mythic_nuget
RUN nuget sources add -name mythic_nuget -source /mythic_nuget
RUN nuget sources disable -name nuget.org
RUN nuget add /fody.2.0.0.nupkg -source /mythic_nuget
RUN nuget add /costura.fody.1.6.2.nupkg -source /mythic_nuget10. Start Mythic
sudo ./mythic-cli startComments are a single text description that can be added to any task, file, credential, etc in an operation. All members of the operation can see and modify the comment, but the last person that adds or modifies it will show up as the one that added it.
Comments can be found in many places throughout Mythic. On almost any page where you see a task and output, you'll be able to see task comments. These comments can be added by selecting the dropdown for the task status and selecting comment. When there is a comment, you can click the chat bubble icon to show/hide them.
Comments can be removed by either clicking the red trash icon or editing the comment to be a blank string "".
Comments are a nice way to highlight certain tasks and output as important for later use, but just like everything else, they can easily get lost in an operation. When searching across any primary object on the search page (tasks, files, credentials, etc), you can opt to search by comment as well.
Commands keep track of a wealth of information such as name, description, help information, if it needs admin permissions, the current version, any parameters, artifacts, MITRE ATT&CK mappings, which payload type the command corresponds to, who created or last editing the command, and when. That is a lot of information, so let’s break that down a bit.
Every command is different – some take no parameters, some take arrays, strings, integers, or a number of other things. To help accommodate this, you can add parameters to commands so that operators know what they need to be providing. You must give each parameter a name and they must be unique within that command. You can also indicate if the parameter is required or not.
Parameters can be in conditional parameter "groups" - this allows you to say things like parameter X and parameter Y are mutually exclusive, but you should always supply parameter W. As an operator, if there are any parameter groups for a command and you don't provide enough parameters to determine which group to use, Mythic will throw a warning and ask you to use shift + enter to force the modal popup. From here, there's a dropdown at the top to change the group you're looking at to see which parameters to enter.
If a command takes named parameters, but none are supplied on the command line, a GUI modal will pop up to assist the operator.
There is no absolute requirement that the input parameters be in JSON format, it's just recommended.
Screenshots for an entire operation can be accessed via the camera icon in the top bar or the search page.
The screenshots display as they're coming in and will indicate how many chunks are left before you have the full image. At any point you can click on the image and view what's available so far.
History of MythicTips
This page describes how messages flow within Mythic
The following subpages have Mermaid sequence diagrams explaining how messages flow amongst the various microservices for Mythic when doing things like creating payloads, issuing tasks, and trasnferring files.
There's a lot of moving pieces within Mythic and its agents, so it's helpful to take a step back and see how messages are flowing between the different components.
Here we can see an operator issue tasking to the Mythic server. The Mythic server registers the task as "preprocessing" and informs the operator that it got the task. Mythic then sends the task off to the corresponding Payload Type container for processing. The container looks up the corresponding command python file, parses the arguments, validates the arguments, and passes the resulting parameters to the create_tasking function. This function can leverage a bunch of RPC functionality going back to Mythic to register files, send output, etc. When it's done, it sends the final parameters back to Mythic which updates the Task to either Submitted or Error. Now that the task is out of the preprocessing state, when an agent checks in, it can receive the task.
What happens when you want to transfer a file from Mythic -> Agent? There's two different options: tracking a file via a UUID and pulling down chunks or just sending the file as part of your tasking.
This is an example of an operator uploading a file, it getting processed at the Payload Type's create_tasking function where it tracks and registers the file within Mythic. Now the tasking has a UUID for the file rather than the file contents itself. This allows Mythic and the Agent to uniquely reference a file. The agent gets tasking, sees the file id, and submits more requests to fetch the file. Upon finally getting the full file, it resolves the relative upload path into an absolute path and sends an update back to Mythic to let it know that the file the operator said to upload to ./test is actually at /abs/pah/to/test on the target host.
Conversely, you can opt to not track the file (or track the file within Mythic, but not send the UUID down to the agent). In this case, you can't easily reference the same instance of the file between the Agent and Mythic:
You're able to upload and transfer the file just fine, but when it comes to reporting back information on it, Mythic and the Agent can't agree on the same file, so it doesn't get updated. You might be thinking that this is silly, of course the two know what the file is, it was just uploaded. Consider the case of files being deleted or multiple instances of a file being uploaded.
When your container starts up, it connects to the rabbitMQ broker system. Mythic then tries to look up the associated payload type and, if it can find it, will update the running status. However, if Mythic cannot find the payload type, then it'll issue a "sync" message to the container. Similarly, when a container starts up, the first thing it does upon successfully connecting to the rabbitMQ broker system is to send its own synced data.
This data is simply a JSON representation of everything about your payload - information about the payload type, all the commands, build parameters, command parameters, browser scripts, etc.
Syncing happens at a few different times and there are some situations that can cause cascading syncing messages.
When a payload container starts, it sends all of its synced data down to Mythic
If a C2 profile syncs, it'll trigger a re-sync of all Payload Type containers. This is because a payload type container might say it supports a specific C2, but that c2 might not be configured to run or might not have check-ed in yet. So, when it does, this re-sync of all the payload type containers helps make sure that every agent that supports the C2 profile is properly registered.
When a Wrapper Payload Type container syncs, it triggers a re-sync of all non-wrapper payload types. This is because a payload type might support a wrapper that doesn't exist yet in Mythic (configured to not start, hasn't checked in yet, etc). So, when that type does check in, we want to make sure all of the wrapper payload types are aware and can update as necessary.
Latest versions can always be found on the Mythic .
MITRE ATT&CK is a great way to track what both offense and defense are doing in the information security realm. To help Mythic operators keep track, each command can be tagged with its corresponding MITRE ATT&CK information:
There can be as many or as few mappings as desired for each command. This information is used in two different ways, but both located in the MITRE ATT&CK button at the top.
The "Fetch All Commands Mapped to MITRE" button takes this information to populate out what is the realm of possible with all of the payload types and commands registered within Mythic. This gives a coverage map of what could be done. Clicking each matrix cell gives a breakdown of which commands from which payload types achieve that objective:
The "Fetch All Issued Tasks Mapped to MITRE" only shows this information for commands that have already been executed in the current operation. This shows what's been done, rather than what's possible. Clicking on a cell with this information loaded gives the exact task and command arguments that occurred with that task:
Internal documentation docker container
Mythic provides an additional docker container that serves static information about the agents and c2 profiles. In the main Mythic/.env file you'll see which port you wan to run this on via the "DOCUMENTATION_PORT" key. You don't need to worry about this port too much since Mythic uses an Nginx reverse proxy to transparently proxy connections back to this container based on the web requests you make.
The documentation stands up a Golang HTTP server based on Hugo (it's HTTP, not HTTPS). It reads all of the markdown files in the /Mythic/documentation-docker/ folder and creates a static website from it. For development purposes, if you make changes to the markdown files here, the website will automatically update in real time. From the Mythic UI if you hit /docs/ then you'll be directed automatically to the main documentation home page.
This page tracks presentations / webinars about Mythic
All information is tracked in the MythicMeta organization on GitHub available here: https://github.com/MythicMeta/Presentations/blob/main/README.md
Feb 23, 2022 - Mythic 2.3 & Apollo 2.0 Updates
Recording: Zoom Webinar
Slides: PDF
Payload types are the different kinds of agents that can be created and used with Mythic.
Payload type information is located in the C2 Profiles and Payload Types page by clicking the headphone icon in the top of the page.
From this initial high-level view, a few important pieces of information are shown:
Container status indicates if the backing container is online or offline based on certain RabbitMQ Queues existing or not. This status is checked every 5 seconds or so.
The name of the payload type which must be unique
Which operating systems the agent supports
The documentation container contains detailed information about the commands, OPSEC considerations, supported C2 profiles, and more for each payload type when you install it. From the Payload Types page, you can click the blue document icon to automatically open up the local documentation website to that agent.
Command and Control (C2) profiles are the way an agent actually communicates with Mythic to get tasking and post responses. There are two main pieces for every C2 profile:
Server code - code that runs in a docker container to convert the C2 profile communication specification (twitter, slack, dropbox, websocket, etc) into the corresponding RESTful endpoints that Mythic uses
Agent code - the code that runs in a callback to implement the C2 profile on the target machine.
C2 profiles can be found by going to Payload Types and C2 Profiles (headphone icon) from the top navigational bar.
Each C2 profile is in its own docker container, the status of which is indicated on the C2 Profiles page.
Each docker container has a python or golang service running in it that connects to a RabbitMQ message broker to receive tasking. This allows Mythic to modify files, execute programs, and more within other docker containers.
The documentation container contains detailed information about the OPSEC considerations, traffic flow, and more for each container when you install the c2 profile. From the C2 Profiles page, you can click the blue document icon to automatically open up the local documentation website to that profile.
Actions are special messages that don't adhere to the normal message types that you see for the rest of the features in this section. There are only a handful of these messages:
Action: checkin - Initial checkin messages and key exchanges
Action: get_tasking - Getting tasking
Action: post_response - Sending tasking responses
Inside of this is where the features listed throughout this section appear
All installed docker containers are located at Mythic/InstalledServices/each with their own folder. The currently running ones can be checked with the sudo ./mythic-cli status . Check A note about containers for more information about them.
Containers allow Mythic to have each Payload Type establish its own operating environment for payload creation without causing conflicting or unnecessary requirements on the host system.
Payload Type containers only come into play for a few special scenarios:
Payload Creation
Tasking
Processing Responses
For more information on editing or creating new containers for payload types, see Payload Type Development.
All PayloadTypes get 2 commands for free - clear and help. The reason these two commands are 'free' is because they don't actually make it down to the agent itself. Instead, they cause actions to be taken on the Mythic server.
The clear command does just that - it clears tasks that are sitting in the queue waiting for an agent to pick them up. It can only get tasks that are in the submitted stage, not ones that are already to the processing stage because that means that an agent has already requested it.
clear - entering the command just like this will clear all of the tasks in that callback are in the appropriate stages.
clear all - entering the command just like this will clear all tasks you've entered on that callback that are in the appropriate stages.
clear # - entering the command just like this will attempt to clear the task indicated by the number after clear.
If a command is successfully cleared by this command before an agent can get to it, then that task will get an automated response stating that it was cleared and which operator cleared it. The clear task itself will get back a list of all the tasks it cleared.
The help command allows users to get lists of commands that are currently loaded into the agent. Just help gives basic descriptions, but help [command] gives users more detailed command information. These commands look at the loaded commands for a callback and looks at the backing Python files for the command to give information about usage, command parameters, and elevation requirements.
This section will highlight a few of the pieces of Mythic that operators are most likely to use on a daily basis.
Browser Scripts - use JavaScript to transform your command output into tables, buttons, links, and more
Active Callbacks - the main operational page for interacting with callbacks, also allows you to see graph/tree views of your callbacks
Files - view the uploads and downloads for the operation
Search - search commands, command parameters, and command output across the operation
Credentials - view/comment/edit/add credentials for your operation
Expanded Callbacks - this allows you to view callbacks as the full screen so that you have more operational screen space
Screencaptures - all of the screencaptures throughout the operation can be viewed and downloaded here
Event Feed - view all of the events going on throughout an operation (new payloads, new callbacks, users signing in, etc) as well as a basic chat program to send messages to all operators in the operation
How to use the Scripting API
Mythic utilizes a combination of a GoLang Gin webserver and a Hasura GraphQL interface. Most actions that happen with Mythic go through the GraphQL interface (except for file transfers). We can hit the same GraphQL endpoints and listen to the same WebSocket endpoints that the main user interface uses as part of scripting, which means scripting can technically be done in any language.
Install the PyPi package via pip pip3 install mythic . The current mythic package is version 0.1.1. The code for it is public - https://github.com/MythicMeta/Mythic_Scripting
The easiest way to play around with the scripting is to do it graphically - select the hamburger icon (three horizontal lines) in the top left of Mythic, select "Services", then "GraphQL Console". This will open up /console in a new tab.
From here, you need to authenticate to Hasura - run sudo ./mythic-cli config get hasura_secret on the Mythic server and you'll get the randomized Hasura secret to log in. At this point you can browser around the scripting capabilities (API at the top) and even look at all the raw Database data via the "Data" tab.
The Jupyter container has a lot of examples of using the Mythic Scripting to do a variety of things. You can access the Jupyter container by clicking on the hamurber icon (three horizontal lines) in the top left of Mythic, select "Services", then "Jupyter Notebooks". This will open up a /jupyter in a new tab.
From here, you need to authenticate to Jupyter - run sudo ./mythic-cli config get jupyter_token on the Mythic server to get the authentication token. By default, this is mythic, but can be changed at any time.
You can also reference the Jupyter examples from the Mythic repo here: https://github.com/its-a-feature/Mythic/tree/master/jupyter-docker/jupyter.
An operator can provide non-default, but specific values for all of fields of a C2 profile and save it off as an instance. These instances can then be used to auto-populate all of the C2 profile's values when creating a payload so that you don't have to manually type them each time.
This is a nice time saver when creating multiple payloads throughout an operation. It's likely that in an operation you will have multiple different domains, domain fronts, and other external infrastructure. It's more convenient and less error prone to provide the specifics for that information once and save it off than requiring operators to type in that information each time when creating payloads.
The Save Parameters button is located next to each C2 profile by clicking the "headphones" icon at the top of the screen.
To create a new named instance, select the Save Instance button to the right of a c2 profile and fill out any parameters you want to change. The name must be unique at the top though.
If you're curious how reverse port forwards work within Mythic and how you can hook into them with an agent, check out the section on RPFWD development.
You probably noticed as you used Mythic that there's a status associated with your task. This status goes through a variety of words/colors depending on where things are in the pipeline and what the agent has done with the task. This provides a way for the operator to know what's happening behind the scenes.
By default, a task goes through the following stages with the following statuses:
preprocessing - The task is being sent to the Payload Type container for processing (parsing arguments, confirming values, doing RPC functionality to register files, etc)
submitted - The task is now ready for an agent to pick it up
processing - The task has been picked up by an agent, but there hasn't been any response back yet
processed - The task has at least one response, but the agent hasn't marked it as done yet.
completed - The task is marked as completed by the agent and there wasn't an error in execution
error:* - The agent report back a status of "error"
The agent can set the status of the task to anything it wants as part of its normal post_response information. Similarly, in a task's create_tasking function, you're free to set the task.status value. Anything of the error:* format will show up as red in the Mythic UI as an error for the user.
API tokens are special JSON web tokens (JWTs) that Mythic can create per-user that don't expire automatically. This allows you to do long-term scripting capabilities without having to periodically check if your current access-token is expired, going through the refresh process, and then continuing along with whatever you were doing.
They're located in your settings page (click your name in the top right and click settings).
When making a request with an API token, set the Header of apitoken with a value of your API token. This is in contrast to normal JWT usage where the header is Authorization and the value is Bearer: <token here>.
Mythic has a special page specifically for viewing screenshots by clicking the camera icon at the top of any of the pages.
When it comes to registering screenshots with Mythic, the process is almost identical to File Downloads (Agent -> Mythic); however, we set the is_screenshot flag to true in the download portion of the message:
{"action": "post_response", "responses": [
{
"task_id": "UUID here",
"download": {
"total_chunks": 4,
"full_path": "/test/test2/test3.file" // full path to the file downloaded
"host": "hostname the file is downloaded from"
"is_screenshot": true //indicate if this is a file or screenshot
}
}
]}So, you want to add a new command to a Payload Type. What does that mean, where do you go, what all do you have to do?
Luckily, the Payload Type containers are the source of truth for everything related to them, so that's the only place you'll need to edit. If your payload type uses its own custom message format, then you might also have to edit your associated translation container, but that's up to you.
Make a new .py file with your command class and make sure it gets imported before mythic_container.mythic_service.start_and_run_forever is called so that the container is aware of the command before syncing over.
This new file should match the requirements of the rest of the commands
Once you're done making edits, restart your payload type container via: ./mythic-cli start [payload type name]. This will restart just that one payload type container, reloading the python files automatically, and re-syncing the data with Mythic.
Make a new .go file with your new command struct instance. You can either do this as part of an init function so it gets picked up automatically when the package/file is imported, or you can have specific calls that initialize and register the command.
Eventually, run agentstructs.AllPayloadData.Get("agent name").AddCommand so that the Mythic container is aware that the command exists. Make sure this line is executed before your MythicContainer.StartAndRunForever function call.
This new file should match the requirements of the rest of the commands
Once you're done making edits, restart your payload type container via: ./mythic-cli build [payload type name]. This will rebuild and restart just that one payload type container and re-syncing the data with Mythic.
Agents can report back credentials they discover
{
"task_id": "task uuid here",
"user_output": "some user output here",
"credentials": [
{
"credential_type": "plaintext",
"realm": "spooky.local",
"credential": "SuperS3Cr37",
"account": "itsafeature"
}
]
}The agent can report back multiple credentials in a single response. The credential_type field represents the kind of credential and must be one of the following:
plaintext
certificate
hash
key
ticket
cookie
The other fields are pretty straightforward, but they must all be provided for each credential. There is one optional field that can be specified here: comment. You can do this manually on the credentials page, but you can also add comments to every credential to provide a bit more context about it.
If you're curious about interactive tasking, what it means, how it works, and how you can leverage it, check out the development section on it.
MythicRPC provides a way to execution functions against Mythic and Mythic's database programmatically from within your command's tasking files via RabbitMQ.
MythicRPC lives as part of the mythic_container PyPi package (and github.com/MythicMeta/MythicContainer GoLang package) that's included in all of the itsafeaturemythic Docker images. This PyPi package uses RabbitMQ's RPC functionality to execute functions that exist within Mythic.
The full list of commands can be found here: https://github.com/MythicMeta/MythicContainerPyPi/tree/main/mythic_container/MythicGoRPC for Python and https://github.com/MythicMeta/MythicContainer/tree/main/mythicrpc for GoLang.
See the C2 Related Development section for more SOCKS specific message details.
To start / stop SOCKS (or any interactive based protocol), use the SendMythicRPCProxyStart and SendMythicRPCProxyStop RPC calls within your Payload Type's tasking functions.
For SOCKS, you want to set LocalPort to the port you want to open up on the Mythic Server - this is where you'll point your proxy-aware tooling (like proxychains) to then tunnel those requests through your C2 channel and out your agent. For SOCKS, the RemotePort and RemoteIP don't matter. The PortType will be CALLBACK_PORT_TYPE_SOCKS (i.e. socks).
Browser Scripts allow users to script the output of agent commands. They are JavaScript functions that can return structured data to indicate for the React user interface to generate tables, buttons, and more.
Browser Scripts are located in the hamburger icon in the top left -> "Operations" -> BrowserScripts.
Every user has the default browser scripts automatically imported upon user creation based on which agents are installed.
Anybody can create their own browser scripts and they'll be applied only to that operator. You can also deactivate your own script so that you don't have to delete it, but it will no longer be applied to your output. This deactivates it globally and takes affect when the task is toggled open/close. For individual tasking you can use the speed dial at the bottom of the task and select to "Toggle Browserscript".
Click Register New Script to create a new one. This is for one-off scripts you create. If you want to make it permanent across databases and for other operators, then you need to add the script to the corresponding Payload Type's container. More information about that process can be found here: .
When you're creating a script, the function declaration will always be function(task, responses) where task is a JSON representation of the current task you're processing and responses is an array of the responses displayed to the user. This will always be a string. If you actually returned JSON data back, be sure to run JSON.parse on this to convert it back to a JSON dictionary. So, to access the first response value, you'd say responses[0].
You should always return a value. It's recommended that you do proper error checking and handling. You can check the status of the task by looking at the task variable and checking the status and completed attributes.
Even if a browser script is pushed out for a command, its output can be toggled on and off individually.
This is a quick primer on using Mythic for the first time
This section will quickly go from first connection to running a basic agent. This walkthrough assumes you have the apfell agent and the http c2 profile installed.
When you log in with the admin account, you'll automatically have your current operation set to the default operation. Your current operation is indicated in the top bar in big letters. When other operators sign in for the first time, they won't have an operation set to their current operation. You can always click on the operation name to get back to the operations management page (or click the hamburger icon on the left and select operations on the side).
You need a payload to use. Click the hazard icon at the top and then select "New Payload" on the top right of the new screen. You can also get here by selecting the hamburger icon on the top left and selecting "Create" -> "Create Payload".
You'll be prompted to select which operating system. This is used to filter down possible payloads to generate. Next select the payload type you're wanting to build and fill out any necessary build parameters for the agent. Select any commands you want stamped into the payload initially. This will show commands not yet selected on the left and commands already selected on the right. There are some that can be pre-selected for you based on the agent developer (some are built in and can't be removed, some suggested, etc). If you hover over any of the commands you can see descriptive information about them. You can potentially load commands in later, but for this walkthrough select all of them. Click Next.
For c2 profiles, toggle the HTTP profile. Change the Callback host parameter to be where you want the agent to connect to (if you're using redirectors, you specify that here), similarly specify the Callback port for where you want the agent to connect to.
Provide a name for the agent (a default one is auto populated) and provide a description that will auto populate the description field for any callbacks created based on this payload. Click Next.
Once you click submit, you'll get a series of popups in the top giving feedback about the creation process. The blue notification popups will go away after a few seconds, but the green success or red error messages must be manually dismissed. This provides information about your newly created agent.
Click the hazard icon on the top again to go to the created payloads page.. This is where you'll be able to see all of the payloads created for the current operation. You can delete the payload, view the configuration, or download the payload. For this walkthrough, download the payload (green download icon).
Now move the payload over to your target system and execute it. The apfell.js payload can be run with osascript and the file name on macOS. Once you've done that, head to the Active Callbacks page from the top navigation bar via the phone icon.
This is where you'll be able to interact with any callback in the operation. Click the button for the row with your new agent to bring up information in the bottom pane where you can type out commands and issue them to the agent.
Mythic allows you to track types of tags as well as instances of tags. A tag type would be something like "contains credential" or "objective 1" - these take a name, a description, and a color to be displayed to the user. An instance of a tag would then include more detailed information such as the source of the information, the actual credential contained or maybe why that thing is tagged as "objective 1", and can even include a link for more information.
Tagging allows more logical grouping of various aspects of an operation. You can create a tag for "objective 1" then apply that tag to tasks, credentials, files, keylogs, etc. This information can then be used for easier deconflictions, attack path narratives, and even a way to signal information to other members of your assessment that something might be worth while to look at.
The tag icon at the top of the screen takes you to the tag management page where you can view/edit/create various types of tags and see how many times that tag is used in the current operation.
Tags are available throughout the various Mythic pages - anywhere you see the tag icon you can view/edit/add tags.
Credentials can be found from the search page on the top navigation bar or by clicking the key icon at the top.
As part of command output, credentials can be registered automatically if the agent parses out the material. Otherwise, users can also manually register credentials. There are a few pieces of information required:
The type of credential - This is more for situational awareness right now, but in the future will help the flow of how to treat the credential before use.
Account - the account this credential applies to
Realm - the domain for the credential or a generic realm in case this is a credential for something else. If the account is a local account, the Domain is the name of the computer.
Credential - the actual credential
Comment - any comment you want to store about the credential
On this page you can also see the task that created credentials (which can be Manual Entry ), who added in the credential, and when it was added.
Command parameters can hook into this by having a parameter type of CredentialJson - the tasking UI will get a dropdown for the various credentials to choose from and your create_go_tasking function will get a dictionary of all the credential's information.
Tasks can register credentials with the server in their responses by following Credentials format.
Here we can see that the operator selects the different payload options they desire in the web user interface and clicks submit. That information goes to Mythic which looks up all the database objects corresponding to the user's selection. Mythic then registers a payload in a building state. Mythic sends all this information to the corresponding Payload Type container to build an agent to meet the desired specifications. The corresponding build command parses these parameters, stamps in any required user parameters (such as callback host, port, jitter, etc) and uses any user supplied build parameters (such as exe/dll/raw) to build the agent.
In the build process, there's a lot of room for customizing. Since it's all async through rabbitMQ, you are free to stamp code together, spin off subprocesses (like mono or go) to build your agent, or even make web requests to CI/CD pipelines to build the agent for you. Eventually, this process either returns an agent or some sort of error. That final result gets send back to Mythic via rabbitMQ which then updates the database and user interface to allow an operator to download their payload.
How does this process work if there's a translation container involved though?
Notice how the only real difference here is that IF the payload type definition says for MythicEncrypts=False and there's a translation container, then it's up to the translation container to generate any encryption keys. These keys can be part of a C2 Profile or they could be part of a payload type's build parameters. This is why you see this flow happening in two places. Other than that, when it comes to building a payload, the translation container has very little interaction.
Mythic can generate JSON or XML style reports. If you need a PDF version, simply generate the XML, open it up locally, and then in your browser save it off to PDF.
Report generation is located from the checker flag icon from the top navigation bar.
You can select your output format, if you want to include MITRE ATT&CK mappings inline with each tasking and if you want a MITRE ATT&CK Summary at the end. You can also optionally exclude certain callbacks, usernames, and hostnames from being included in the generated report.
The final generated report can be downloaded from this screen when it's ready via a toast notification. If you navigate away before it's done though, the report is also always available from the "files" section of the search page (click the paper clip icon at the top and select "Uploads" instead of "Downloads").
Here we can see an agent sends a message to Mythic. The C2 Profile container is simply a fancy redirector that know show to pull the message off the wire, it doesn't do anything else than that. From there, Mythic starts processing the message. It pulls out the UUID so it can determine which agent/callback we're talking about. This is where a decision point happens:
If the Payload Type associated with the payload/callback for the UUID of the message has a translation container associated with it, then Mythic will send the message there. It's here that the rest of the message is converted from the agent's special sauce C2 format into the standard JSON that Mythic expects. Additionally, if the Payload Type handles encryption for itself, then this is where that happens.
If there is not translation container associated with the payload/callback for the UUID in the message, then Mythic moves on to the next step and starts processing the message.
Mythic then processes the message according to the "action" listed.
Mythic then potentially goes back to the translation container to convert the response message back to the agent's custom C2 spec before finally returning everything back through the C2 Profile docker container.
For any active callback, select the dropdown next to it and select "Expand Callback". This will open a new tab for that callback where you can actually view the tasking full screen with metadata on the side.
When you're downloading a file from the Agent to Mythic (such as a file on disk, a screenshot, or some large piece of memory that you want to track as a file), you have to indicate in some way that this data is specific to a file and not destined to be part of the information displayed to the user. The way this works is pretty much the inverse of what happens for uploads. Specifically, an agent has a file it wants to transfer, so it tells Mythic "i have data, i'm gonna send it as X chunks of size Y, can you give me a UUID so we can track this". Mythic tracks the data and gives back a UUID. Now the agent sends each chunk individually and Mythic can track it. This allows a single task to be able to send back multiple files concurrently or sequentially and still track it all.
There are two kinds of C2 profiles - egress profiles that talk directly out of the target network or peer-to-peer (p2p) profiles that talk to neighboring agents.
The default HTTP and the dynamicHTTP profiles are both examples of egress profiles. They talk directly out of the target network. Egress profiles have associated Docker containers that allow you to do the translation between your special sauce c2 profile and the normal RESTful web requests to the main Mythic server. More information on how this works and how to create your own can be found here: C2 Related Development.
Peer-to-peer profiles in general are a bit different. They don't talk directly out to the internet; instead, they allow agents to talk to each other.
This distinction between P2P and Egress for Mythic is made by a simple boolean indicating the purpose of the c2 container.
P2P profiles announce their connections to Mythic via P2P Connections. When Mythic gets these messages, it can start mapping out what the internal mesh looks like. To help view this from an operator perspective, there is an additional views on the main Callbacks page.
This view uses a directed graph to illustrate the connections between the agents. There's a central "Mythic Server" node that all egress agents connect to. When a route is announced, the view is updated to move one of the callbacks to be a child of another callback.
The event feed is a live feed of all events happening within Mythic. This is where Mythic records messages for new callbacks, payload creations, users signing in/out, etc
The event feed is located at the alarm bell icon in the top right.
The event feed is a running list of all that's going on within an operation. If Mythic has an error, these will be recorded in the event log with a red background and a button to allow "resolution" of the problem. If you resolve the problem, then the background will change to green. You can also delete messages as needed:
In the Mythic UI, you can click the hamburger icon (three horizontal lines) in the top left to see the current Server version and UI version.
There are three scenarios to updating Mythic: updates to the patch version (1.4.1 to 1.4.2), updates to the minor (1.4.1 to 1.5), or major version (1.4 to 2.0).
In all updates, after a git pull you should run make to get the latest mythic-cli binary.
This is when you're on version 1.2 for example and want to pull in new updates (but not a new minor version like 1.3 or 1.4). In this case, the database schema should not have changed.
Pull in the latest code for your version (if you're still on the current version, this should be as easy as a git pull)
Make a new mythic-cli binary with sudo make
Restart Mythic to pull in the latest code changes into the docker containers with sudo ./mythic-cli start
This is when you're on version 1.2 for example and want to upgrade to version 1.3 or 2.1 for example. In this case, the database schema has changed.
Starting with Mythic 3.1, we now have database migrations within PostgreSQL. You should be fine to git pull and rebuild everything. It's important that you rebuild so that server changes are pulled in for the various services that updated. This means that if you're on Mythic 3.0.0-rc* and want to upgrade to Mythic 3.1.0, you'll automatically get database migrations to help with this.
Note: I always highly recommend backing everything up if you plan to update a production system. Just in case something happens, you'll be able to revert.
You will have some down time while this happens (the containers need to rebuild and start back up), so make sure whatever you're doing can handle a few seconds to a few minutes of down time.
Pull in the latest code for your version (if you're still on the current version, this should be as easy as a git pull)
Make a new mythic-cli binary with sudo make
Restart Mythic to pull in the latest code changes into the docker containers with sudo ./mythic-cli start. If you have in your .env to not rebuild on start, then you will need to change that first.
Since Mythic now has all of the C2 Profiles and Payload Types split out into different GitHub Organizations ( and ), you might need to update those projects as well.
Agents and C2 Profiles are hosted in their own repositories, and as such, might have a different update schedule than the main Mythic repo itself. So, you might run into a scenario where you update Mythic, but now the current Agent/C2Profiles services are no longer supported.
You'll know if they're no longer supported because when the services check in, they'll report their current version number. Mythic has a range of supported version numbers for Agents, C2 Profiles, Translation services, and even scripting. If something checks in that isn't in the supported range, you'll get a warning notification in the UI about it.
To update these (assuming that the owner/maintainer of that Agent/C2 profile has already done the updates), simply stop the services (sudo ./mythic-cli stop agentname or sudo ./mythic-cli stop profileName) and run the install command again. The install command should automatically determine that a previous version exists, remove it, and copy in the new components. Then you just need to either start those individual services, or restart mythic overall.
Deleting Database
If you want to wipe the database and upgrade, the following steps will help:
Reset the database with sudo ./mythic-cli database reset
Make sure Mythic is stopped, sudo ./mythic-cli stop
Purge all of your containers, sudo docker system prune -a
Pull in the version you want to upgrade to (if you're wanting to upgrade to the latest, it's as easy as git pull)
Make a new mythic-cli binary with sudo make.
Delete your Mythic/.env file - this file contains all of the per-install generated environment variables. There might be new environment variables leveraged by the updated Mythic, so be sure to delete this file and a new one will be automatically generated for you.
Restart Mythic to pull in the latest code changes into the docker containers with sudo ./mythic-cli start
MITRE ATT&CK () is an amazing knowledge base of adversary techniques.
MITRE ATT&CK® is a globally-accessible knowledge base of adversary tactics and techniques based on real-world observations. The ATT&CK knowledge base is used as a foundation for the development of specific threat models and methodologies in the private sector, in government, and in the cybersecurity product and service community.
With the creation of ATT&CK, MITRE is fulfilling its mission to solve problems for a safer world — by bringing communities together to develop more effective cybersecurity. ATT&CK is open and available to any person or organization for use at no charge.
This is in development to bring into the new user interface. This is still tracked by the back-end and available via reporting, but the ATT&CK matrix itself still needs to be ported over to the new React interface.
Commands can be automatically tagged with MITRE ATT&CK Techniques (this is what populates the "Commands by ATT&CK" output). To locate this, you just need to look at the associated python/golang files for each command.
In addition to this file defining the general properties of the command (such as parameters, description, help information, etc). There's a field called attackmapping that takes an array of MITRE's T# values. For example, looking at the apfell agent's download command:
When this command syncs to the Mythic server, those T numbers are stored and used to populate the ATT&CK Matrix. When you issue this download command, Mythic does a lookup to see if there's any MITRE ATT&CK associations with the command, and if there are, Mythic creates entries for the "Tasks by ATT&CK" mappings. This is why you're able to see the exact command associated.
As long as you're keeping with the old MITRE ATT&CK mappings, simply add your T# to the list like shown above, then run sudo ./mythic-cli start [agent name]. That'll restart the agent's container and trigger a re-sync of information. If the container is using golang instead of python for its Mythic connectivity, then you need to run sudo ./mythic-cli build [agent name] instead.
Operations are collections of operators, payloads, tasks, artifacts, callbacks, and files. While payload types and c2 profiles are shared across an entire Mythic instance, operations allow fine grained control over the visibility and access during an assessment.
Operation information can be found via the hamburger icon in the top left, then selecting "Operations" -> "Modify Operations" page. If you're a global Mythic admin, you'll see all operations here. Otherwise, you'll only see operations that are associated with your account.
Every operation has at least one member - the lead operator. Other operators can be assigned to the operation with varied levels of access.
operator is your normal user.
lead is the lead of that operation
spectator can't do anything within Mythic. They essentially have Read-Only access across the entire operation. They can't create payloads, issue tasking, add comments, send messages, etc. They can search and view callbacks/tasking, but that's it.
For more fine-grained control than that listed above, you can also create block lists. These are named lists of commands that an operator is not allowed to execute for a specific payload type. These block lists are then tied to specific operators. This offers a middle-ground between normal operator with full access and a spectator with no access. You can edit these block lists via the yellow edit button.
For the configure button for the operation, there are many options. You can specify a Slack webhook along with the channel. By default, whenever you create a payload via the "Create Payloads" page, it is tagged as alert-able - any time a new callback is created based on that payload, this slack webhook will be invoked. If you want to prevent that for a specific payload, go to the payloads page, select the "Actions" dropdown for the payload in question, and select to stop alerting. If you have the Slack webhook set on the operation overall, other payloads will continue to generate alerts, but not the ones you manually disable. You can always enable this feature again in the same way.
For the operators edit button, you can edit who is assigned to the operation, what their roles are, and specify which (if any) block lists should be assigned to that user.
Because many aspects of an assessment are tied to a specific operation (payloads, callbacks, tasks, files, artifacts, etc), there are many things that will appear empty within the Mythic UI until you have an operation selected as your current operation. This lets the Mythic back-end know which data to fetch for you. If you don't have an operation as your active one, then you'll see no operation name listed on the top center of your screen. Go to the operations page and, if you're assigned to an operation that you can see, you can select to "Make Current".
Socks proxy capabilities are a way to tunnel other traffic through another protocol. Within Mythic, this means tunneling other proxy-aware traffic through your normal C2 traffic. Mythic specifically leverages a modified Socks5 protocol without authentication (it's going through your C2 traffic afterall).
The Mythic server runs within a Docker container, and as such, you have to define which ports to expose externally. Mythic/.env has a special environment variable you can use to expose a range of ports at a time for this exact reason - MYTHIC_SERVER_DYNAMIC_PORTS="7000-7010". By default this uses ports 7000-7010, but you can change this to any range you want and then simply restart Mythic to make the changes.
Click the main Search field at the top and click the "Socks" icon on the far right (or click the socks icon at the top bar).
When you issue a command to start a socks proxy with Mythic, you specify an action "start/stop" and a port number. The port number you specify is the one you access remotely and leverage with your external tooling (such as proxychains).
An operator issues a command to start socks on port 3333. This command goes to the associated payload type's container which does an RPC call to Mythic to open that port for Socks.
Mythic opens port 3333 in a go routine.
An operator configures proxychains to point to the Mythic server on port 3333.
An operator runs a tool through proxychains (ex: proxychains curl https://www.google.com)
Proxychains connects to Mythic on port 3333 and starts the Socks protocol negotiations.
The tool sends data through proxychains, and Mythic stores it in memory. In this temporary data, Mythic assigns each connection its own ID number.
The next time the agent checks in, Mythic takes this socks data and hands it off to the agent as part of the normal or process.
The agent checks if it's seen that ID before. If it has, it looks up the appropriate TCP connection and sends off the data. If it hasn't, it parses the Socks data to see where to open the connection. Then sends the resulting data and same randomID back to Mythic via .
Mythic gets the response, parses out the Socks specific data, and sends it back to proxychains
The above is a general scenario for how data is sent through for Socks. The Mythic server itself doesn't look at any of the data that's flowing - it simply tracks port to Callback mappings and shuttles data appropriately.
Don't forget to change the sleep interval of your agent back to your normal intervals when you're done with Socks so that you reduce the burden on both the server and your agent.
The database schema describes the current state of Mythic within the mythic_postgres Docker container. Mythic tracks everything in the Postgres database so that if an operator needs to close their browser or the server where Mythic runs reboots, nothing is lost. The benefit of having all data tracked within the database and simply streamed to the operator's interface means that all operators stay in sync about the state of the operation - each operator doesn't have to browse all of the file shares themselves to see what's going on and you don't have to grep through a plethora of log files to find that one task you ran that one time.
The database lives in the postgres-docker folder and is mapped into the mythic_postgres container as a volume. This means that if you need to move Mythic to a new server, simply stop mythic with ./mythic-cli stop, copy the Mythic folder to its new home, and start everything back up again with ./mythic-cli start.
On the first start of Mythic, the database schema is loaded from a schema file located in mythic-docker: .
Since the database schema is the source of truth for all of Mythic, mythic scripting, and all of the operator's interfaces, it needs to be easily accessible in a wide range of cases.
The mythic_server container connects directly to the mythic_postgres container to sync the containers and quickly react to agent messages. The mythic_graphql container (Hasura) also directly connects to the database and provides a GraphQL interface to the underlying data. This GraphQL interface is what both the React UI and mythic scripting use to provide a role-based access control (RBAC) layer on top of the database.
How do you, as an operator or developer, find out more about the database schema? The easiest way is to click the hamburger icon in the top left of Mythic, select "Services", and then select the "GraphQL Console". This drops you into the Hasura Login screen; the password for Hasura can be found randomly generated in your Mythic/.env file.
From here, the API tab, shown below, provides an easy way to dynamically explore the various queries, subscriptions, and modifications you can make to the database right here or via scripting.
Since the Mythic Scripting simply uses this GraphQL interface as well, anything you put in that center body pane you can submit as a POST request to Mythic's grapqhl endpoint (shown above) to achieve the same result. The majority of the functions within Mythic Scripting are simply ease-of-use wrappers around these same queries.
If you want to have even more fun exploring how the GraphQL interface manipulates the database schema, you can check out the built-in Jupyter Notebook and test out your modifications there as well. As shown in the two screenshots below, you can create scripts to interact with the GraphQL endpoints to return only the data you want.
This scripting, combined with the Hasura GraphQL console allows operators to very easily get direct access and real-time updates to the database without having to know any specific SQL syntax or worry about accidentally making a schema change.
C2 Profiles can optionally provide some operational security checks before allowing a payload to be created. For example, you might want to prevent operators from using a known-bad named pipe name, or you might want to prevent them from using infrastructure that you know is burned.
These checks all happen within a single function per C2 profile with a function called opsec:
From the code snippet above, you can see that this function gets in a request with all of the parameter values for that C2 Profile that the user provided. You can then either return success or error with a message as to why it passed or why it failed. If you return the error case, then the payload won't be built.
C2 servers know the most about their configuration. You can pass in the configuration for an agent and check it against the server's configuration to make sure everything matches up or get additional insight into how to configure potential redirectors.
C2 servers know the most about how their configurations work. You can pass in an agent's configuration and get information about how to generate potential redirector rules so that only your agent's traffic makes it through.
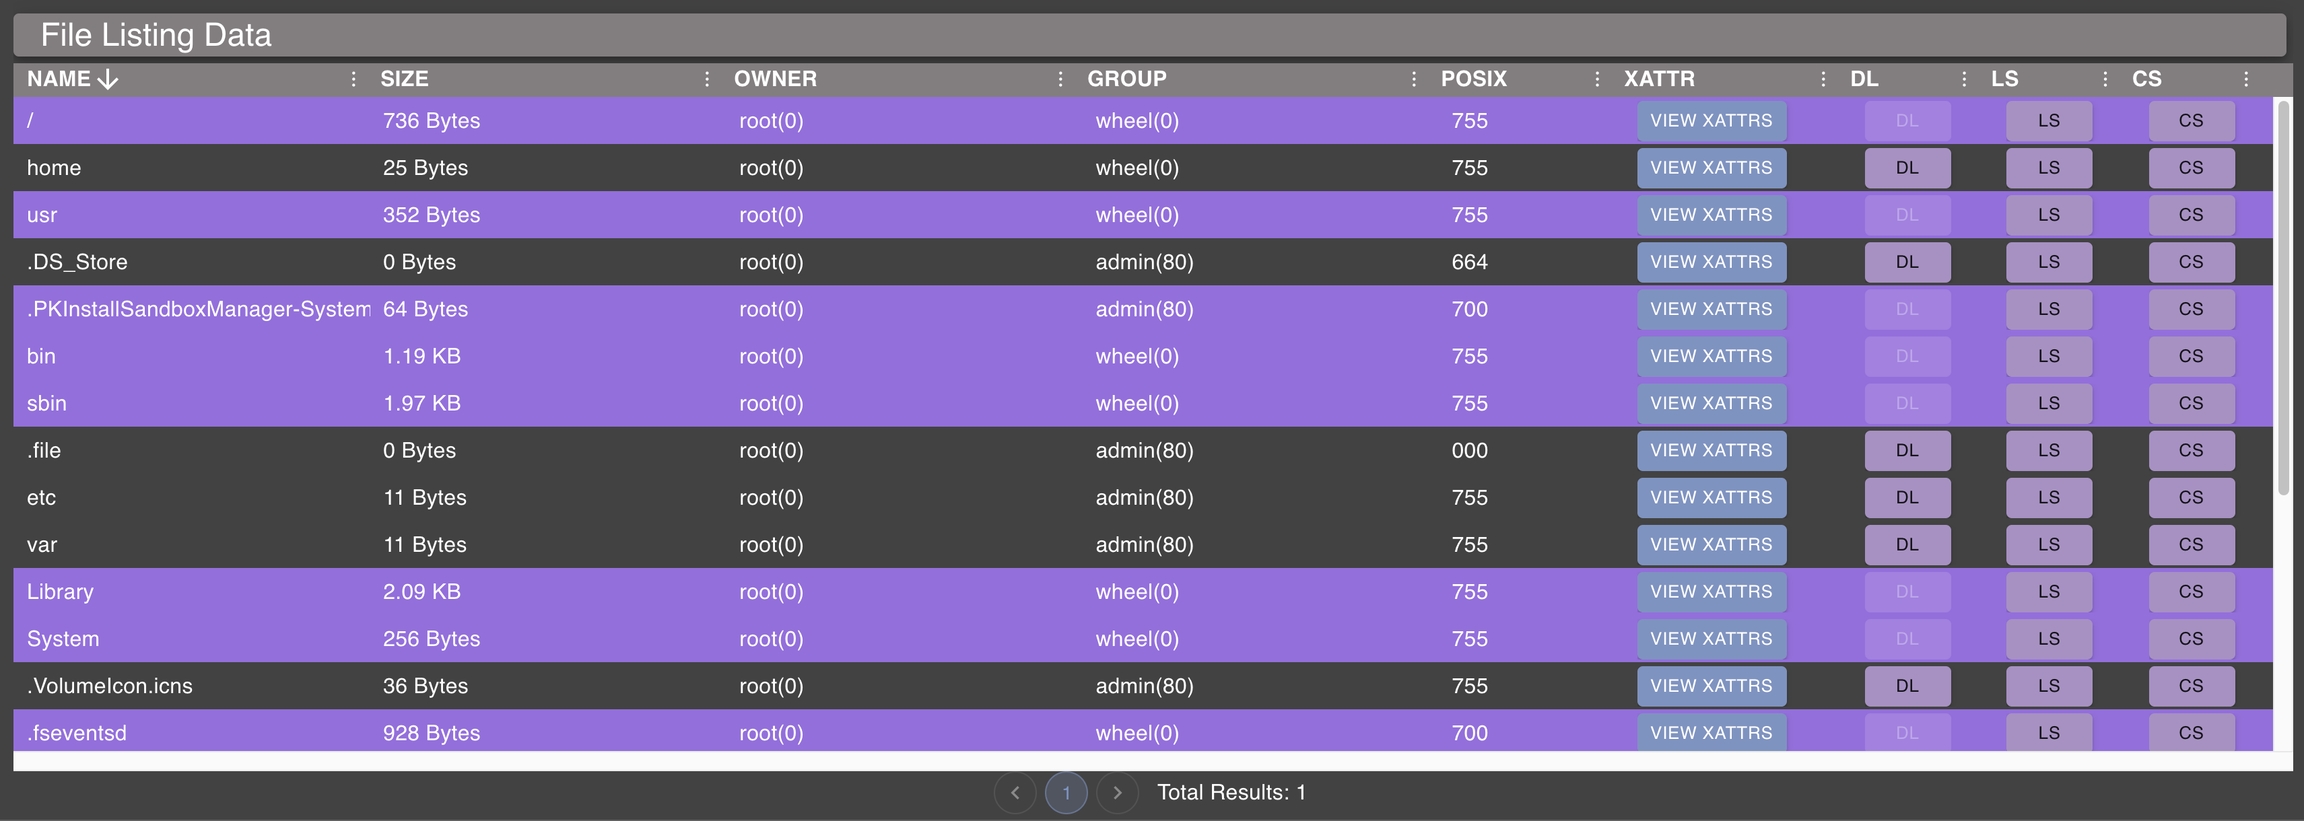
Unified, Persistent File Browser
The file browser is a visual, file browser representation of the directory listings that agents perform. Not all agents support this feature however.
From any callback dropdown in the "Active Callbacks" window, select "File Browser" and the view will be rendered in the lower-half of the screen. This information is a combination of the data across all of the callbacks, and is persistent.
The view is divided into two pieces - a graphical hierarchy on the left and a more detailed view of a folder on the right. The top layer on the left will be the hostname and everything below it will correspond to the file structure for that host.
You'll notice a green checkmark for the files folder. The green checkmark means that an agent reported back information for that folder specifically (i.e. somebody tasked an ls of that folder or issued a list command via the button on the table side). This is in contrast the other folders in that tree - those folders are "implicitly" known because we have the full path returned for the folder we did access. If there is a red circle with an exclamation point, it means that you tried to perform an ls on the directory, but it failed.
On the right hand side, the table view has a few pieces along the top:
The text field is the path associated with the information below with the corresponding hostname right above it. If you haven't received any information from any agent yet or you haven't clicked on a path, this will default to the current directory ..
The first button is the list button. This looks at the far right hand side Callback number, finds the associated payload type, then looks for the command with file_browser:list set in the command's supported_ui_features. Then issues that command with the host and path shown in the first two fields. If you want to list the contents of a directory that you can't see in the UI, just modify these two values and hit list.
The second button is the upload button. This will look for the file_browser:upload set in the supported_ui_features for a command and execute that command. In most cases this will cause a popup dialog where you can upload your file.
The last field allows you to toggle viewing deleted files or not.
For each entry in the table menu on the right, there are some actions you can do by clicking the gear icon:
The file browser only shows some information that's returned. There are portions that are Operating Specific though - like UNIX permissions, extended attributes, or SDDLs. This information doesn't make sense to display in the main table, so clicking the View Permissions action will display a popup with more specific information.
The Download History button will display information about all the times that file has been downloaded. This is useful when you repeatedly download the same file over and over again (ex: downloading a user's Chrome Cookie's file every day). If you've downloaded a file, there will be a green download icon next to the filename. This will always point to the latest version of the file, but you can use the download history option to view all other instances in an easy pane. This popup will also show the comments associated with the tasks that issued the download commands.
The other three are self explanatory - tasking to list a file/folder, download a file, or remove a file/folder. If a file is removed and reports back the removal to hook into the file browser, then the filename will have a small trash icon next to it and the name will have a strikethrough.
You installed a service into Mythic that's not yours (agent, c2, webhook, etc), made a change, but you're not seeing it? That could be from forking a public agent, making changes in your own repo and installing it with ./mythic-cli install or just making local changes on disk. Luckily, there's a really easy solution to this.
This page walks through the various things covered in this blog post as well:
Docker containers are really amazing. They rely on "images" to create a kind of "snapshot" of a simulated VM and then turn that image into an instance of that running snapshot by creating a container. These images can do a lot of things and configure a lot of different components for you so that you can be absolutely sure that how something is set up in one environment matches another environment regardless of whatever else is installed or set up. To do this, when building the image, you identify packages to install, things to configure, build new binaries, etc.
The downside is that creating the image in the first place can be very taxing for a CPU and for the HDD. They can be building python from source and ballooning the size of intermediary layers all over the place. To help with this, some authors of Mythic services have opted to use remote images. This means that the images are already pre-built for the general case and hosted somewhere (GitHub, DockerHub, etc).
If you're ever curious about an agent using a remote image, you can check and look at the Docker Image column. If there's something there, then the service is going to use the image hosted there by default. If you want to check locally, you'll see three new variables in your .env about it. For example, let's say we installed Poseidon:
You'll see three new .env variables all prefixed with the name of the thing you installed.
The *_USE_BUILD_CONTEXT variable says whether or not to use the LOCAL build context to create an image or to instead use the specified *_REMOTE_IMAGE that's pre-built. This means that when this variable is false (the default), then no new local changes will be used and the pre-built image will simply be fetched and turned into a container. So, no matter how many local changes you make, you'll never see the changes.
Setting this to true means that the local Dockerfile will be used to generate the image you use for your container. It's most likely the case that this Dockerfile is set up to pull in your local changes when creating the image, rebuilding things as necessary. If it's not though, then your local Dockerfile will be used to generate a new local image, but it doesn't guarantee that your local changes are getting picked up. So, be sure to check the Dockerfile and if necessary, check for a .docker/Dockerfile that you might be able to copy from to make sure that your changes are used when generating the new image.
By default, to go with the remote image that's used, a volume will be created to hold any changes that the container makes. This means that when local things change (such as uploading a file into a container), it goes into the volume, not locally on disk where the service is installed.
If you want to see these things locally, then set this to false.
If you make a change to either of these two variables, you need to rebuild the container to make them apply. Simply run sudo ./mythic-cli build [name] and you should see your changes.
onContainerStart Functionality
OnContainerStartFunction and on_container_start are functions you can optionally implement in any container to get execution, per operation, when the container starts up. This is helpful when your container needs to do some housekeeping and prep an agent, c2 profile, or even eventing before anything else happens.
This function is one you can implement as part of the definition for your container (PayloadType, C2Profile, Eventing, etc).
This function gets an APIToken that is valid for 5 minutes and has the permissions of a spectator. This allows your container to query everything it needs, but not make any modifications.
This function is called when your container first comes online and syncs with Mythic. It's also called (as of Mythic 3.3.1-rc26) when anybody adds/removes/edits a file inside of your container through the UI. This allows you, the container developer, to be reactive to changes users make to files that might affect things like configurations.
Agent reports new artifacts created on the system or network
Any command is able to reply with its own artifacts that are created along the way. The following response can be returned as a separate C2 message or as part of the command's normal output.
Agents can report back their own artifacts they create at any time. They just include an artifacts keyword with an array of the artifacts. There are two components to this:
base_artifact is the type of base artifact being reported. If this base_artifact type isn't already captured in the "Global Configurations" -> "Artifact Types" page, then this base_artifact value will be created.
artifact is the actual artifact being created. This is a free-form field.
needs_cleanup - this is an optional field that indicates if this artifact will need to be cleaned up at some point
resolved - this is an optional field that indicates if the artifact is already cleaned up
Artifacts created this way will be tracked in Artifacts page (click the fingerprint icon at the top)
is a knowledge base of adversary tactics and techniques mapped out to various threat groups. It provides a common language between red teams and blue teams when discussing operations, TTPs, and threat hunting. For Mythic, this provides a great way to track all of the capabilities the agents provide and to track all of the capabilities so far exercised in an operation.
For more information on MITRE ATT&CK, check out the following:
integrations can be found by clicking the chart icon from the top navigation bar.
There are a few different ways to leverage this information.
Clicking the "Fetch All Commands Mapped to MITRE" action will highlight all of the matrix cells that have a command registered to that ATT&CK technique. Clicking on a specific cell will bring up more specific information on which payload type and which command is mapped to that technique. All of this information comes from the portion of commands.
This is a slightly different view. This button will highlight and show the cells that have been exercised in the current operation. A cell will only be highlighted if a command was executed in the current operation with that ATT&CK technique mapped to it.
The cell view will show the exact command that caused the cell to be highlighted with a link (via task number) back to the full display of the task:
If there is an issue with the mapping, clicking the red X button will remove the mapping.
All uploads and downloads for an operation can be tracked via the clip icon or the search icon at the top.
This page simply shows all uploads and downloads tracked by Mythic and breaks them up by task.
From here, you can see who download or uploaded a file, when it happened, and where it went to or came from. Clicking the download button will download the file to the user's machine.
If you want to download multiple files at once from the Downloads section, click the toggle for all the files you want and select the Zip & Download selected button at the top right to download them. You can also preview the first 512KB of a file either as a string or as a hex xxd formatted view. This makes it easier to browse downloaded files without having to actually download them and open them up in a new tool.
Each file has additional information such as the SHA1 and MD5 of each file that can be viewed by clicking the blue info icon. If there's a comment on the task associated with the file upload or download, that comment will be visible here as well.
Unified process listing across multiple callbacks for a single host
The supported ui features flag on the command that does this tasking needs to have the following set:supported_ui_features = ["process_browser:list"] if you want to be able to issue a process listing from the UI process listing table. If you don't care about that, then you don't need that feature set for your command.
There are many instances where you might have multiple agents running on a single host and you run common tasking like process lists over and over and over again. You often do this because the tasking has scrolled out of view, maybe it's just stale information, or maybe you couldn't quite remember which callback actually had that task. This is where the unified process listing comes into play.
With a special format for process listing, Mythic can track all the different process lists together for a single host. It doesn't matter which host you ran the task on, as long as you pull up the process_list view for that host, all of the tasks will be available and viewable.
Naturally, this has a special format for us to make it the most useful. Like almost everything else in Mythic, this requires structured output for each process we want the following:
All that's needed is an array of all the processes with the above information in the processes field of your post_response action. That allows Mythic to create a process hierarchy (if you supply both process_id and parent_process_id) and a sortable/filterable table of processes. The above example shows a post_response with one response in it. That one response has a processes field with an array of processes it wants to report.
Any field that ends with _time expects the value to be an int64 of unix epoch time in milliseconds. You're welcome to supply any additional field you want about a process - it all gets aggregated together and provided as part of the "metadata" for the process that you can view in the UI in a nice table listing.
For example, a macOS agent might report back signing flags and entitlements and a windows agent might report back integrity level and user session id.
All additional buttons through the Process Browser UI (such as task inject, task kill, etc) have their own supported ui features: process_browser:inject, process_browser:kill, process_browser:list_tokens, process_browser:steal_token. All of these will get three parameters passed to them for tasking:
host
process_id
architecture
For example, {"host": "ABC.COM", "process_id": 1234, "architecture": "x64"}. Your commands that support these features will need to expect and process these arguments.
Artifacts track potential indicators of compromise and other notable events occurring throughout an operation.
A list of all current artifacts can be found by clicking the fingerprint icon at the top of Mythic.
This page tracks all of the artifacts automatically created by executing tasks. This should provide a good idea for both defenders and red teamers about the artifacts left behind during an operation and should help with deconfliction requests.
Artifacts are created in a few different ways:
A command's tasking automatically creates an artifact.
An agent reports back a new artifact in an ad-hoc fashion
Keystrokes are sent back from the agent to the Mythic server
Agents can report back keystrokes at any time. There are three components to a keystroke report:
user - the user that is being keylogged
window_title - the title of the window to which the keystrokes belong
keystrokes - the actual recorded keystrokes
Having the information broken out into these separate pieces allows Mythic to do grouping based on the user and window_title for easier readability.
If the agent doesn't know the user or the window_title fields, they should still be included, but can be empty strings. If empty strings are reported for either of these two fields, they will be replaced with "UNKNOWN" in Mythic.
What happens if you need to send keystrokes for multiple users/windows?
If you're curious how SOCKS works within Mythic and how you can hook into it with an agent, check out the section for coding.
# The opsec function is called when a payload is created as a check to see if the parameters supplied are good
# The input for "request" is a dictionary of:
# {
# "action": "opsec",
# "parameters": {
# "param_name": "param_value",
# "param_name2: "param_value2",
# }
# }
# This function should return one of two things:
# For success: {"status": "success", "message": "your success message here" }
# For error: {"status": "error", "error": "your error message here" }
async def opsec(self, inputMsg: C2OPSECMessage) -> C2OPSECMessageResponse:
response = C2OPSECMessageResponse(Success=True)
response.Message = "Not Implemented, passing by default"
response.Message += f"\nInput: {json.dumps(inputMsg.to_json(), indent=4)}"
return responseasync def config_check(self, inputMsg: C2ConfigCheckMessage) -> C2ConfigCheckMessageResponse:
response = C2ConfigCheckMessageResponse(Success=True)
response.Message = "Not Implemented"
response.Message += f"\nInput: {json.dumps(inputMsg.to_json(), indent=4)}"
return responseasync def redirect_rules(self, inputMsg: C2GetRedirectorRulesMessage) -> C2GetRedirectorRulesMessageResponse:
response = C2GetRedirectorRulesMessageResponse(Success=True)
response.Message = "Not Implemented"
response.Message += f"\nInput: {json.dumps(inputMsg.to_json(), indent=4)}"
return response{
"task_id": "task uuid here",
"user_output": "some user output here",
"artifacts": [
{
"base_artifact": "Process Create",
"artifact": "sh -c whoami",
"needs_cleanup": false, // optional, defaults to false
"resolved": false, // optional, defaults to false
},
{
"base_artifact": "File Write",
"artifact": "/users/itsafeature/Desktop/notmalware.exe",
"needs_cleanup": true, // optional, defaults to false
"resolved": false, // optional, defaults to false
}
]
} {"action": "post_response", "responses": [
{
"task_id": "uuid",
"processes": [
{
"process_id": 12345,
"name": "evil.exe"
"host": "a.b.com", //optional
"parent_process_id": 1234, //optional
"architecture": "x64", // optional
"bin_path": "C:\\Users\\bob\\Desktop\\evil.exe", // optional
"user": "bob", // optional
"command_line": "C:\\Users\\bob\\Desktop\\evil.exe -f test.txt -thread 12", // optional
"integrity_level": 3, // optional
"start_time": unix epoch time in milliseconds, //optional
"description": "not malware", // optional
"signer": "Bob's software co", // optional
"protected_process_level": 0, // optional
"update_deleted": false, // optional - setting this to true tells Mythic to mark any process not returned in this process array as deleted
** // any other fields you want, they all end up in the metadata field within the database
}
]
}
]}{
"task_id": "task uuid here",
"keylogs": [
{
"user": "its-a-feature",
"window_title": "Notepad - Untitled",
"keystrokes": "my password is zer0c00l"
}
]
}{
"action": "post_response",
"responses": [
{
"task_id": "task uuid here",
"keylogs": [
{
"user": "its-a-feature",
"window_title": "Notepad - Untitled",
"keystrokes": "my password is zer0c00l"
},
{
"user": "its-a-feature",
"window_title": "Notepad - Untitled",
"keystrokes": "my password is zer0c00l"
}
,{
"user": "its-a-feature",
"window_title": "Notepad - Untitled",
"keystrokes": "my password is zer0c00l"
}
]
}
]
}class DownloadCommand(CommandBase):
cmd = "download"
needs_admin = False
help_cmd = "download {path to remote file}"
description = "Download a file from the victim machine to the Mythic server in chunks (no need for quotes in the path)."
version = 1
author = "@its_a_feature_"
parameters = []
attackmapping = ["T1020", "T1030", "T1041"]
argument_class = DownloadArguments
browser_script = BrowserScript(script_name="download", author="@its_a_feature_")POSEIDON_USE_BUILD_CONTEXT="true"
POSEIDON_USE_VOLUME="false"
POSEIDON_REMOTE_IMAGE="ghcr.io/mythicagents/poseidon:v0.0.0.14"This describes how to report back p2p connection information to the server
This message type allows agents to report back new or removed connections between themselves or elsewhere within a p2p mesh. Mythic uses these messages to construct a graph of connectivity that's displayed to the user and for handling routing for messages through the mesh.
The agent message to Mythic has the following form:
{
"user_output": "some ouser output here",
"task_id": "uuid of task here",
"edges": [
{
"source": "uuid of source callback",
"destination": "uuid of destination callback",
"metadata": "{ optional metadata json string }",
"action": "add" or "remove"
"c2_profile": "name of the c2 profile used in this connection"
}
]
}Just like other post_response messages, this message has the same UUID and encryption requirements found in Agent Message Format. Some things to note about the fields:
edges is an array of JSON objects describing the state of the connections that the agent is adding/removing. Each edge in this array has the following fields:
source this is one end of the p2p connection (more often than not, this is the agent that's reporting this information)
destination this is the other end of the p2p connection
metadata is additional information about the connection that the agent wants to report. For example, when dealing with SMB bind pipes, this could contain information about the specific pipe name instances that are being used if they're being programmatically generated.
action this indicates if the connection described above is to be added or removed from Mythic.
c2_profile this indicates which c2 profile is used for the connection
After getting a message like this, Mythic responds with a message of the following form:
{
"status": "success" or "error",
"error": "error message if status was error",
"task_id": "id of task"
}This is very similar to most other response messages from the Mythic server.
When an agent sends a message to Mythic with a delegate component, Mythic will automatically add a route between the delegate and the agent that sent the message.
For example: If agentA is an egress agent sending messages to a C2 Docker container and it links to agentB, a p2p agent. There are now a few options:
If the p2p protocol involves sending messages back-and-forth between the two agents, then agentA can determine if agentB is a new payload, trying to stage, or a complete callback. When agentB is a complete callback, agentA can announce a new route to agentB.
When agentA sends a message to Mythic with a delegate message from agentB, Mythic will automatically create a route between the two agents.
This distinction is important due to how the p2p protocol might work. It could be the case that agentB never sends a get_tasking request and simply waits for messages to it. In this case, agentA would have to do some sort of p2p comms with agentB to determine who it is so it can announce the route or start the staging process for agentB.
Within a Command class, there are two functions - create_go_tasking and process_response. As the names suggest, the first one allows you to create and manipulate a task before an agent pulls it down, and the second one allows you to process the response that comes back. If you've been following along in development, then you know that Mythic supports many different fields in its post_response action so that you can automatically create artifacts, register keylogs, manipulate callback information, etc. However, all of that requires that your agent format things in a specific way for Mythic to pick them up and process. That can be tiring.
The process_response function takes in one argument class that contains two pieces of information: The task that generated the response in the first place, and the response that was sent back from the agent. Now, there's a specific process_response keyword you have to send for mythic to shuttle data off to this function instead of processing it normally. When looking at a post_response message, it's structured as follows:
{
"action": "post_response",
"responses": [
{
"task_id": "some uuid",
"process_response": {"myown": "data format"},
// all of the other fields you want to leverage
}
]
}Now, anything in that process_response key will get sent to the process_response function in your Payload Type container. This value for process_response can be any type - int, string, dictionary, array, etc.
Some caveats:
You can send any data you want in this way and process it however you want. In the end, you'll be doing RPC calls to Mythic to register the data
Not all things make sense to go this route. Because this is an async process to send data to the container for processing, this happens asynchronously and in parallel to the rest of the processing for the message. For example, if your message has just the task_id and a process_container key, then as soon as the data is shipped off to your process_response function, Mythic is going to send the all clear back down to the agent and say everything was successful. It doesn't wait for your function to finish processing anything, nor does it expect any output from your function.
We do this sort of separation because your agent shouldn't be waiting on the hook for unnecessary things. We want the agent to get what it wants as soon as possible so it can go back to doing agent things.
Some functionality like SOCKS and file upload/download don't make sense for the process_response functionality because the agent needs the response in order to keep functioning. Compare this to something like registering a keylog, creating an artifact, or providing some output to the user which the agent tends to think of in a "fire and forget" style. These sorts of things are fine for async parallel processing with no response to the agent.
The function itself is really simple:
async def process_response(self, task: PTTaskMessageAllData, response: any) -> PTTaskProcessResponseMessageResponse:
resp = PTTaskProcessResponseMessageResponse(TaskID=task.Task.ID, Success=True)
return respwhere task is the same task data you'd get from your create_go_tasking function, and response is whatever you sent back.
You have full access to all of the RPC methods to Mythic from here just like you do from the other functions.
This page discusses how to register that commands are loaded/unloaded in a callback
{
"task_id": "task uuid here",
"user_output": "some user output here",
"commands": [
{
"action": "add",
"cmd": "shell"
},
{
"action": "add",
"cmd": "jsimport"
}
]
}It's a common feature for agents to be able to load new functionality. Even within Mythic, you can create agents that only start off with a base set of commands and more are loaded in later. Using the commands keyword, agents can report back that commands are added ("action": "add") or removed ("action": "remove").
This is easily visible when interacting with an agent. When you start typing a command, you'll see an autocomplete list appear above the command prompt with a list of commands that include what you've typed so far. When you load a new command and register it back with mythic in this way, that new command will also appear in that autocomplete list.
type ContainerOnStartMessage struct {
ContainerName string `json:"container_name"`
OperationID int `json:"operation_id"`
OperationName string `json:"operation_name"`
ServerName string `json:"server_name"`
APIToken string `json:"apitoken"`
}
type ContainerOnStartMessageResponse struct {
ContainerName string `json:"container_name"`
EventLogInfoMessage string `json:"stdout"`
EventLogErrorMessage string `json:"stderr"`
}
OnContainerStartFunction func(sharedStructs.ContainerOnStartMessage) sharedStructs.ContainerOnStartMessageResponse `json:"-"`More information on P2P message communication can be found here.
1. P2P agents do their "C2 Comms" (which in this case is reaching out to agent1 over the decided TCP port) and start their Checkin/Encrypted Key Exchange/etc.
2. When Agent1 gets a connection from Agent2, there's a lot of unknowns. Agent2 could be a new payload that isn't registered as a callback in Mythic yet. It could be an already existing callback that you're re-linking to or linking to for the first time from this callback. Either way, Agent1 doesn't know anything about Agent2 other than it connected to the right port, so it generates a temporary UUID to refer to that connection and waits for a message from Agent 2 (the first message sent through should always be from Agent2->Agent1 with a checkin message). Agent1 sends this information out with its next message as a "Delegate" Message of the form:
{
"action": "some action here",
"delegates": [
{
"message": agentMessage,
"uuid": UUID,
"c2_profile": "ProfileName"
}
]
}This "delegates" key sits at the same level as the "action" key and can go with any message (upload, checkin, post_response, etc). The "message" field is the checkin message from Agent2, the "uuid" field is the tempUUID that agent1 generated, and the "c2_profile" is the name of the C2 profile that the two agents are using to connect.
3. When Mythic parses this delegate message, it can automatically assume that there's a connection between Agent1 and Agent2 because Agent1's message has a Deleggate from Agent 2.
4. When Mythic is done processing Agent2's checkin message, it takes that result and adds it as a "delegate" message back for Agent1's message.
5. When Agent1 gets its message back, it sees that there is a delegate message. That message is of the format:
{
"action": "some action here",
"delegates": [
{
"message": agentMessage,
"uuid": "same UUID as the message agent -> mythic",
"mythic_uuid": UUID that mythic uses
}
]
}6. You can see that the response format is a little different. We don't need to echo back the C2 Profile because the agent already knows that information. The "message" field is the Mythic response that goes back to Agent 2. The "uuid" field is the same tempUUID that the agent sent in the message to Mythic. The "mythic_uuid" field though is Mythic indicating back to Agent1 that it doesn't know what tempUUID is, but the agent that sent that message actually has this UUID. That allows the agent to update its records. The main reason this is important is in the case where the connection between Agent1 and Agent2 goes away. Agent1 has to have some way of indicating to Mythic that Agent2 is no longer talking to it. Mythic only knows Agent2 by its UUID, so if Agent1 tried to report that it could no longer talk to tempUUID, Mythic would have no idea who that is.
The "HTTP" C2 profile speaks the exact same protocol as the Mythic server itself. All other C2 profiles will translate between their own special sauce back to this format. This profile has a docker container as well that you can start that uses a simple JSON configuration to redirect traffic on another port (with potentially different SSL configurations) to the main Mythic server.
This container code starts a small Golang gin web server that accepts messages on the specified port and proxies all connections to the /agent_message endpoint within Mythic. This allows you to host the Mythic instance on port 7443 for example and expose the default HTTP profile on port 443 or 80.
Clicking the "Configure" button gives a few options for how to edit and interact with the profile.
If you want to use SSL with this profile, edit the configuration to use_ssl to true and the C2 profile will automatically generate some self-signed certificates. If you want to use your own certificates though, you can upload them through the UI by clicking the "Manage Files" button next to the http profile and uploading your files. Then simply update the configuration with the names of the files you uploaded.
This sections allows you to see some information about the C2 profile, including sample configurations.
The name of a C2 profile cannot be changed once it's created, but everything else can change. The Supported Payloads shows which payload types can speak the language of this C2 profile.
This dialog displays the current parameters associated with the C2 profile. These are the values you must supply when using the C2 profile to create an agent.
There are a few things to note here:
randomize - This specifies if you want to randomize the value that's auto-populated for the user.
format_string - This is where you can specify how to generate the string in the hint when creating a payload. For example, setting randomize to true and a format_string of \d{10} will generate a random 10 digit integer.
This can be seen with the same test parameter in the above screenshot.
Every time you view the parameters, select to save an instance of the parameters, or go to create a new payload, another random instance from this format_string will be auto-populated into that c2 profile parameter's hint field.
Discussion / Explanation for Common Errors
All Payload containers leverage the mythic_container PyPi package or the github.com/MythicMeta/MythicContainer golang package. These packages keeps track of a version that syncs up with Mythic when the container starts. As Mythic gains new functionality or changes how things are done, these containers might not be supported anymore. At any given time, Mythic could support only a single version or a range of versions. A list of all PyPi reported versions and their corresponding Mythic version/DockerImage versions can be found here.
The agent in question needs to have its container updated or downgraded to be within the range specified by your version of Mythic. If you're using a Dockerimage from itsafeaturemythic (i.e. in your Mythic/Payload_Types/[agent name]/Dockerfile it says FROM itsafeaturemythic/something) then you can look here to see which version you should change to.
This is a warning that a C2 Profile's internal service was started, but has since stopped. Typically this happens as a result of rebooting the Mythic server, but if for some reason a C2 Profile's Docker container restarts, you'll get this notification as well.
If a C2 Profile is manually stopped by an operator instead of it stopping automatically for some other reason, the warning message will reflect the variation:
Go to the C2 Profiles page and click to "Start Internal Server". If the container went down and is still down, then you won't be able to start it from the UI and you'll see a different button that you "Can't Start Server". If that's the case, you need to track down why that container stopped on the host.
The "Failed to correlate UUID" message means that data came in through some C2 Profile, made its way to Mythic, Mythic base64 decoded the data successfully and looked at the first characters for a UUID. In Mythic messages, the only piece that's normally not encrypted is this random UUID4 string in the front that means something to Mythic, but is generally meaningless to everybody else. Mythic uses that UUID to look up the callback/payload/stage crypto keys and other related information for processing. In this case though, the UUID that Mythic sees isn't registered within Mythic's database. Normally people see this because they have old agents still connecting in, but they've since reset their database.
Looking at the rest of the message, we can see additional data. All C2 Profile docker containers add an additional header when forwarding messages to the Mythic server with mythic: c2profile_name. So, in this case we see 'mythic': 'http' which means that the http profile is forwarding this message along to the Mythic server.
First check if you have any agents that you forgot about from other engagements, tests, or deployments. The error message should tell you where they're connecting from. If the UUID that Mythic shows isn't actually a UUID format, then that means that some other data made its way to Mythic through a C2 profile. In that case, check your Firewall rules to see if there's something getting through that shouldn't be getting through. This kind of error does not impact the ability for your other agents to work (if they're working successfully), but does naturally take resources away from the Mythic server (especially if you're getting a lot of these).
If you are going back-and-forth between windows and linux doing edits on files, then you might accidentally end up with mixed line endings in your files. This typically manifests after an edit and when you restart the container, it goes into a reboot loop. The above error can be seen by using sudo ./mythic-cli logs [agent name].
Running dos2unix on your files will convert the line endings to the standard linux \n characters and you should then be able to restart your agent sudo ./mythic-cli start [agent name]. At that point everything should come back up.
If you use mythic-cli to install an agent, but you're not seeing it show up in the UI, it means that something is going wrong with booting up the agent and syncing to Mythic.
Run sudo ./mythic-cli logs [agent name] to look at the output of the container. Usually you'll see some sort of error here about why things aren't working. This is typically the result of an agent/c2 profile being too far out of date from the rest of the Mythic instance that it can't properly sync up anymore.
This refers to the act of connecting two agents together with a peer-to-peer protocol. The details here are agnostic of the actual implementation of the protocol (could be SSH, TCP, Named Pipes, etc), but the goal is to provide a way to give one agent the context it needs to link or establish some peer-to-peer connectivity to a running agent.
When creating a command, give a parameter of type ParameterType.ConnectionInfo. Now, when you type your command without parameters, you'll get a popup like normal. However, for this type, there will be three dropdown menus for you to fill out:
This field is auto populated based on two properties:
The list of all hosts where you have registered callbacks
The list of all hosts where Mythic is aware you've moved moved a payload to
Once you've selected a host, the Payload dropdown will populate with the associated payloads that Mythic knows are on that host. These payloads are in two main groups:
The payloads that spawned the current callbacks on that host
The payloads that were moved over via a command that created a new payload and registered it to the new host
This payload simply acts as a template of information so that you can select the final piece.
Select the green + next to host, manually specify which host your payload lives on, then select from the dropdown the associated payload that was used. Then click add. Now Mythic is also tracking that the selected payload lives on the indicated host. You can continue with the host/payload/c2_profile dropdowns like normal.
When trying to connect to a new agent, you have to specify which specific profile you're wanting to connect to. This is because on any given host and for any given payload, there might be multiple c2 profiles within it (think HTTP, SMB, TCP, etc). This field will auto populate based on the C2 profiles that are in the payload selected in the drop down above it.
Once you've selected all of the above pieces, the task will insert all of that selected profile's specific instantiations as part of the task for the agent to use when connecting. This can include things like specific ports to connect to, specific pipe names to use, or any other information that might be needed to make the connection.
All of the above is to help an operator identify exactly which payload/callback they're trying to connect to and via which p2p protocol. As a developer, you have the freedom to instead allow operators to specify more generic information via the command-line such as: link-command-name hostname or link-command-name hostname other-identifier. The caveat is this now requires the operator to know more detailed information about the connection ahead of time.
The ParameterType.ConnectionInfo parameter type is useful when you want to make a new connection between a callback to a payload you just executed or to another callback that your current callback hasn't connected to before. A common command that leverages this parameter type would be link. However, this isn't too helpful if you want to remove a certain connection or if you just want to re-establish a connection that died. To help with this, there's the ParameterType.LinkInfo which, as the name implies, gives information about the links associated with your callback.
When you use a parameter type of ParameterType.LinkInfo, you'll get a dropdown menu where the user can select from live or dead links to leverage. When you select a current/dead link, the data that's sent down to your create_tasking function is the exact same as when you use the ParameterType.ConnectionInfo - i.e. information about the host, payload uuid, callback uuid, and the p2p c2 profile parameter information.
If you want to have a different form of communication between Mythic and your agent than the specific JSON messages that Mythic uses, then you'll need a "translation container".
The first thing you'll need to do is specify the name of the container in your associated Payload Type class code. Update the Payload Type's class to include a line like translation_container = "binaryTranslator" . Now we need to create the container.
The process for making a translation container is almost identical to a c2 profile or payload type container, we're simply going to change which classes we instantiate, but the rest of it is the same.
Unlike Payload Type and C2 Profile containers that mainly do everything over RabbitMQ for potentially long-running queues of jobs, Translation containers use gRPC for fast responses.
If a translation_container is specified for your Payload Type, then the three functions defined in the following two examples will be called as Mythic processes requests from your agent.
You then need to get the new container associated with the docker-compose file that Mythic uses, so run sudo ./mythic-cli add binaryTranslator. Now you can start the container with sudo ./mythic-cli start binaryTranslator and you should see the container pop up as a sub heading of your payload container.
Additionally, if you're leveraging a payload type that has mythic_encrypts = False and you're doing any cryptography, then you should use this same process and perform your encryption and decryption routines here. This is why Mythic provides you with the associated keys you generated for encryption, decryption, and which profile you're getting a message from.
For the Python version, we simply instantiate our own subclass of the TranslationContainer class and provide three functions. In our main.py file, simply import the file with this definition and then start the service:
mythic_container.mythic_service.start_and_run_forever()For the GoLang side of things, we instantiate an instance of the translationstructs.TranslationContainer struct with our same three functions. For GoLang though, we have an Initialize function to add this struct as a new definition to track.
Then, in our main.go code, we call the Initialize function and start the services:
mytranslatorfunctions.Initialize()
// sync over definitions and listen
MythicContainer.StartAndRunForever([]MythicContainer.MythicServices{
MythicContainer.MythicServiceTranslationContainer,
})These examples can be found at the MythicMeta organization on GitHub: https://github.com/MythicMeta/ExampleContainers/tree/main/Payload_Type
Docker doesn't allow you to have capital letters in your image names, and when Mythic builds these containers, it uses the container's name as part of the image name. So, you can't have capital letters in your agent/translation container names. That's why you'll see things like service_wrapper instead of serviceWrapper
Just like with Payload Types, a Translation container doesn't have to be a Dockerized instance. To turn any VM into a translation container just follow the general flow at

Token awareness and Token tasking
Mythic supports Windows tokens in two ways: tracking which tokens are viewable and tracking which tokens are usable by the callback. The difference here, besides how they show up in the Mythic interface, is what the agent can do with the tokens. The idea is that you can list out all tokens on a computer, but that doesn't mean that the agent has a handle to the token for use with tasking.
As part of the normal responses sent back from the agent, there's an additional key you can supply, tokens that is a list of token objects that can be stored in the Mythic database. These will be viewable from the "Search" -> "Tokens" page, but are not leveraged as part of further tasking.
If you want to be able to leverage tokens as part of your tasking, you need to register those tokens with Mythic and the callback. This can be done as part of the normal post_response responses like everything else. The key here is to identify the right token - specifically via the unique combination of token_id and host.
If the token 12345 hasn't been reported via the tokens key then it will be created and then associated with Mythic.
Once the token is created and associated with the callback, there will be a new dropdown menu next to the tasking bar at the bottom of the screen where you can select to use the default token or one of the new ones specified. When you select a token to use in this way when issuing tasking, the create_tasking function's task object will have a new attribute, task.token that contains a dictionary of all the token's associated attributes. This information can then be used to send additional data with the task down to the agent to indicate which tokens should be used for the task as part of your parameters.
Additionally, when getting tasks that have tokens associated with them, the TokenId value will be passed down to the agent as an additional field:
It's often useful to perform some operational security checks before issuing a task based on everything you know so far, or after you've generated new artifacts for a task but before an agent picks it up. This allows us to be more granular and context aware instead of the blanket command blocking that's available from the Operation Management page in Mythic.
OPSEC checks and information for a command is located in the same file where everything else for the command is located. Let's take an example all the way through:
In the case of doing operational checks before a task's create_tasking is called, we have the opsec_pre function. Similarly, the opsec_post function happens after your create_tasking, but before your task is finally ready for an agent to pick it up.
opsec_pre/post_blocked - this indicates True/False for if the function decides the task should be blocked or not
opsec_pre/post_message - this is the message to the operator about the result of doing this OPSEC check
opsec_pre/post_bypass_role - this determines who should be able to bypass this check. The default is operator to allow any operator to bypass it, but you can change it to lead to indicate that only the lead of the operation should be able to bypass it. You can also set this to other_operator to indicate that somebody other than the operator that issued the task must approve it. This is helpful in cases where it's not necessarily a "block", but something you want to make sure operators acknowledge as a potential security risk
As the name of the functions imply, the opsec_pre check happens before create_tasking function runs and the opsec_post check happens after the create_tasking function runs. If you set opsec_pre_blocked to True, then the create_tasking function isn't executed until an approved operator bypasses the check. Then, execution goes back to create_tasking and the opsec_post. If that one also sets blocked to True, then it's again blocked at the user to bypass it. At this point, if it's bypassed, the task status simply switched to Submitted so that an agent can pick up the task on next checkin.
From the opsec_pre and opsec_post functions, you have access to the entire task/callback information like you do in . Additionally, you have access to the entire RPC suite just like in .
Messages for interactive tasking have three pieces:
If you have a command called pty and issue it, then when that task gets sent to your agent, you have your normal tasking structure. That tasking structure includes an id for the task that's a UUID. All follow-on interactive input for that task uses the same UUID (task_id in the above message).
The data is pretty straight forward - it's the base64 of the raw data you're trying to send to/from this interactive task. The message_type field is an enum of int. It might see complicated at first, but really it boils down to providing a way to support sending control codes through the web UI, scripting, and through an opened port.
When something is coming from Mythic -> Agent, you'll typically see Input, Exit, or Escape -> CtrlZ. When sending data back from Agent -> Mythic, you'll set either Output or Error. This enum example also includes what the user typically sees in a terminal (ex: ^C when you type CtrlC) along with the hex value that's normally sent. Having data split out this way can be helpful depending on what you're trying to do. Consider the case of trying to do a tab-complete. You want to send down data and the tab character (in that order). For other things though, like escape, you might want to send down escape and then data (in that order for things like control sequences).
You'll probably notice that some letters are missing from the control codes above. There's no need to send along a special control code for \n or \r because we can send those down as part of our input. Similarly, clearing the screen isn't useful through the web UI because it doesn't quite match up as a full TTY.
This data is located in a similar way to SOCKS and RPFWD:
the interactive keyword takes an array of these sorts of messages to/from the agent. This keyword is at the same level in the JSON structure as action, socks, responses, etc.
When sending responses back for interactive tasking, you send back an array in the interactive keyword just like you got the data in the first place.
Sometimes when creating a command, the options you present to the operator might not always be static. For example, you might want to present them with a list of files that have been download; you might want to show a list of processes to choose from for injection; you might want to reach out to a remote service and display output from there. In all of these scenarios, the parameter choices for a user might change. Mythic can now support this.
Since we're talking about a command's arguments, all of this lives in your Command's class that subclasses TaskArguments. Let's take an augmented shell example:
Here we can see that the files CommandParameter has an extra component - dynamic_query_function. This parameter points to a function that also lives within the same class, get_files in this case. This function is a little different than the other functions in the Command file because it occurs before you even have a task - this is generating parameters for when a user does a popup in the user interface. As such, this function gets one parameter - a dictionary of information about the callback itself. It should return an array of strings that will be presented to the user.
You have access to a lot of the same RPC functionality here that you do in create_tasking, but except for one notable exception - you don't have a task yet, so you have to do things based on the callback_id. You won't be able to create/delete entries via RPC calls, but you can still do pretty much every query capability. In this example, we're doing a get_file query to pull all files that exist within the current callback and present their filenames to the user.
What information do you have at your disposal during this dynamic function call? Not much, but enough to do some RPC calls depending on the information you need to complete this function. Specifically, the PTRPCDynamicQueryFunctionMessage parameter has the following fields:
command - name of the command
parameter_name - name of the parameter
payload_type - name of the payload type
callback - the ID of the callback used for RPC calls
This is an optional function to supply when you have a command parameter of type TypedArray. This doesn't apply to BuildParameters or C2Profile Parameters because you can only supply those values through the GUI or through scripting. When issuing tasks though, you generally have the option of using a modal popup window or freeform text. This typedarray_parse_function is to help with parsing freeform text when issuing tasks.
This is an optional function you can supply as part of your command parameter definitions.
A TypedArray provides two things from the operator to the agent - an array of values and a type for each value. This makes its way to the payload type containers during tasking and building as an array of arrays (ex: [ ["int", "5"], ["string", "hello"] ] ). However, nobody types like that on the command line when issuing tasks. That's where this function comes into play.
Let's say you have a command, my_bof, with a TypedArray parameter called bof_args. bof_args has type options (i.e. the choices of the parameter) of int, wstring, and char*. When issuing this command on the command line, you'd want the operator to be able to issue something a bit easier than multiple nested arrays. Something like:
The list of options can go on and on and on. There's no ideal way to do it, and everybody's preferences for doing something like this is a bit different. This is where the TypedArray parsing function comes into play. Your payload type can define or explain in the command description how arguments should be formatted when using freeform text, and then your parsing function can parse that data back into the proper array of arrays.
This function takes in a list of strings formatted how the user presented it on the command line, such as:
The parse function should take that and split it back out into our array of arrays:
This function gets called in a few different scenarios:
The user types out my_bof -bof_args int:5 char*:testing on the command line and hits enter
If the modal is used then this function is not called because we already can create the proper array of arrays from the UI
The user uses Mythic scripting or browser scripts to submit the task
The user types out my_bof -bof_args int:5 char*:testing on the command line and hits SHIFT+enter to open up a modal dialog box. This will call your parsing function to turn that array into an array of arrays so that the modal dialog can display what the user has typed out so far.
These functions are essentially the first line of processing that can happen on the parameters the user provides (the first optional parsing being done in the browser). For your typed array parameter, bof_args in this case, you just need to make sure that one of the following is true after you're done parsing with either of these functions:
the typed array parameter's value is set to an array of strings, ex: ["int:5", "char*:testing"]
the typed array parameter's value is set to an array of arrays where the first entry is empty and the second entry is the value, ex: [ ["", "int:5"], ["", "char*:testing"] ]
After your parse_arguments or parse_dictionary function is called, the mythic_container code will check for any typed_array parameters and check their value. If the value is one of the above two instances, it'll make it match what's expected for the typedarray parse function, call your function, then automatically update the value.
If you're using the Mythic UI and want to make sure your parsed array happened correctly, it's pretty easy to see. Expand your task, click the blue plus sign, then go to the keyboard icon. It'll open up a dialog box showing you all the various stages of parameter parsing that's happened. If you just typed out the information on the command line (no modal), then you'll likely see an array of arrays where the first element is always "" displayed to the user, but the agents parameters section will show you the final value after all the parsing happens. That's where you'll see the result of your parsing.
{ "action": "post_response",
"responses": [
{
"task_id": "uuid here",
"user_output": "got some tokens yo",
"tokens": [
{
"token_id": 18947, // required, agent generated
"host": "bob.com", // optional
"description": "", // optional
"user": "bob", // optional
"groups": "", //optional
"thread_id": 456, // optional
"process_id": 2345, // optional
"default_dacl": "", //optional p.TextField(null=True)
"session_id": 0, //optional p.IntegerField(null=True)
"restricted": false, //optional = p.BooleanField(null=True)
"capabilities": "", //optional = p.TextField(null=True)
"logon_sid": "", //optional = p.TextField(null=True)
"integrity_level_sid": 0, //optional = p.IntegerField(null=True)
"app_container_number": 0, //optional = p.IntegerField(null=True)
"app_container_sid": "", //optional = p.TextField(null=True)
"privileges": "", //optional = p.TextField(null=True)
"handle": 12345, //optional = p.IntegerField(null=True)
}
]
}
]
}{"action": "post_response",
"responses": [
{
"task_id": "uuid here",
"output": "now tracking token 12345",
"callback_tokens": [
{
"action": "add", // could also be "remove"
"host": "a.b.com", //optional - default to callback host if not specified
"token_id": 12345, // id
}
]
}
]
}
{ "action": "get_tasking",
"tasks": [
{
"command": "shell",
"parameters": "whoami",
"id": "uuid here",
"timestamp": 1234567,
"token": 12345
}
]
}{
"task_id": "UUID of task",
"data": "base64 of data",
"message_type": int enum of types
}const (
Input = 0
Output = 1
Error = 2
Exit = 3
Escape = 4 //^[ 0x1B
CtrlA = 5 //^A - 0x01 - start
CtrlB = 6 //^B - 0x02 - back
CtrlC = 7 //^C - 0x03 - interrupt process
CtrlD = 8 //^D - 0x04 - delete (exit if nothing sitting on input)
CtrlE = 9 //^E - 0x05 - end
CtrlF = 10 //^F - 0x06 - forward
CtrlG = 11 //^G - 0x07 - cancel search
Backspace = 12 //^H - 0x08 - backspace
Tab = 13 //^I - 0x09 - tab
CtrlK = 14 //^K - 0x0B - kill line forwards
CtrlL = 15 //^L - 0x0C - clear screen
CtrlN = 16 //^N - 0x0E - next history
CtrlP = 17 //^P - 0x10 - previous history
CtrlQ = 18 //^Q - 0x11 - unpause output
CtrlR = 19 //^R - 0x12 - search history
CtrlS = 20 //^S - 0x13 - pause output
CtrlU = 21 //^U - 0x15 - kill line backwards
CtrlW = 22 //^W - 0x17 - kill word backwards
CtrlY = 23 //^Y - 0x19 - yank
CtrlZ = 24 //^Z - 0x1A - suspend process
end
){
"action": "some action",
"interactive": [ {"task_id": UUID, "data": "base64", "message_type": 0 } ]
}class ShellArguments(TaskArguments):
def __init__(self, command_line):
super().__init__(command_line)
self.args = {
"command": CommandParameter(
name="command", type=ParameterType.String, description="Command to run"
),
"files": CommandParameter(name="files", type=ParameterType.ChooseOne, default_value=[],
dynamic_query_function=self.get_files)
}
async def get_files(self, inputMsg: PTRPCDynamicQueryFunctionMessage) -> PTRPCDynamicQueryFunctionMessageResponse:
fileResponse = PTRPCDynamicQueryFunctionMessageResponse(Success=False)
file_resp = await SendMythicRPCFileSearch(MythicRPCFileSearchMessage(
CallbackID=inputMsg.Callback,
LimitByCallback=False,
Filename="",
))
if file_resp.Success:
file_names = []
for f in file_resp.Files:
if f.Filename not in file_names and f.Filename.endswith(".exe"):
file_names.append(f.Filename)
fileResponse.Success = True
fileResponse.Choices = file_names
return fileResponse
else:
fileResponse.Error = file_resp.Error
return fileResponse
async def parse_arguments(self):
if len(self.command_line) > 0:
if self.command_line[0] == "{":
self.load_args_from_json_string(self.command_line)
else:
self.add_arg("command", self.command_line)
else:
raise ValueError("Missing arguments")my_bof -bof_args int:5 char*:testing wstring:"this is my string"
my_bof -bof_args int/5 char*/testing wstring/"this is my string"
my_bof -bof_args int(5) char*(testing) wstring(this is my string)
...[ "int:5", "char*:testing", "wstring:this is my string" ][ ["int": "5"], ["char*", "testing"], ["wstring", "this is my string"] ]class ShellCommand(CommandBase):
cmd = "shell"
needs_admin = False
help_cmd = "shell {command}"
description = """This runs {command} in a terminal by leveraging JXA's Application.doShellScript({command}).
WARNING! THIS IS SINGLE THREADED, IF YOUR COMMAND HANGS, THE AGENT HANGS!"""
version = 1
author = "@its_a_feature_"
attackmapping = ["T1059", "T1059.004"]
argument_class = ShellArguments
attributes = CommandAttributes(
suggested_command=True
)
async def opsec_pre(self, taskData: PTTaskMessageAllData) -> PTTTaskOPSECPreTaskMessageResponse:
response = PTTTaskOPSECPreTaskMessageResponse(
TaskID=taskData.Task.ID, Success=True, OpsecPreBlocked=True,
OpsecPreBypassRole="other_operator",
OpsecPreMessage="Implemented, but not blocking, you're welcome!",
)
return response
async def opsec_post(self, taskData: PTTaskMessageAllData) -> PTTTaskOPSECPostTaskMessageResponse:
response = PTTTaskOPSECPostTaskMessageResponse(
TaskID=taskData.Task.ID, Success=True, OpsecPostBlocked=True,
OpsecPostBypassRole="other_operator",
OpsecPostMessage="Implemented, but not blocking, you're welcome! Part 2",
)
return response
async def create_go_tasking(self, taskData: MythicCommandBase.PTTaskMessageAllData) -> MythicCommandBase.PTTaskCreateTaskingMessageResponse:
response = MythicCommandBase.PTTaskCreateTaskingMessageResponse(
TaskID=taskData.Task.ID,
Success=True,
)
await SendMythicRPCArtifactCreate(MythicRPCArtifactCreateMessage(
TaskID=taskData.Task.ID, ArtifactMessage="{}".format(taskData.args.get_arg("command")),
BaseArtifactType="Process Create"
))
response.DisplayParams = taskData.args.get_arg("command")
return response
Sometimes you want your agent to be able to bring something to the operator's attention. Your task might return an error, but if it's a long-running task, then who knows if the operator is actively looking at the task.
Using the alerts keyword, agents can sent alert messages to Mythic's operation event log. There are two ways you can do this:
As part of a task, you can use another keyword, alerts to send the following structure:
"responses": [
{
"task_id": "some uuid here",
"alerts": [
{
"source": "source of this message", //optional
"alert": "the alert message you want to send to mythic"
}
]
]
You can send multiple alerts at once since it's an array.
The source field doesn't get displayed to the user, but it is used to collapse like-messages within the UI. If the user has an alert that's not resolved with a source of "bob", then the next message with a source of "bob" will NOT be displayed, but will instead simply increase the count of the current message. If the user resolves the message with a source of "bob" and a new one comes in, then that message WILL be displayed. This is to help prevent users from getting flooded with messages.
Sometimes you have other aspects to your agent that might be monitoring or running tasks and you want to report that data back to the user, but you don't have a specific task to associate it with. In that case, you can do the exact same alerts structure, but at a higher level in the structure:
{
"action": "get_tasking", // any action
"alerts": [
{
"source": "source of this message", //optional
"alert": "the alert message you want to send to mythic"
}
]
}The base format is an alert to display in the UI and the source of the alert. This can be extended though to provide more customization:
{
"action": "some action",
"alerts": [
{
"source": "String source of message", // optional
"level": "String level: warning, info, debug", // optional
"send_webhook": true, // optional boolean to send a webhook regardless of if this is a warning or not
"alert": "String message to display in UI event feed", // optional
"webhook_alert": {}, // optional dictionary data for webhook
}
]
}This extended format has a few more fields:
send_webhook - normally, if the level is not provided or is warning then an alert webhook is sent. However, if you set the level to something like info or debug, then you can optionally still force a webhook with this flag
level - this identifies how alert is presented to the user. warning is the default and will show a warning error as well as put a warning notification in the event log (increasing the warning count in the UI by 1). info is similar - it displays an informative message in the UI to the user and adds a message to the event log, but it isn't a warning message that needs to be addressed. debug will allow you to send a message to the event log, but it will not display a toast notification to the user.
alert - your normal string message that's displayed to the user and put in the event log
webhook_alert - optional dictionary data that doesn't get displayed to the user or put in the operation event log, but is instead sent along as custom data to the custom_webhook webhook for additional processing. Specifically, the data sent to the custom_webhook is as follows:
if err := RabbitMQConnection.EmitWebhookMessage(WebhookMessage{
OperationID: operationInfo.ID,
OperationName: operationInfo.Name,
OperationWebhook: operationInfo.Webhook,
OperationChannel: operationInfo.Channel,
OperatorUsername: "",
Action: WEBHOOK_TYPE_CUSTOM,
Data: map[string]interface{}{
"callback_id": callbackID,
"alert": alert.Alert,
"webhook_alert": alert.WebhookAlert,
"source": alert.Source,
},
}); err != nil {
logging.LogError(err, "Failed to send webhook")
}The main difference between submitting a response with a post_response and submitting responses with get_tasking is that in a get_tasking message with a responses key, you'll also get back additional tasking that's available. With a post_response message and a responses key, you won't get back additional tasking that's ready for your agent. You can still get socks, rpfwd, interact, and delegates messages as part of your message back from Mythic, but you won't have a tasks key.
The contents of the JSON message from the agent to Mythic when posting tasking responses is as follows:
Base64( CallbackUUID + JSON(
{
"action": "post_response",
"responses": [
{
"task_id": "uuid of task",
... response message (see below)
},
{
"task_id": "uuid of task",
... response message (see below)
}
], //if we were passing messages on behalf of other agents
"delegates": [
{"message": agentMessage, "c2_profile": "ProfileName", "uuid": "uuid here"},
{"message": agentMessage, "c2_profile": "ProfileName", "uuid": "uuid here"}
]
}
)
)There are two things to note here:
responses - This parameter is a list of all the responses for each tasking.
For each element in the responses array, we have a dictionary of information about the response. We also have a task_id field to indicate which task this response is for. After that though, comes the actual response output from the task.
If you don't want to hook a certain feature (like sending keystrokes, downloading files, creating artifacts, etc), but just want to return output to the user, the response section can be as simple as:
{"task_id": "uuid of task", "user_output": "output of task here"}
You can find many fields to send in the hooking features section, but outside of that you can set:
completed - boolean field to indicate that the task is done or not
status - string field to indicate the current status of the task. If the task completes successfully, you can set this to success, otherwise you can use it to indicate a generic error mesage to the user. If you start the status with error: then in the Mythic UI that status message will turn red to help indicate an error. Any other status you set will appear as blue text.
Each response style is described in Hooking Features. The format described in each of the Hooking features sections replaces the ... response message piece above
To continue adding to that JSON response, you can indicate that a command is finished by adding "completed": true or indicate that there was an error with "status": "error".
delegates - This parameter is not required, but allows for an agent to forward on messages from other callbacks. This is the peer-to-peer scenario where inner messages are passed externally by the egress point. Each of these messages is a self-contained "Agent Message".
Mythic responds with the following message format for post_response requests:
Base64( CallbackUUID + JSON(
{
"action": "post_response",
"responses": [
{
"task_id": UUID,
"status": "success" or "error",
"error": 'error message if it exists'
}
],
//if we were passing messages on behalf of other agents
"delegates": [
{"message": agentMessage, "c2_profile": "ProfileName", "uuid": "uuid here"},
{"message": agentMessage, "c2_profile": "ProfileName", "uuid": "uuid here"}
]
}
)
)If your initial responses array to Mythic has something improperly formatted and Mythic can't deserialize it into GoLang structs, then Mythic will simply set the responses array going back as empty. So, you can't always check for a matching response array entry for each response you send to Mythic. In this case, Mythic can't respond back with task_id in this response array because it failed to deserialize it completely.
There are two things to note here:
responses - This parameter is always a list and contains a success or error + error message for each task that was responded to.
delegates - This parameter contains any responses for the messages that came through in the first message
How does SOCKS work within Mythic
Socks provides a way to negotiate and transmit TCP connections through a proxy (https://en.wikipedia.org/wiki/SOCKS). This allows operators to proxy network tools through the Mythic server and out through supported agents. SOCKS5 allows a lot more options for authentication compared to SOCKS4; however, Mythic currently doesn't leverage the authenticated components, so it's important that if you open up this port on your Mythic server that you lock it down.
Opened SOCKS5 ports in Mythic do not leverage additional authentication, so MAKE SURE YOU LOCK DOWN YOUR PORTS.
Without going into all the details of the SOCKS5 protocol, agents transmit dictionary messages that look like the following:
{
"exit": True,
"server_id": 1234567,
"data": ""
}These messages contain three components:
exit - boolean True or False. This indicates to either Mythic or your Agent that the connection has been terminated from one end and should be closed on the other end (after sending data). Because Mythic and 2 HTTP connections sit between the actual tool you're trying to proxy and the agent that makes those requests on your tool's behalf, we need this sort of flag to indicate that a TCP connection has closed on one side.
server_id - uint32. This number is how Mythic and the agent can track individual connections. Every new connection from a proxied tool (like through proxychains) will generate a new server_id that Mythic will send with data to the Agent.
data - base64 string. This is the actual bytes that the proxied tool is trying to send.
In Python translation containers, if exit is True, then data can be None
These SOCKS messages are passed around as an array of dictionaries in get_tasking and post_response messages via a (added if needed) socks key:
{
"action": "get_tasking",
"tasking_size": 1,
"socks": [
{
"exit": False,
"server_id": 2,
"data": "base64 string"
},{
"exit": True,
"server_id": 1,
"data": ""
}
],
"delegates": []
}or in the post_response messages:
{
"action": "post_response",
"responses": [
{
"user_output": "blah",
"task_id": "uuid here",
"completed": true
}
],
"socks": [
{
"exit": False,
"server_id": 2,
"data": "base64 string"
},{
"exit": True,
"server_id": 1,
"data": ""
}
],
"delegates": []Notice that they're at the same level of "action" in these dictionaries - that's because they're not tied to any specific task, the same goes for delegate messages.
For the most part, the message processing is pretty straight forward:
Get a new SOCKS array
Get the first element from the list
If we know the server_id, then we can forward the message off to the appropriate thread or channel to continue processing. If we've never seen the server_id before, then it's likely a new connection that opened up from an operator starting a new tool through proxychains, so we need to handle that appropriately.
For new connections, the first message is always a SOCKS Request message with encoded data for IP:PORT to connect to. This means that SOCKS authenticaion is already done. There's also a very specific message that gets sent back as a response to this. This small negotiation piece isn't something that Mythic created, it's just part of the SOCKS protocol to ensure that a tool like proxychains gets confirmation the agent was able to reach the desired IP:PORT
For existing connections, the agent looks at if exit is True or not. If exit is True, then the agent should close its corresponding TCP connection and clean up those resources. If it's not exit, then the agent should base64 decode the data field and forward those bytes through the existing TCP connection.
The agent should also be streaming data back from its open TCP connections to Mythic in its get_tasking and post_response messages.
That's it really. The hard part is making sure that you don't exhaust all of the system resources by creating too many threads, running into deadlocks, or any number of other potential issues.
While not perfect, the poseidon agent have a generally working implementation for Mythic: https://github.com/MythicAgents/poseidon/blob/master/Payload_Type/poseidon/poseidon/agent_code/socks/socks.go
Download a file from the target to the Mythic server
This section is specifically for downloading a file from the agent to the Mythic server. Because these can be very large files that you task to download, a bit of processing needs to happen: the file needs to be chunked and routed through the agents.
In general, there's a few steps that happen for this process (visually this can be found on the Message Flow page):
The operator issues a task to download a file, such as download file.txt
This gets sent down to the agent in tasking, the agent locates the file, and determines it has the ability to read it. Now it needs to send the data back
The agent first gets the full path of the file so that it can return that data. That's a quality of life requirement so that operators don't need to supply the full path when specifying files, but so that Mythic can still properly track all files, especially ones that have the same name.
The agent then sends an initial message to the Mythic server indicating that it has a file to send. The agent specifies how many chunks it'll take, and which task this is for. If the agent specifies that there are -1 total chunks, then Mythic will expect at some point for the agent to return a total chunk count so that Mythic knows the transfer is over. This can be helpful when the agent isn't able to seek the file length ahead of time.
The Mythic server then registers that file in the database so it can be tracked. This results in a file UUID. The Mythic server sends back this UUID so that the agent and Mythic can make sure they're talking about the same file for the actual transfer.
The agent then starts chunking up the data and sending it chunk by chunk. Each message will have chunk_size amount of data base64 encoded, the file UUID from step 5, and which chunk number is being sent. Chunk numbers start at 1.
The Mythic server responds back with a successful acknowledgement that it received each chunk
It's not an extremely complex process, but it does require a bit more back-and-forth than a fire-and-forget style. This process allows Mythic to track how many chunks it'll take to download a file and how many have been downloaded so far. The rest of this page will walk through those steps with more concrete code examples.
When an agent is ready to transfer a file from agent to Mythic, it first needs to get the full_path of the file and determine how many chunks it'll take to transfer the file. It then creates the following structure:
{"action": "post_response", "responses": [
{
"task_id": "UUID here",
"download": {
"total_chunks": 4,
"full_path": "/test/test2/test3.file", // optional full path to the file downloaded
"host": "hostname the file is downloaded from", // optional
"filename": "filename for Mythic/operator if full_path doesn't make sense", // optional
"is_screenshot": false, //indicate if this is a file or screenshot (default is false)
"chunk_size": 512000, // indicate chunk size if intending to send chunks out of order or paralellized
}
}
]}The host field allows us to track if you're downloading files on the current host or remotely. If you leave this out or leave it blank (""), then it'll automatically be populated with the callback's hostname. Because you can use this same process for downloading files and downloading screenshots from the remote endpoint in a chunked fashion, the is_screenshot flag allows this distinction. This helps the UI track whether something should be shown in the screenshot pages or in the files pages. If this information is omitted, then the Mythic server assumes it's a file (i.e. is_screenshot is assumed to be false). This message is what's sent as an Action: post_response message.
What if you don't know the total number of chunks ahead of time? No worries - register as normal but for the total_chunks field put a negative value. Later on, when you're sending chunks, you can add in your total_chunks and Mythic will simply update it on the fly.
The full_path can be reported in any of the chunks and is an optional value. For example, if you collected a screenshot into memory and want to "download" it to Mythic, then there is no full_path to report back. In cases like this, you can specify a filename value that might make more sense (ex: screenshot 1, monitor 2, lsass memory dump, etc).
Mythic will respond with a file_id:
{"action": "post_response", "responses": [{
"status": "success",
"file_id": "UUID Here"
"task_id": "task uuid here",
}
]}The agent sends back each chunk sequentially and calls out the file_id its referring to along with the actual chunked data.
The chunk_num field is 1-based. So, the first chunk you send is "chunk_num": 1.
"Why on earth is chunk_num 1 based", you might be wondering. It's a legacy situation from Mythic 1.0 where everything was written in Python without proper struct tracking. This meant Mythic was having to do a lot of guess work for if keys weren't there or if agents were simply supplying "empty" or null fields that they weren't using as part of a message. This made it tricky to determine if an agent was referring to chunk 0 or if they were simply setting that value to 0 because it wasn't being used (especially if a user tried to download a file that was 0 bytes in size). Starting real chunk data at 1 made it much easier to determine the scenario.
Since then, Mythic was rewritten in Golang with stronger type checking, structs, and a slightly modified struct structure to help with all of this. Now it's a legacy thing so that everybody's agents don't have a breaking change.
{"action": "post_response", "responses": [{
{
"task_id": "task uuid",
"download": {
"chunk_num": 1,
"file_id": "UUID From previous response",
"chunk_data": "base64_blob==",
"chunk_size": 512000, // this is optional, but required if you're not sending it with the initial registration message and planning on sending chunks out of order
}
}
]}For each chunk, Mythic will respond with a success message if all went well:
{"action": "post_response", "responses": [{
{
"status": "success"
"task_id": "task uuid here"
}
]}Once all of the chunks have arrived, the file will be downloadable from the Mythic server. Mythic can handle chunks out of order, but needs to know the chunk_size first. The chunk_size allows Mythic to seek the right spot in the file on disk before writing that chunk's data. chunk_size is not the size of the current chunk, Mythic can determine that much, but rather the size of every chunk the agent will try to read at a time. The last chunk is most likely not going to be the same size as the other chunks; because of this, Mythic needs to know the size of chunks in general in case it gets the last chunk first.
How does Reverse Port Forward work within Mythic
Reverse port forwards provide a way to tunnel incoming connections on one port out to another IP:Port somewhere else. It normally provides a way to expose an internal service to a network that would otherwise not be able to directly access it.
Agents transmit dictionary messages that look like the following:
{
"exit": True,
"server_id": 1234567,
"data": "",
"port": 80, // optional, but if you support multiple rpfwd ports within a single callback, you need this so Mythic knows which rpfwd you're getting data from
}These messages contain three components:
exit - boolean True or False. This indicates to either Mythic or your Agent that the connection has been terminated from one end and should be closed on the other end (after sending data). Because Mythic and 2 HTTP connections sit between the actual tool you're trying to proxy and the agent that makes those requests on your tool's behalf, we need this sort of flag to indicate that a TCP connection has closed on one side.
server_id - unsigned int32. This number is how Mythic and the agent can track individual connections. Every new connection will generate a new server_id . Unlike SOCKS where Mythic is getting the initial connection, the agent is getting the initial connection in a reverse port forward. In this case, the agent needs to generate this random uint32 value to track connections.
data - base64 string. This is the actual bytes that the proxied tool is trying to send.
port - an optional uint32 value that specifies the port you're listening on within your agent. If your agent allows for multiple rpfwd commands within a single callback, then you need to specify this port so that Mythic knows which rpfwd command this data is associated with and can redirect it out to the appropriate remote IP:Port combination. This port value is specifically the local port your agent is listening on, not the port for the remote connection.
In Python translation containers, if exit is True, then data can be None
These RPFWD messages are passed around as an array of dictionaries in get_tasking and post_response messages via a (added if needed) rpfwd key:
{
"action": "get_tasking",
"tasking_size": 1,
"rpfwd": [
{
"exit": False,
"server_id": 2,
"data": "base64 string",
"port": 80,
},{
"exit": True,
"server_id": 1,
"data": "",
"port": 445,
}
],
"delegates": []
}or in the post_response messages:
{
"action": "post_response",
"responses": [
{
"user_output": "blah",
"task_id": "uuid here",
"completed": true
}
],
"rpfwd": [
{
"exit": False,
"server_id": 2,
"data": "base64 string",
"port": 80,
},{
"exit": True,
"server_id": 1,
"data": "",
"port": 80,
}
],
"delegates": []Notice that they're at the same level of "action" in these dictionaries - that's because they're not tied to any specific task, the same goes for delegate messages.
For the most part, the message processing is pretty straight forward:
Agent opens port X on the target host where it's running
ServerA makes a connection to PortX
Agent accepts the connection, generates a new uint32 server_id, and sends any data received to Mythic via rpfwd key. If the agent is tracking multiple ports, then it should also send the port the connection was received on with the message.
Mythic looks up the server_id (and optionally port) for that Callback if Mythic has seen this server_id, then it can pass it off to the appropriate thread or channel to continue processing. If we've never seen the server_id before, then it's likely a new connection that opened up, so we need to handle that appropriately. Mythic makes a new connection out to the RemoteIP:RemotePort specified when starting the rpfwd session. Mythic forwards the data along and waits for data back. Any data received is sent back via the rpfwd key the next time the agent checks in.
For existing connections, the agent looks at if exit is True or not. If exit is True, then the agent should close its corresponding TCP connection and clean up those resources. If it's not exit, then the agent should base64 decode the data field and forward those bytes through the existing TCP connection.
The agent should also be streaming data back from its open TCP connections to Mythic in its get_tasking and post_response messages.
That's it really. The hard part is making sure that you don't exhaust all of the system resources by creating too many threads, running into deadlocks, or any number of other potential issues.
While not perfect, the poseidon agent have a generally working implementation for Mythic: https://github.com/MythicAgents/poseidon/blob/master/Payload_Type/poseidon/poseidon/agent_code/rpfwd/rpfwd.go
This page describes the format for getting new tasking
The contents of the JSON message from the agent to Mythic when requesting tasking is as follows:
Base64( CallbackUUID + JSON(
{
"action": "get_tasking",
"tasking_size": 1, //indicate the maximum number of tasks you want back
//if passing on messages for other agents, include the following
"delegates": [
{"message": agentMessage, "c2_profile": "ProfileName", "uuid": "uuid here"},
{"message": agentMessage, "c2_profile": "ProfileName", "uuid": "uuid here"}
],
"get_delegate_tasks": true, //optional, defaults to true
}
)
)There are two things to note here:
tasking_size - This parameter defaults to one, but allows an agent to request how many tasks it wants to get back at once. If the agent specifies -1 as this value, then Mythic will return all of the tasking it has for that callback.
delegates - This parameter is not required, but allows for an agent to forward on messages from other callbacks. This is the peer-to-peer scenario where inner messages are passed externally by the egress point. Each of these agentMessage is a self-contained "Agent Message" and the c2_profile indicates the name of the C2 Profile used to connect the two agents. This allows Mythic to properly decode/translate the messages even for nested messages.
get_delegate_tasks - This is an optional parameter. If you don't include it, it's assumed to be True. This indicates whether or not this get_tasking request should also check for tasks that belong to callbacks that are reachable from this callback. So, if agentA has a route to agentB, agentB has a task in the submitted state, and agentA issues a get_tasking, agentA can decide if it wants just its own tasking or if it also wants to pick up agentB's task as well.
Why does this matter? This is helpful if your linked agents issue their own periodic get_tasking messages rather than simply waiting for tasking to come to them. This way the parent callback (agentA in this case) doesn't accidentally consume and toss aside the task for agentB; instead, agentB's own periodic get_tasking message has to make its way up to Mythic for the task to be fetched.
Mythic responds with the following message format for get_tasking requests:
Base64( CallbackUUID + JSON(
{
"action": "get_tasking",
"tasks": [
{
"command": "command name",
"parameters": "command param string",
"timestamp": 1578706611.324671, //timestamp provided to help with ordering
"id": "task uuid",
}
],
//if we were passing messages on behalf of other agents
"delegates": [
{"message": agentMessage, "c2_profile": "ProfileName", "uuid": "uuid here"},
{"message": agentMessage, "c2_profile": "ProfileName", "uuid": "uuid here"}
]
}
)
)There are a few things to note here:
tasks - This parameter is always a list, but contains between 0 and tasking_size number of entries.
parameters - this encapsulates the parameters for the task. If a command has parameters like: {"remote_path": "/users/desktop/test.png", "file_id": "uuid_here"}, then the params field will have that JSON blob as a STRING value (i.e. the command is responsible to parse that out).
delegates - This parameter contains any responses for the messages that came through in the first message.
class ContainerOnStartMessage:
def __init__(self,
container_name: str = "",
operation_id: int = 0,
server_name: str = "",
apitoken: str = "",
**kwargs):
self.ContainerName = container_name
self.OperationID = operation_id
self.ServerName = server_name
self.APIToken = apitoken
def to_json(self):
return {
"container_name": self.ContainerName,
"operation_id": self.OperationID,
"server_name": self.ServerName,
"apitoken": self.APIToken
}
class ContainerOnStartMessageResponse:
def __init__(self,
ContainerName: str = "",
EventLogInfoMessage: str = "",
EventLogErrorMessage: str = ""):
self.ContainerName = ContainerName
self.EventLogInfoMessage = EventLogInfoMessage
self.EventLogErrorMessage = EventLogErrorMessage
def to_json(self):
return {
"container_name": self.ContainerName,
"stdout": self.EventLogInfoMessage,
"stderr": self.EventLogErrorMessage
}
async def on_container_start(self, message: ContainerOnStartMessage) -> ContainerOnStartMessageResponse:
return ContainerOnStartMessageResponse(ContainerName=self.name)The main page to see and interactive with active callbacks can be found from the phone icon at the top of the screen.
The top table has a list of current callbacks with a bunch of identifying information. All of the table headers can be clicked to sort the information in ascending or descending order.
Callback - The identifying callback number. The blue or red button will bring the bottom section into focus, load the previously issued tasks for that callback, and populate the bottom section with the appropriate information (discussed in the next section).
If the integrity_level of the callback is <= 2, then the callback button will be blue. Otherwise it'll be red (indicating high integrity) and there will be an * next to the username. It's up to the agent to report back its own integrity level
Host - The hostname for the machine the callback is from
IP - The IP associated with the host
User - The current user context of the callback
PID - The process ID for the callback
OS (arch) - This is the OS and architecture information for the host
Initial Checkin - The time when the callback first checked in. This date is stored in UTC in the database, but converted to the operator's local time zone on the page.
Last Checkin - How long it's been since the last checkin in day:hour:minute:second time\
Description - The current description of the callback. The default value for this is specified by the default description section when creating a payload. This can be changed either via the callback's dropdown.
Next to the Interact button is a dropdown button that provides more accessible information:
Expand Callback - This opens up the callback in a separate window where you can either just view that whole callback full screen, or selectively add other callbacks to view in a split view
Edit Description - This allows you to edit the description of a callback. This will change the side description at the end and also rename the tab at the bottom when somebody clicks interact. To set this back to the default value, interact with the callback and type set description reset. or set this to an empty string
Hide Callback - This removes the callback from the current view and sets it to inactive. Additionally, from the Search page, you can make the callback Active again which will bring it back into view here.
Hide Multiple - allows you to hide multiple callbacks at once instead of doing one at a time.
Process Browser - This allows you to view a unified process listing from all agents related to this host, but issue new process listing requests from within this callback's context
Locked - If a callback is locked by a specific user, this will be indicated here (along with a changed user and lock icon instead of a keyboard on the interacting button).
File Browser - this allows you to view a process browser across all of the agents.
Task Multiple - this allows you to task multiple callbacks of the same Payload Type at once.
The bottom area is where you'll find the tasks, process listings, file browsers, and comments related to specific callbacks. Clicking the keyboard icon on a callback will open or select the corresponding tab in this area.
When you start typing a command, you can press Tab to finish out and cycle through the matching commands. If you don't type anything and hit Tab then you'll cycle through all available commands. You can use the up and down arrow keys to cycle through the tasking history for that callback, and you can use ctrl+r to do a reverse grep search through your previous history as well.
Submitting a command goes through a few phases that are also color coded to help visually see the state of your task:
Preprocessing - This is when the command is submitted to Mythic, but execution is passed to the associated Payload Type's command file for processing. These capabilities are covered in more depth in the Payload Types section.
Submitted- The task has finished pre-processing and is ready for the agent to request it.
Processing - The agent has pulled down the task, but has not returned anything.
Processed - The agent has returned at least one response for the task, but hasn't explicitly marked the task as completed
Completed - The agent has reported the task done successfully
Error -The agent reported that there was an error with executing the task.
Once you've submitted tasking, there's a bit of information that'll be automatically displayed.
The user that submitted the task
The task number - You can click on this task number to view just that task and its output in a separate page. This makes it easy to share the output of a task between members of an operation.
The command and any parameters supplied by the operator
The very bottom right hand of the screen has a little filter button that you can click to filter out what you see in your callbacks. The filtering only applies as long as you're on that callback page (i.e. it gets reset when you refresh the page).

There are scenarios in which you need a Mythic container for an agent, but you can't (or don't want) to use the normal docker containers that Mythic uses. This could be for reasons like:
You have a custom build environment that you don't want to recreate
You have specific kernel versions or operating systems you're wanting to develop with
So, to leverage your own custom VM or physical computer into a Mythic recognized container, there are just a few steps.
External agents need to connect to mythic_rabbitmq in order to send/receive messages. They also need to connect to the mythic_server to transfer files and potentially use gRPC. By default, these container is bound on localhost only. In order to have an external agent connect up, you will need to adjust this in the Mythic/.env file to have RABBITMQ_BIND_LOCALHOST_ONLY=false and MYTHIC_SERVER_BIND_LOCALHOST_ONLY=false and restart Mythic (sudo ./mythic-cli restart).
Install python 3.10+ (or Golang 1.21) in the VM or on the computer
pip3 install mythic-container (this has all of the definitions and functions for the container to sync with Mythic and issue RPC commands). Make sure you get the right version of this PyPi package for the version of Mythic you're using (). Alternatively, go get -u github.com/MythicMeta/MythicContainer for golang.
Create a folder on the computer or VM (let's call it path /pathA). Essentially, your /pathA path will be the new InstalledServices/[agent name] folder. Create a sub folder for your actual agent's code to live, like /pathA/agent_code. You can create a Visual Studio project here and simply configure it however you need.
Your command function definitions and payload definition are also helpful to have in a folder, like /pathA/agent_functions.
Edit the /pathA/rabbitmq_config.json with the parameters you need
the mythic_server_host value should be the IP address of the main Mythic install
the rabbitmq_host value should be the IP address of the main Mythic install unless you're running rabbitmq on another host.
You'll need the password of rabbitmq from your Mythic instance. You can either get this from the Mythic/.env file, by running sudo ./mythic-cli config get rabbitmq_password, or if you run sudo ./mythic-cli config payload you'll see it there too.
External agents need to connect to mythic_rabbitmq in order to send/receive messages. By default, this container is bound on localhost only. In order to have an external agent connect up, you will need to adjust this in the Mythic/.env file to have RABBITMQ_BIND_LOCALHOST_ONLY=false and restart Mythic (sudo ./mythic-cli restart). You'll also need to set MYTHIC_SERVER_BIND_LOCALHOST_ONLY=false.
In the file where you define your payload type is where you define what it means to "build" your agent.
Run python3.10 main.py and now you should see this container pop up in the UI
If you already had the corresponding payload type registered in the Mythic interface, you should now see the red text turn green.
You should see output similar to the following:
If you mythic instance has a randomized password for rabbitmq_password, then you need to make sure that the password from Mythic/.env after you start Mythic for the first time is copied over to your vm. You can either add this to your rabbitmq_config.json file or set it as an environment variable (MYTHIC_RABBITMQ_PASSWORD).
There are a few caveats to this process over using the normal process. You're now responsible for making sure that the right python version and dependencies are installed, and you're now responsible for making sure that the user context everything is running from has the proper permissions.
One big caveat people tend to forget about is paths. Normal containers run on *nix, but you might be doing this dev on Windows. So if you develop everything for windows paths hard-coded and then want to convert it to a normal Docker container later, that might come back to haunt you.
Whether you're using a Docker container or not, you can load up the code in your agent_code folder in any IDE you want. When an agent is installed via mythic-cli, the entire agent folder (agent_code and mythic) is mapped into the Docker container. This means that any edits you make to the code is automatically reflected inside of the container without having to restart it (pretty handy). The only caveat here is if you make modifications to the python or golang definition files will require you to restart your container to load up the changes sudo ./mythic-cli start [payload name]. If you're making changes to those from a non-Docker instance, simply stop your python3.8 main.py and start it again. This effectively forces those files to be loaded up again and re-synced over to Mythic.
If you're doing anything more than a typo fix, you're going to want to test the fixes/updates you've made to your code before you bother uploading it to a GitHub project, re-installing it, creating new agents, etc. Luckily, this can be super easy.
Say you have a Visual Studio project set up in your agent_code directory and you want to just "run" the project, complete with breakpoints and configurations so you can test. The only problem is that your local build needs to be known by Mythic in some way so that the Mythic UI can look up information about your agent, your "installed" commands, your encryption keys, etc.
To do this, you first need to generate a payload in the Mythic UI (or via Mythic's Scripting). You'll select any C2 configuration information you need, any commands you want baked in, etc. When you click to build, all of that configuration will get sent to your payload type's "build" function in mythic/agent_functions/builder.py. Even if you don't have your container running or it fails to build, no worries, Mythic will first save everything off into the database before trying to actually build the agent. In the Mythic UI, now go to your payloads page and look for the payload you just tried to build. Click to view the information about the payload and you'll see a summary of all the components you selected during the build process, along with some additional pieces of information (payload UUID and generated encryption keys).
Take that payload UUID and the rest of the configuration and stamp it into your agent_code build. For some agents this is as easy as modifying the values in a Makefile, for some agents this can all be set in a config file of some sort, but however you want to specify this information is up to you. Once all of that is set, you're free to run your agent from within your IDE of choice and you should see a callback in Mythic. At this point, you can do whatever code mods you need, re-run your code, etc.
Following from the previous section, if you just use the payload UUID and run your agent, you should end up with a new callback each time. That can be ideal in some scenarios, but sometimes you're doing quick fixes and want to just keep tasking the same callback over and over again. To do this, simply pull the callback UUID and encryption keys from the callback information on the active callbacks page and plug that into your agent. Again, based on your agent's configuration, that could be as easy as modifying a Makefile, updating a config file, or you might have to manually comment/uncomment some lines of code. Once you're reporting back with the callback UUID instead of the payload UUID and using the right encryption keys, you can keep re-running your build without creating new callbacks each time.
Manipulate tasking before it's sent to the agent
All commands must have a create_go_tasking function with a base case like:
When an operator types a command in the UI, whatever the operator types (or whatever is populated based on the popup modal) gets sent to this function after the input is parsed and validated by the TaskArguments and CommandParameters functions mentioned in .
It's here that the operator has full control of the task before it gets sent down to an agent. The task is currently in the "preprocessing" stage when this function is executed and allows you to do many things via Remote Procedure Calls (RPC) back to the Mythic server.
So, from this create tasking function, what information do you immediately have available? <-- this class definition provides the basis for what's available.
taskData.Task - Information about the Task that's issued
taskData.Callback - Information about the Callback for this task
taskData.Payload - Information about the packing payload for this callback
taskData.Commands - A list of the commands currently loaded into this callback
taskData.PayloadType - The name of this payload type
taskData.BuildParameters - The build parameters and their values used when building the payload for this callback
taskData.C2Profiles - Information about the C2 Profiles included inside of this callback.
taskData.args - access to the associated arguments class for this command that already has all of the values populated and validated. Let's say you have an argument called "remote_path", you can access it via taskData.args.get_arg("remote_path") .
Want to change the value of that to something else? taskData.args.add_arg("remote_path", "new value").
Want to change the value of that to a different type as well? taskData.args.add_arg("remote_path", 5, ParameterType.Number)
Want to add a new argument entirely for this specific instance as part of the JSON response? taskData.args.add_arg("new key", "new value"). The add_arg functionality will overwrite the value if the key exists, otherwise it'll add a new key with that value. The default ParameterType for args is ParameterType.String, so if you're adding something else, be sure to change the type. Note: If you have multiple parameter groups as part of your tasking, make sure you specify which parameter group your new argument belongs to. By default, the argument gets added to the Default parameter group. This could result in some confusion where you add an argument, but it doesn't get picked up and sent down to the agent.
You can also remove args taskData.args.remove_arg("key"), rename args taskData.args.rename_arg("old key", "new key")
You can also get access to the user's commandline as well via taskData.args.commandline
Want to know if an arg is in your args? taskData.args.has_arg("key")
taskData.Task.TokenID - information about the token that was used with the task. This requires that the callback has at some point returned tokens for Mythic to track, otherwise this will be 0.
In the PTTaskCreateTaskingMessageResponse, you can set a variety of attributes to reflect changes back to Mythic as a result of your processing:
Success - did your processing succeed or not? If not, set Error to a string value representing the error you encountered.
CommandName - If you want the agent to see the command name for this task as something other than what the actual command's name is, reflect that change here. This can be useful if you are creating an alias for a command. So, your agent has the command ls, but you create a script_only command dir. During the processing of dir you set the CommandName to ls so that the agent sees ls and processes it as normal.
TaskStatus - If something went wrong and you want to reflect a specific status to the user, you can set that value here. Status that start with error: will appear red in the UI.
Stdout and Stderr - set these if you want to provide some additional stdout/stderr for the task but don't necessarily want it to clutter the user's interface. This is helpful if you're doing additional compliations as part of your tasking and want to store debug or error information for later.
Completed - If this is set to True then Mythic will mark the task as done and won't allow an agent to pick it up.
CompletionFunctionName - if you want to have a specific local function called when the task completes (such as to do follow-on tasking or more RPC calls), then specify that function name here. This requires a matching entry in the command's completion_functions like follows:
ParameterGroupName - if you want to explicitly set the parameter group name instead of letting Mythic figure it out based on which parameters have values, you can specify that here.
DisplayParams - you can set this value to a string that you'd want the user to see instead of the taskData.Task.OriginalParams. This allows you to leverage the JSON structure of the popup modals for processing, but return a more human-friendly version of the parameters for operators to view. There's a new menu-item in the UI when viewing a task that you can select to view all the parameters, so on a case-by-case basis an operator can view the original JSON parameters that were sent down, but this provides a nice way to prevent large JSON blobs that are hard to read for operators while still preserving the nice JSON scripting features on the back-end.
This additional functionality is broken out into a series of files () file that you can import at the top of your Python command file.
They all follow the same format:
This section talks about the different components for creating messages from the agent to a C2 docker container and how those can be structured within a C2 profile. Specifically, this goes into the following components:
How are formatted
How to perform and do encrypted
How to
How to
Files
Another major component of the agent side coding is the actual C2 communications piece within your agent. This piece is how your agent actually implements the C2 components to do its magic.
Every C2 profile has zero or more C2 Parameters that go with it. These describe things like callback intervals, API keys to use, how to format web requests, encryption keys, etc. These parameters are specific to that C2 profile, so any agent that "speaks" that c2 profile's language will leverage these parameters. If you look at the parameters in the UI, you'll see:
Name - When creating payloads or issuing tasking, you will get a dictionary of name -> user supplied value for you to leverage. This is a unique key per C2 profile (ex: callback_host)
description - This is what's presented to the user for the parameter (ex: Callback host or redirector in URL format)
default_value - If the user doesn't supply a value, this is the default one that will be used
verifier_regex - This is a regex applied to the user input in the UI for a visual cue that the parameter is correct. An example would be ^(http|https):\/\/[a-zA-Z0-9]+ for the callback_host to make sure that it starts with http:// or https:// and contains at least one letter/number.
required - Indicate if this is a required field or not.
randomized - This is a boolean indicating if the parameter should be randomized each time. This comes into play each time a payload is generated with this c2 profile included. This allows you to have a random value in the c2 profile that's randomized for each payload (like a named pipe name).
format_string - If randomized is true, then this is the regex format string used to generate that random value. For example, [a-z0-9]{8}-[a-z0-9]{4}-[a-z0-9]{4}-[a-z0-9]{4}-[a-z0-9]{12} will generate a UUID4 each time.
{
"rabbitmq_host": "127.0.0.1",
"rabbitmq_password": "PqR9XJ957sfHqcxj6FsBMj4p",
"mythic_server_host": "127.0.0.1",
"webhook_default_channel": "#mythic-notifications",
"debug_level": "debug",
"rabbitmq_port": 5432,
"mythic_server_grpc_port": 17444,
"webhook_default_url": "",
"webhook_default_callback_channel": "",
"webhook_default_feedback_channel": "",
"webhook_default_startup_channel": "",
"webhook_default_alert_channel": "",
"webhook_default_custom_channel": "",
}itsafeature@spooky my_container % python3 main.py
INFO 2023-04-03 21:17:10,899 initialize 29 : [*] Using debug level: debug
INFO 2023-04-03 21:17:10,899 start_services 267 : [+] Starting Services with version v1.0.0-0.0.7 and PyPi version 0.2.0-rc9
INFO 2023-04-03 21:17:10,899 start_services 270 : [*] Processing webhook service
INFO 2023-04-03 21:17:10,899 syncWebhookData 261 : Successfully started webhook service
INFO 2023-04-03 21:17:10,899 start_services 281 : [*] Processing agent: apfell
INFO 2023-04-03 21:17:10,902 syncPayloadData 104 : [*] Processing command jsimport
INFO 2023-04-03 21:17:10,902 syncPayloadData 104 : [*] Processing command chrome_tabs
DEBUG 2023-04-03 21:17:10,915 SendRPCMessage 132 : Sending RPC message to pt_sync
INFO 2023-04-03 21:17:10,915 GetConnection 84 : [*] Trying to connect to rabbitmq at: 127.0.0.1:5672
INFO 2023-04-03 21:17:10,999 GetConnection 98 : [+] Successfully connected to rabbitmq
INFO 2023-04-03 21:17:11,038 ReceiveFromMythicDirectTopicExchange 306 : [*] started listening for messages on emit_webhook.new_callback
INFO 2023-04-03 21:17:11,038 ReceiveFromMythicDirectTopicExchange 306 : [*] started listening for messages on emit_webhook.new_feedback
INFO 2023-04-03 21:17:11,051 ReceiveFromMythicDirectTopicExchange 306 : [*] started listening for messages on emit_webhook.new_startup
INFO 2023-04-03 21:17:13,240 syncPayloadData 123 : [+] Successfully synced apfell


Upload a file from Mythic to the target
This section is specifically for uploading a file from the Mythic server to an agent. Because these messages aren't just to an agent directly (they can be routed through a p2p mesh), they can't just be as simple as a GET request to download a file. The file needs to be chunked and routed through the agents. This isn't specific to the upload command, this is for any command that wants to leverage a file from Mythic.
In general, there's a few steps that happen for this process (this can be seen visually on the Message Flow page):
The operator issues some sort of tasking that has a parameter type of "File". You'll notice this in the Mythic user interface because you'll always see a popup for you to supply a file from your file system.
Once you select a file and hit submit, Mythic loops through all of the files selected and registers them. This process sends each one down to Mythic, saves it off to disk, and assigns it a UUID. These UUIDs are what's stored in place of the raw bytes when you submit your task. So, if you had an upload command that takes a file and a path, your arguments would end up looking like {"file":"uuid", "path": "/some/path"} rather than {"file": raw bytes of file, "path": "/some/path"}.
In the Payload Type's corresponding command python file there is a function called create_tasking that handles the processing of tasks from users before handing them off to the database to be fetched by an agent. If your agent supports chunking and transferring files that way, then you don't need to do anything else, but if your agent requires that you send down the entire file's contents as part of your parameters, you need to get the associated file.
To get the file with Mythic, there's an RPC call we can do:
async def create_tasking(self, task: MythicTask) -> MythicTask:
file_resp = await MythicRPC().execute("get_file",
file_id=task.args.get_arg("file_id"),
task_id=task.id,
get_contents=False)
if file_resp.status == MythicRPCStatus.Success:
original_file_name = file_resp.response[0]["filename"]
else:
raise Exception("Error from Mythic: " + str(file_resp.error))
task.display_params = f"script {original_file_name}"
file_resp = await MythicRPC().execute("update_file",
file_id=task.args.get_arg("file_id"),
delete_after_fetch=False,
comment="Uploaded into memory for jsimport")
return taskLines 2-5 is where we do an RPC call with Mythic to search for files, specifically, we want ones where the file_id matches the one that was passed down as part of our parameters. This should only return one result, but the result, for consistency, will always come back as an Array. So, file_resp.response is an array of file information, we'll take the filename from the first entry. We can use this to get the original filename back out from Mythic from the user's upload command. If there's something we want to modify about the file (such as adding a comment automatically or indicating that the file should be deleted from disk after the agent fetches it) we can use the update_file RPC function to do so.
4. The agent gets the tasking and sees that there's a file UUID it needs to pull. It sends an initial message to Mythic saying that it will be downloading the file in chunks of a certain size and requests the first chunk. If the agent is going to be writing the file to disk (versus just pulling down the file into memory), then the agent should also send full_path. This allows Mythic to track a new entry in the database with an associated task for uploads. The full_path key lives at the same level as user_output, total_chunks, etc in the post_response .
5. The Mythic server gets the request for the file, makes sure the file exists and belongs to this operation, then gets the first chunk of the file as specified by the agent's chunk_size and also reports to the agent how many chunks there are.
6. The Agent can now use this information to request the rest of the chunks of the file.
It's not an extremely complex process, but it does require a bit more back-and-forth than a fire-and-forget style. The rest of this page will walk through those steps with more concrete code examples.
There is no expectation when doing uploads or downloads that the operator must type the absolute path to a file, that's a bit of a strict requirement. Instead, Mythic allows operators to specify relative paths and has an option in the upload action to specify the actual full path (this option also exists for downloading files so that the absolute path can be returned for better tracking). This allows Mythic to properly track absolute file system paths that might have the same resulting file name without an extra burden on the operator.
Files can (optionally) be pulled down multiple times (if you set delete_after_fetch as True, then the file won't exist on disk after the first fetch and thus can't be re-used). This is to prevent bloating up the server with unnecessary files.
An agent pulling down a file to the target is similar to downloading a file from the target to Mythic. The agent makes the following request to Mythic:
Base64( CallbackUUID + JSON(
{
"action": "post_response",
"responses": [
{
"upload": {
"chunk_size": 512000, //bytes of file per chunk
"file_id": UUID, //the file specified to pull down to the target
"chunk_num": #, // which chunk are we currently pulling down
"full_path": "full path to uploaded file on target" //optional
},
"task_id": task_id // the associated task that caused the agent to pull down this file
}]
}
))The chunk_num field is 1-based. So, the first chunk you request is "chunk_num": 1.
The full_path parameter is helpful for accurate tracking. This allows an operator to be in the /Temp directory and simply call the upload function to the current directory, but allows Mythic to track the full path for easier reporting and deconfliction.
The agent gets back a message like:
Base64( CallbackUUID + JSON(
{
"action": "post_response",
"responses": [ {
"status": "success or error",
"error": "error message if status is error, otherwise key not present",
"total_chunks": #, // given the previous chunk size, the total num of chunks
"chunk_num": #, //the current chunk number Mythic is returning
"chunk_data": "base64_of_data" // the actual file data,
"file_id": "file id that was requested",
"task_id": "UUID of task" // task id that was presented in the request for tracking
}
]
}
))This process repeats as many as times as is necessary to pull down all of the contents of the file.
If there is an error pulling down a file, the server will respond with as much information as possible and blank out the rest (i.e.: {'action': 'post_response', 'responses': [ {'total_chunks': 0, 'chunk_num': 0, 'chunk_data': '', 'file_id': '', 'task_id': '', 'status': 'error', 'error': 'some error message'} ] })
If the task_id was there in the request, but there was an error with some other piece, then the task_id will be present in the response with the right value.
There's a reason that files aren't base64 encoded and placed inside the initial tasking blobs. Keeping the files tracked by the main Mythic system and used in a separate call allows the initial messages to stay small and allows for the agent and C2 mechanism to potentially cache or limit the size of the transfers as desired.
Consider the case of using DNS as the C2 mechanism. If the file mentioned in this section was sent through this channel, then the traffic would potentially explode. However, having the option for the agent to pull the file via HTTP or some other mechanism gives greater flexibility and granular control over how the C2 communications flow.


completion_functions = {"formulate_output": formulate_output}async def SendMythicRPC*(MythicRPC*Message) -> MythicRPC*MessageResponseasync def create_go_tasking(self, taskData: MythicCommandBase.PTTaskMessageAllData) -> MythicCommandBase.PTTaskCreateTaskingMessageResponse:
response = MythicCommandBase.PTTaskCreateTaskingMessageResponse(
TaskID=taskData.Task.ID,
Success=True,
)
return response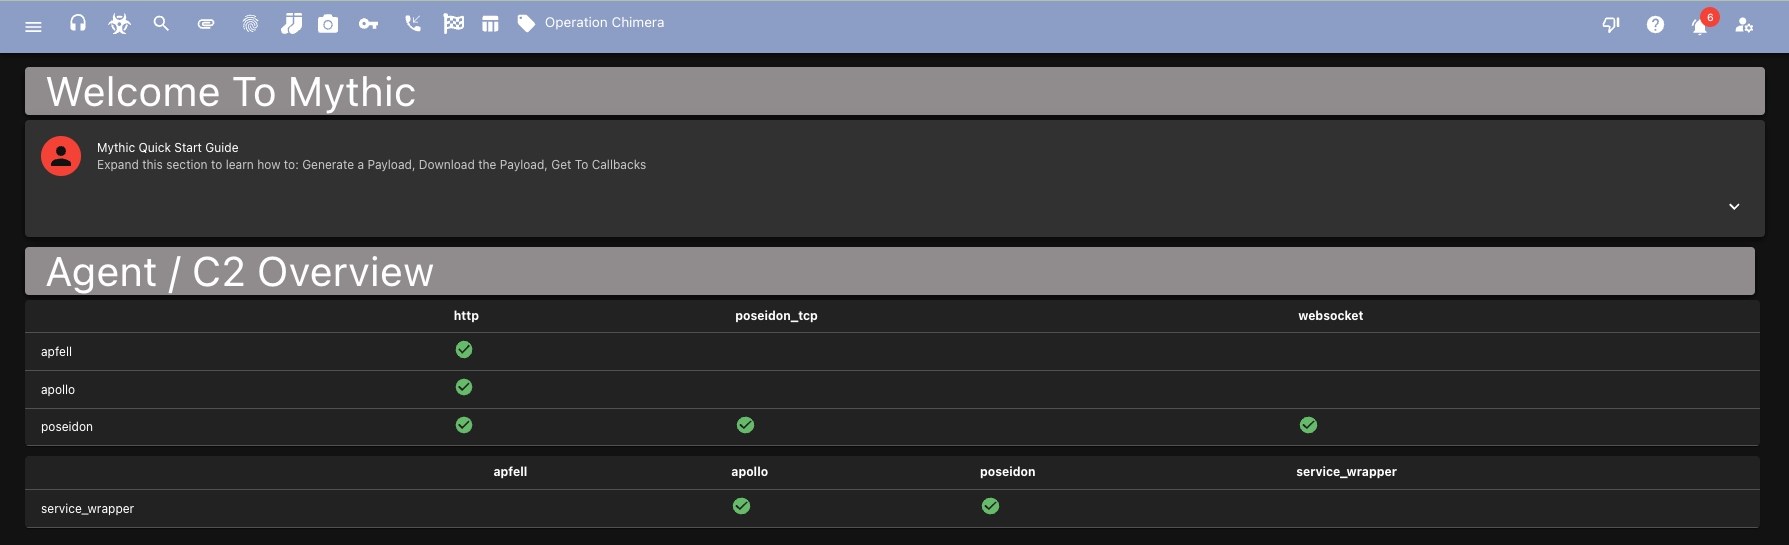
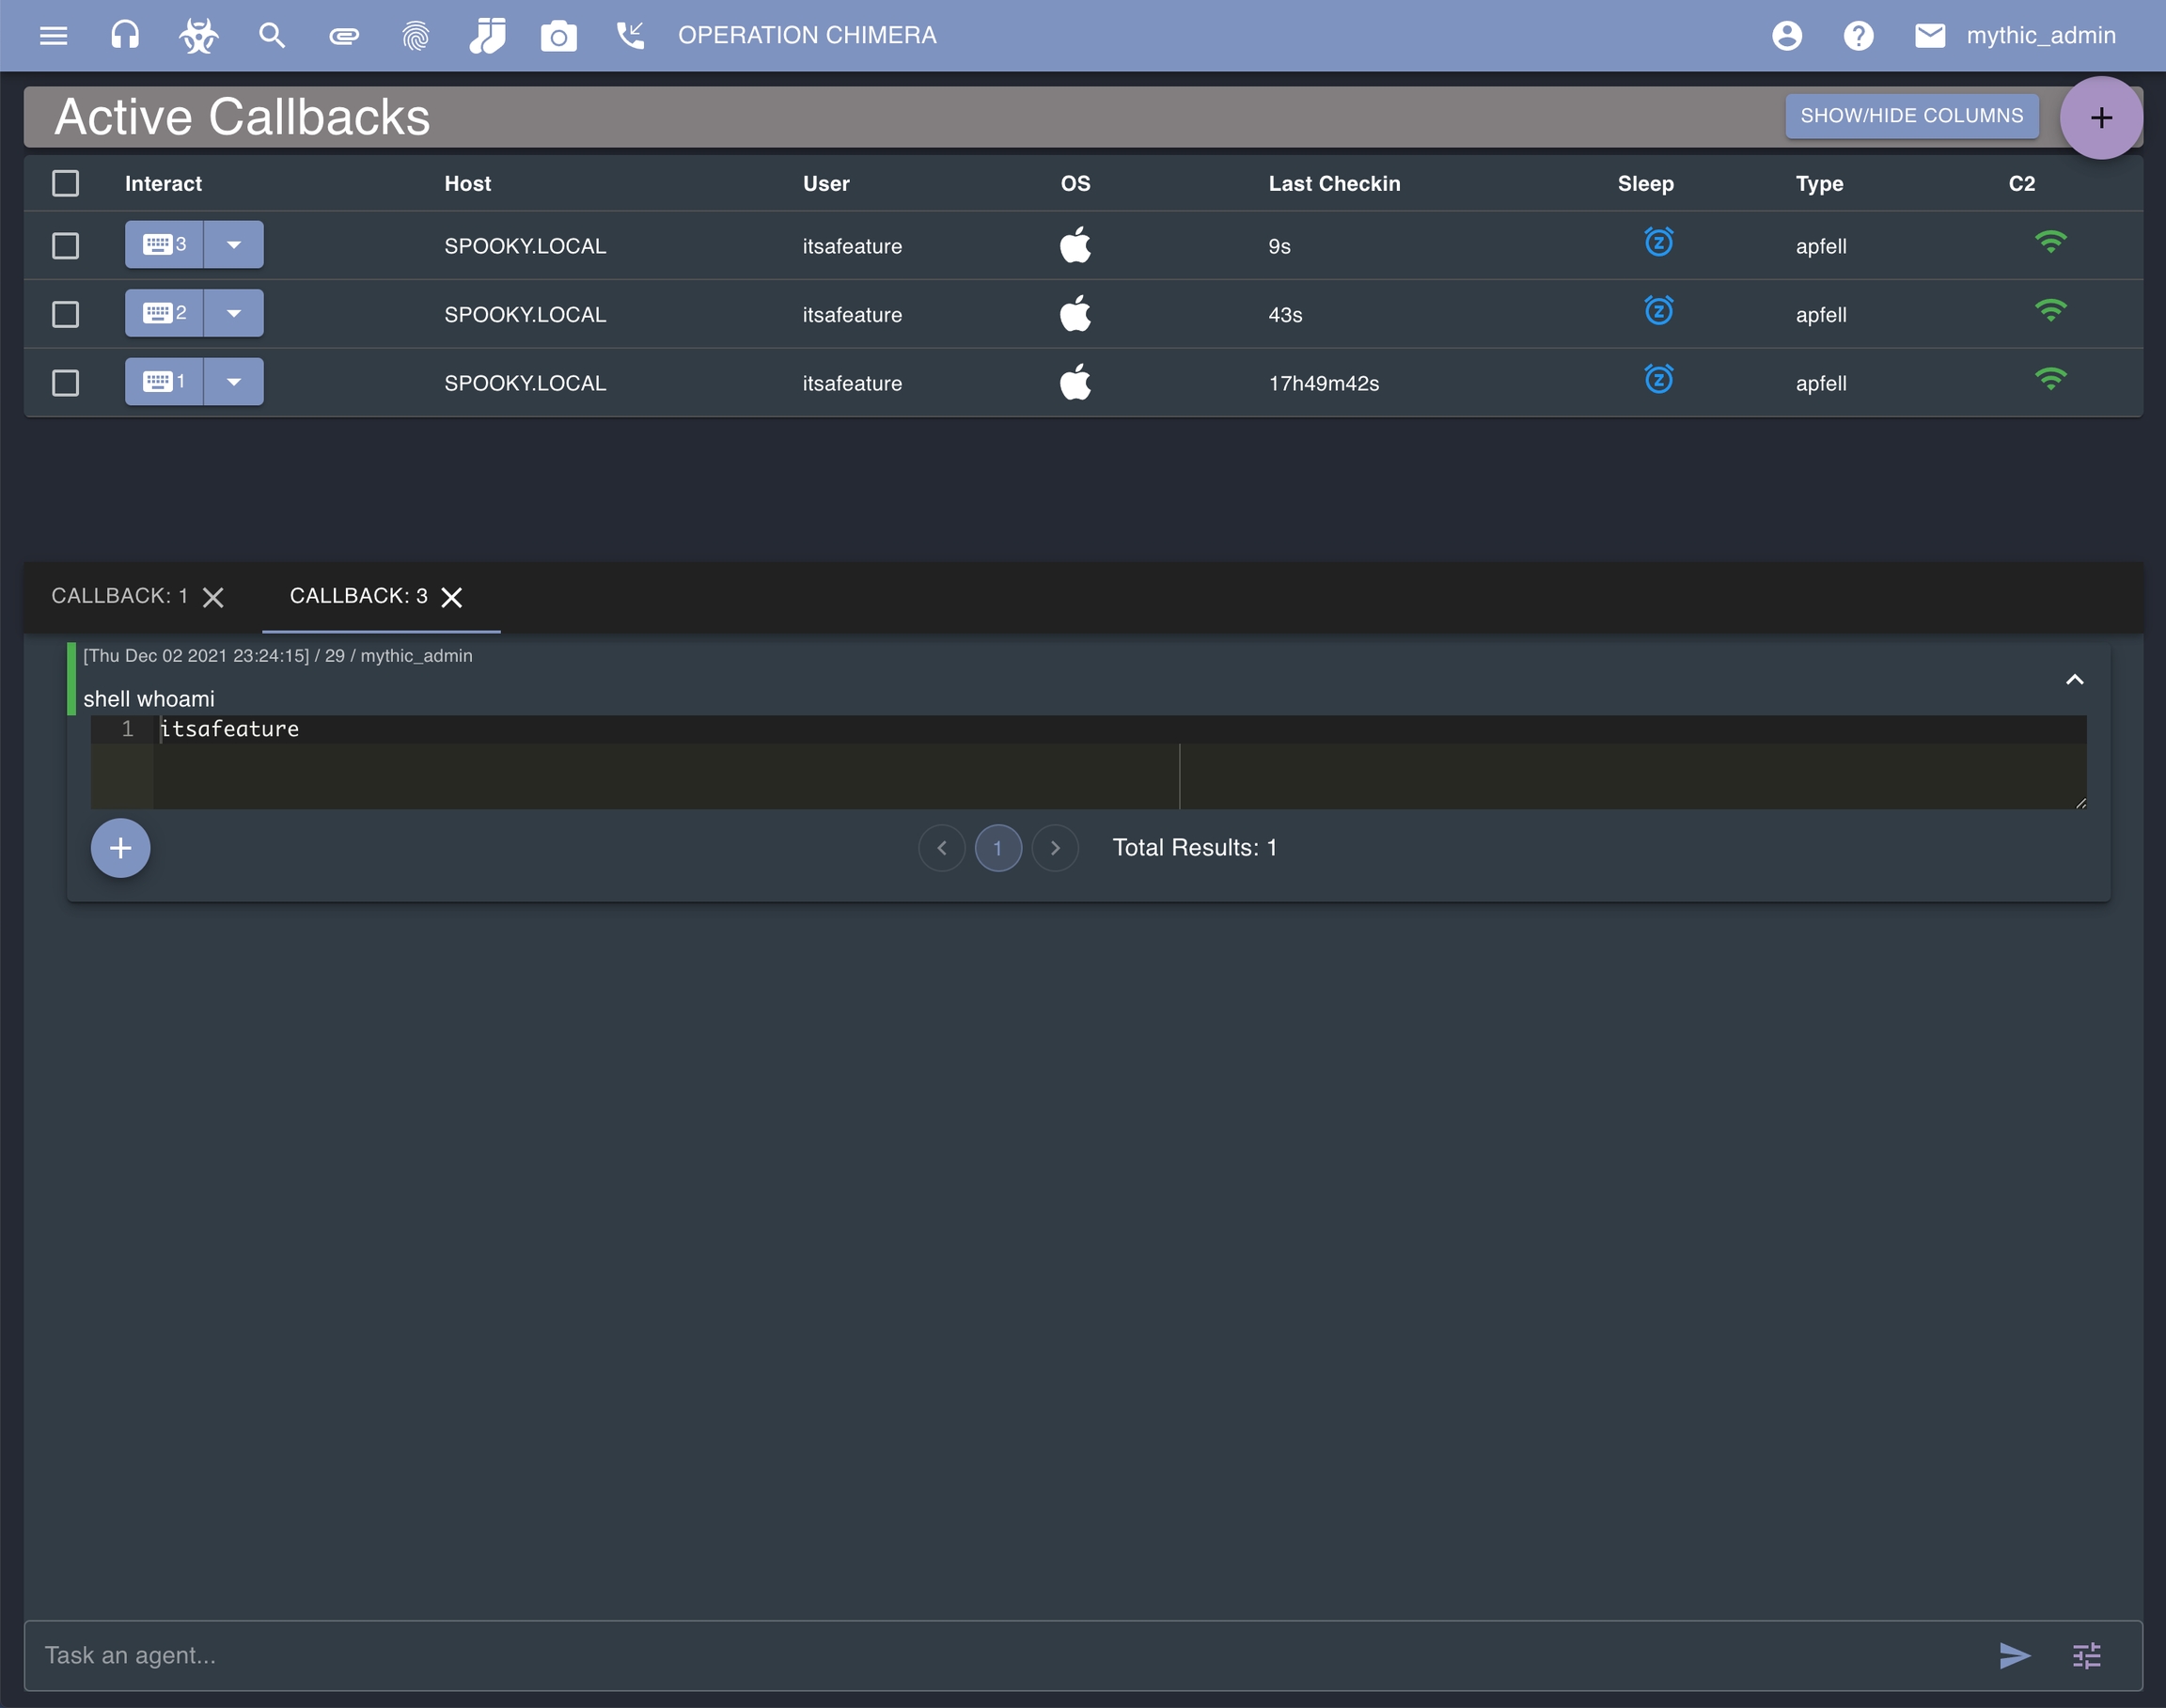


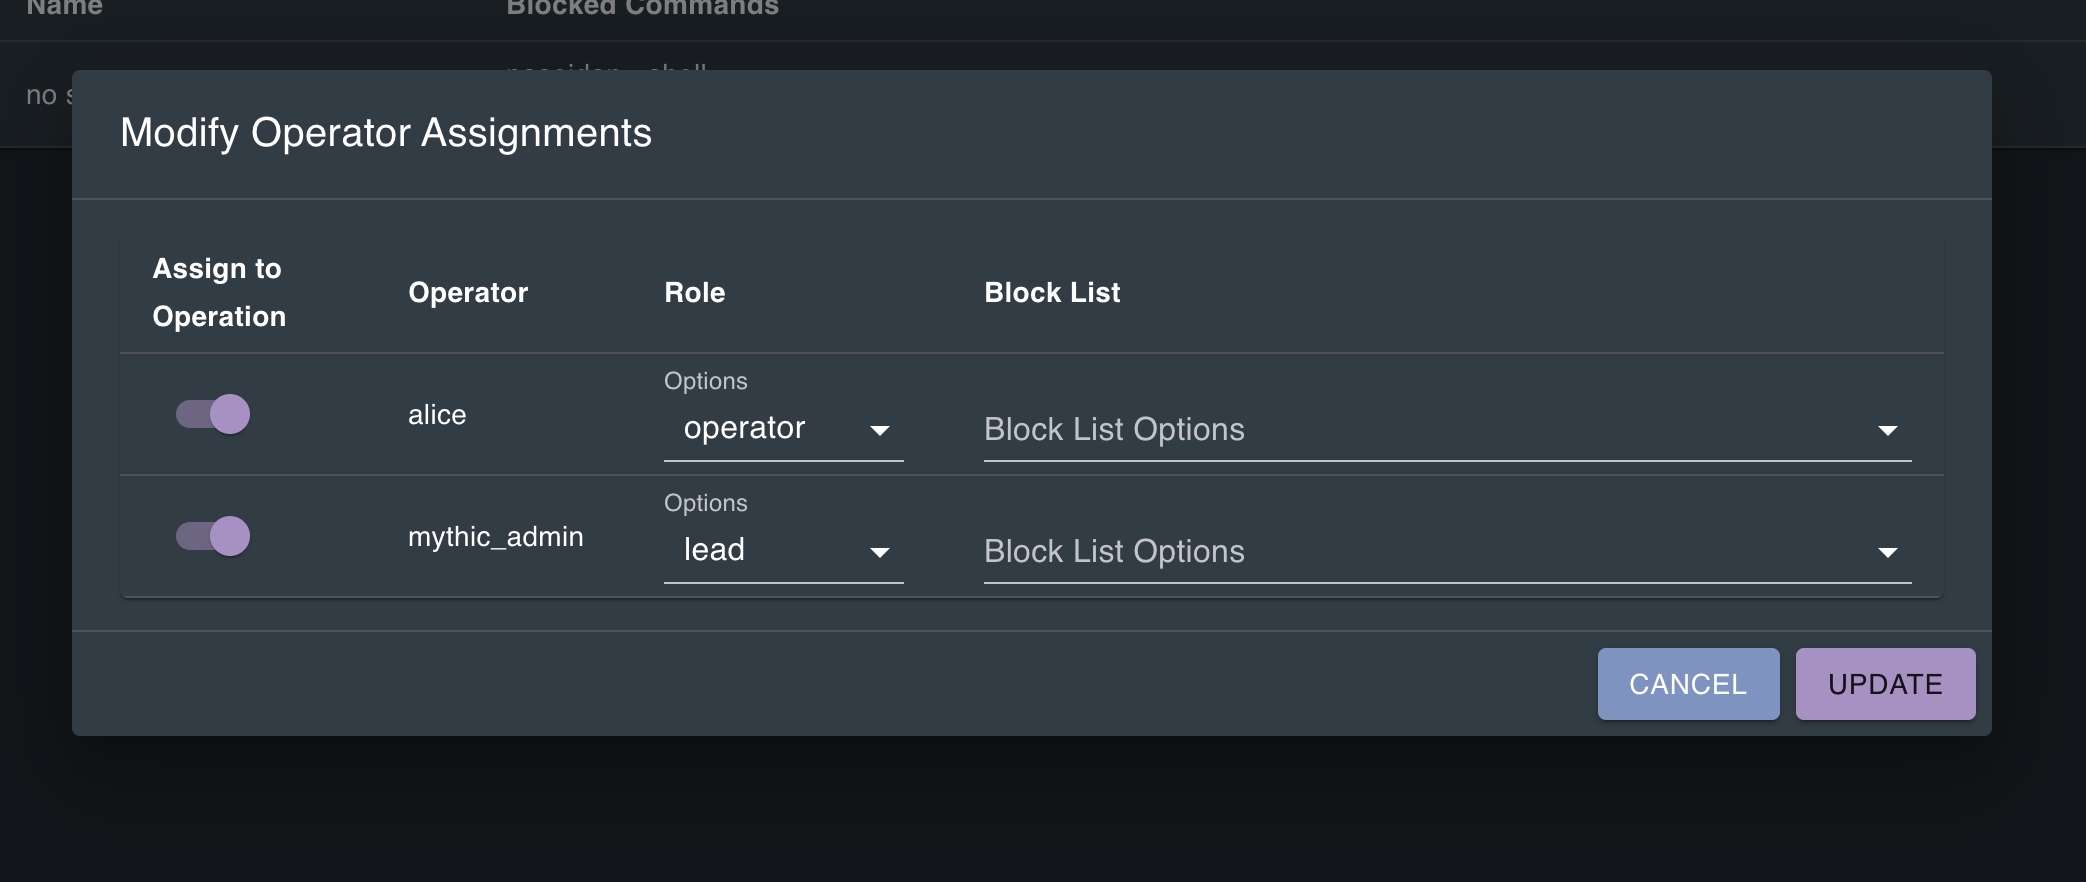

Sub-tasking is the ability for a task to spin off sub-tasks and wait for them to finish before potentially entering a "submitted" state themselves for an agent to pick them up. When creating subtasks, your create_go_tasking function will finish completing like normal (it doesn't wait for subtasks to finish).
When a task has outstanding subtasks, its status will change to "delegating" while it waits for them all to finish.
Subtasking provides a way to separate out complex logic into multiple discrete steps. For example, if a specific task you're trying to do ends up with a complex series of steps, then it might be more beneficial for the agent developer and operator to see them broken out. For example, a psexec command actually involves a lot of moving pieces from making sure that you:
have a service executable (or some sort-lived task that is ok to get killed by the service control manager)
can access the remote file system
can write to the remote file system in some way (typically smb)
can create a scheduled task
can delete the scheduled task
can remove the remote file
That's a lot of steps and conditionals to report back. If any step fails, are you able to track down where it failed and the status of any of the cleanup steps (if any performed at all)? That starts to become a massive task, especially when other parts of the task might already be separate tasks within the agent. Creating/manipulating scheduled tasks could be its own command, same with copying files to a remote share. So, at that point you're either duplicating code, or you have some sort of shared dependency. It would be easier if you could just issue these all as subtasks and let each one handle its job as needed in smaller, isolated chunks.
Creating subtasks are pretty easy:
This function called be called from within your create_go_tasking or even task callbacks (in the next section). We're specifying the name of the command to run along with the parameters to issue (as a string). We can even specify a SubtaskCallbackFunction to get called within our current task when the subtask finishes. It's a way for the parent task to say "when this subtask is done, call this function so I can make more decisions based on what happened". These callback functions look like this:
Notice how this function's parameters don't start with self. This isn't a function in your command class, but rather a function outside of it. With the data passed in via the PTTaskCompletionFunctionMessage you should still have all you need to do MythicRPC* calls though.
This PTTaskCompletionFunctionMessage has all the normal information you'd expect for the parent task (just like you'd see in your create_go_tasking function) as well as all the same information for your subtask. This makes it easy to manipulate both tasks from this context.
These callback functions are called in the parent task that spawned the subtask in the first place.
If you're creating subtasks and you want tokens associated with them (such as matching the token supplied for the parent task), then you must manually supply it as part of creating your subtask (ex: Token=taskData.Task.TokenID). Mythic doesn't assume subtasks also need the token applied.
Here we have the flow for a command, shell, that issues a subtask called run and registers two completion handlers - one for when run completes and another for when shell completes. Notice how execution of shell's create tasking function continues even after it issues the subtask run. That's because this is all asynchronous - the result you get back from issuing a subtask is only an indicator of if Mythic successfully registered the task to not, not the final execution of the task.
Task callbacks are functions that get executed when a task enters a "completed=True" state (i.e. when it completes successfully or encounters an error). These can be registered on a task itself
or on a subtask:
When Mythic calls these callbacks, it looks for the defined name in the command's completed_functions attribute like:
Where the key is the same name of the function specified and the value is the actual reference to the function to call.
Like everything else associated with a Command, all of this information is stored in your command's Python/GoLang file. Sub-tasks are created via RPC functions from within your command's create_tasking function (or any other function - i.e. you can issue more sub-tasks from within task callback functions). Let's look at what a callback function looks like:
This is useful for when you want to do some post-task processing, actions, analysis, etc when a task completes or errors out. In the above example, the formulate_output function simply just displays a message to the user that the task is done. In more interesting examples though, you could use the get_responses RPC call like we saw above to get information about all of the output subtasks have sent to the user for follow-on processing.
Delegate messages are messages that an agent is forwarding on behalf of another agent. The use case here is an agent forwarding peer-to-peer messages for a linked agent. Mythic supports this by having an optional delegates array in messages. An example of what this looks like is in the next section, but this delegates array can be part of any message from an agent to mythic.
When sending delegate messages, there's a simple standard format:
Within a delegates array are a series of JSON dictionaries:
UUID - This field is some UUID identifier used by the agent to track where a message came from and where it should go back to. Ideally this is the same as the UUID for the callback on the other end of the connection, but can be any value. If the agent uses a value that does not match up with the UUID of the agent on the other end, Mythic will indicate that in the response. This allows the middle-man agent to generate some UUID identifier as needed upon first connection and then learn of and use the agent's real UUID once the messages start flowing.
message - this is the actual message that the agent is transmitting on behalf of the other agent
c2_profile - This field indicates the name of the C2 Profile associated with the connection between this agent and the delegated agent. This allows Mythic to know how these two agents are talking to each other when generating and tracking connections.
The new_uuid field indicates that the uuid field the agent sent doesn't match up with the UUID in the associated message. If the agent uses the right UUID with the agentMessage then the response would be:
Why do you care and why is this important? This allows an agent to randomly generate its own UUID for tracking connections with other agents and provides a mechanism for Mythic to reveal the right UUID for the callback on the other end. This implicitly gives the agent the right UUID to use if it needs to announce that it lost the route to the callback on the other end. If Mythic didn't correct the agent's use of UUID, then when the agent loses connection to the P2P agent, it wouldn't be able to properly indicate it to Mythic.
Ok, so let's walk through an example:
agentA is an egress agent speaking HTTP to Mythic. agentA sends messages directly to Mythic, such as the {"action": "get_tasking", "tasking_size": 1}. All is well.
somehow agentB gets deployed and executed, this agent (for sake of example) opens a port on its host (same host as agentA or another one, doesn't matter)
agentA connects to agentB (or agentB connects to agentA if agentA opened the port and agentB did a connection to it) over this new P2P protocol (smb, tcp, etc)
agentB sends to agentA a staging message if it's doing EKE, a checkin message if it's already an established callback (like the example of re-linking to a callback), or a checkin message if it's doing like a static PSK or plaintext. The format of this message is exactly the same as if it wasn't going through agentA
agentA gets this message, and is like "new connection, who dis?", so it makes a random UUID to identify whomever is on the other end of the line and forwards that message off to Mythic with the next message agentA would be sending anyway. So, if the next message that agentA would send to Mythic is another get tasking, then it would look like: {"action": "get_tasking", "tasking_size": 1, "delegates": [ {"message": agentB's message, "c2_profile": "Name of the profile we're using to communicate", "uuid": "myRandomUUID"} ] }. That's the message agentA sends to Mythic.
Mythic gets the message, processes the get_tasking for agentA, then sees it has delegate messages (i.e. messages that it's passing along on behalf of other agents). So Mythic recursively processes each of the messages in this array. Because that message value is the same as if agentB was talking directly to Mythic, Mythic can parse out the right UUIDs and information. The c2_profile piece allows Mythic to look up any c2-specific encryption information to pass along for the message. Once Mythic is done processing the message, it sends a response back to agentA like: {"action": "get_tasking", "tasks": [ normal array of tasks ], "delegates": [ {"message": "response back to what agentB sent", "uuid": "myRandomUUID that agentA generated", "new_uuid": "the actual UUID that Mythic uses for agentB"} ] }. If this is the first time that Mythic has seen a delegate from agentB through agentA, then Mythic knows that there's a route between the two and via which C2 profile, so it can automatically display that in the UI
agentA gets the response back, processes its get_tasking like normal, sees the delegates array and loops through those messages. It sees "oh, it's myRandomUUID, i know that guy, let me forward it along" and also sees that it's been calling agentB by the wrong name, it now knows agentB's real name according to Mythic. This is important because if agentA and agentB ever lose connection, agentA can report back to Mythic that it can no longer to speak to agentB with the right UUID that Mythic knows.
This same process repeats and just keeps nesting for agentC that would send a message to agentB that would send the message to agentA that sends it to Mythic. agentA can't actually decrypt the messages between agentB and Mythic, but it doesn't need to. It just has to track that connection and shuttle messages around.
Now that there's a "route" between the two agents that Mythic is aware of, a few things happen:
when agentA now does a get_tasking message (with or without a delegate message from agentB), if mythic sees a tasking for agentB, Mythic will automatically add in the same delegates message that we saw before and send it back with agentA so that agentA can forward it to agentB. That's important - agentB never had to ask for tasking, Mythic automatically gave it to agentA because it knew there was a route between the two agents.
if you DON"T want that to happen though - if you want agentB to keep issuing get_tasking requests through agentA with periodic beaconing, then in agentA's get_tasking you can add get_delegate_tasks to False. i.e ({"action": "get_tasking", "tasking_size": 1, "get_delegate_tasks": false}) then even if there are tasks for agentB, Mythic WILL NOT send them along with agentA. agentB will have to ask for them directly
What happens when agentA and agentB can no longer communicate though? agentA needs to send a message back to Mythic to indicate that the connection is lost. This can be done with the key. Using all of the information agentA has about the connection, it can announce that Mythic should remove a edge between the two callbacks. This can either happen as part of a response to a tasking (such as an explicit task to unlink two agents) or just something that gets noticed (like a computer rebooted and now the connection is lost). In the first case, we see the example below as part of a normal post_response message:
If this wasn't part of some task, then there would be no task_id to use. In this case, we can add the same edges structure at a higher point in the message:
How is an agent supposed to work with a Peer-to-peer (P2P) profile? It's pretty simple and largely the same as working with a Push C2 egress connection:
If a payload is executed (it's not a callback yet), then make a connection to your designated P2P method (named pipes, tcp ports, etc). Once a connection is established, start your normal encrypted key exchange or checkin process.
If an existing callback loses connection for some reason, then make a connection to your designated P2P method (named pipes, tcp ports, etc). Once a connection is established, send your checkin message again to inform Mythic of your existence
At this point, just wait for messages to come to you (no need to do a get_tasking poll) and as you get any data (socks, edges, alerts, responses, etc) just send them out through your p2p connection.
Unexpected error with integration github-files: Integration is not installed on this space
Unexpected error with integration github-files: Integration is not installed on this space
{
"action": "some action here",
"delegates": [
{
"message": agentMessage,
"uuid": UUID,
"c2_profile": "ProfileName"
}
]
}{
"action": "some action here",
"delegates": [
{
"message": agentMessage,
"uuid": "same UUID as the message agent -> mythic",
"new_uuid": UUID that mythic uses
}
]
}{
"action": "some action here",
"delegates": [
{
"message": agentMessage,
"uuid": "same UUID as the message agent -> mythic"
}
]
}{
"user_output": "some ouser output here",
"task_id": "uuid of task here",
"edges": [
{
"source": "uuid of source callback",
"destination": "uuid of destination callback",
"action": "remove"
"c2_profile": "name of the c2 profile used in this connection"
}
]
}{
"action": "get_tasking" (could be "post_response", "upload", etc)
"edges": [
{
"source": "uuid of source callback",
"destination": "uuid of destination callback",
"action": "add" or "remove"
"c2_profile": "name of the c2 profile used in this connection"
}
]
}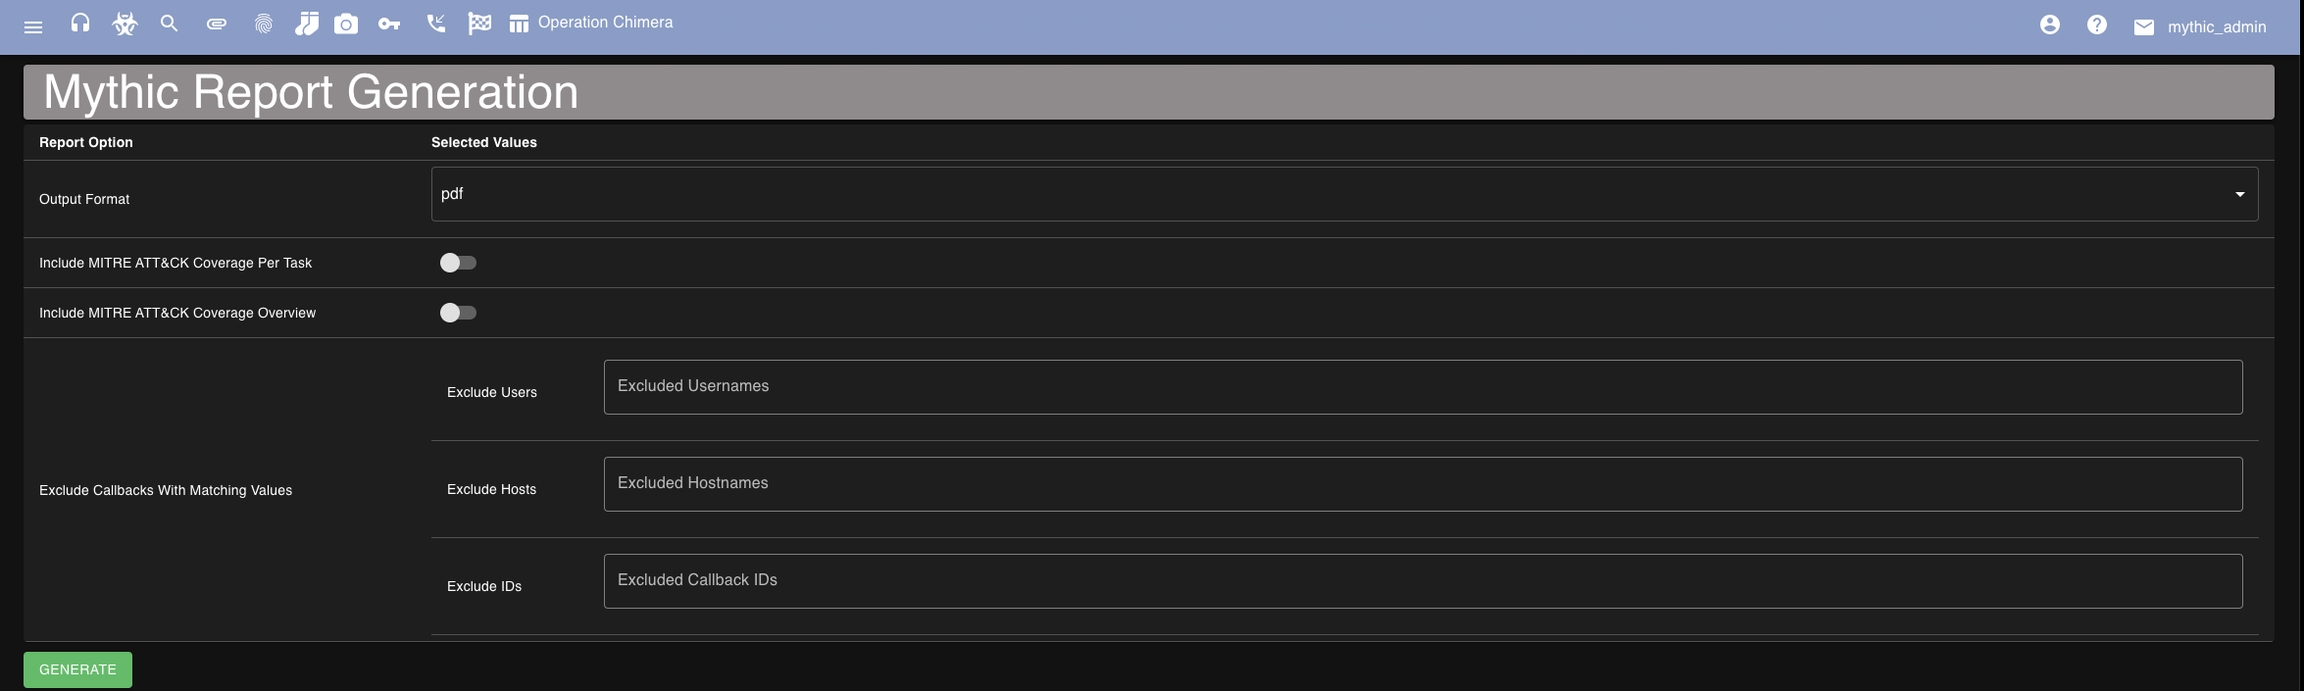
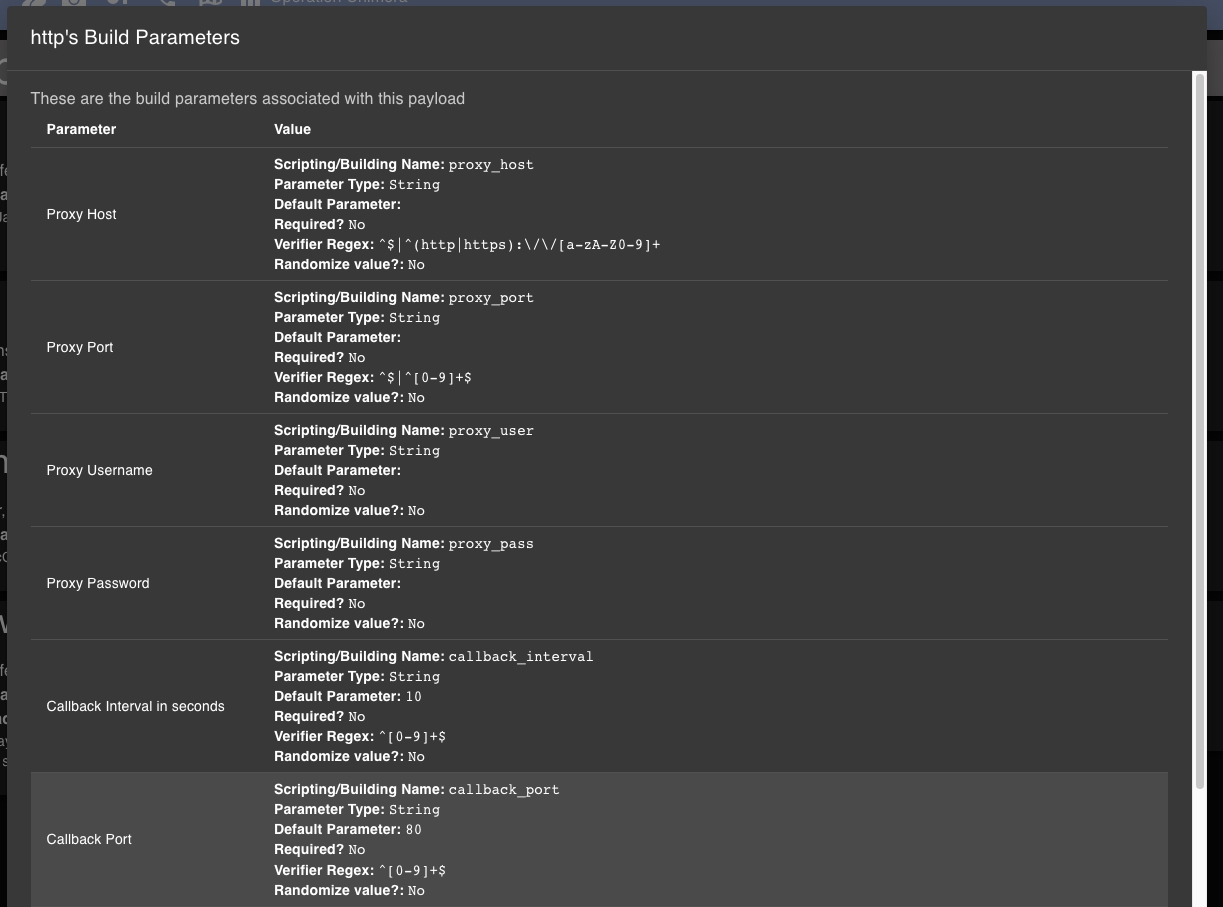
This page describes how an agent message is formatted
All messages go to the /agent_message endpoint via the associated C2 Profile docker container. These messages can be:
POST request
message content in body
GET request
message content in FIRST header value
message content in FIRST cookie value
message content in FIRST query parameter
For query parameters, the Base64 content must be URL Safe Encoded - this has different meaning in different languages, but means that for the "unsafe" characters of + and /, they need to be swapped out with - and _ instead of %encoded. Many languages have a special Base64 Encode/Decode function for this. If you're curious, this is an easy site to check your encoding: https://www.base64url.com/
message content in body
All agent messages have the same general structure, but it's the message inside the structure that varies.
Each message has the following general format shown below. The message is a JSON string, which is then typically encrypted (doesn't have to be though), with a UUID prepended, and then the entire thing base64 encoded:
base64(
UUID + EncBlob( //the following is all encrypted
JSON({
"action": "", //indicating what the message is - required
"...": ... // JSON data relating to the action - required
//this piece is optional and just for p2p mesh forwarding
"delegates": [
{"message": agentMessage, "c2_profile": "ProfileName", "uuid": "uuid here"},
{"message": agentMessage, "c2_profile": "ProfileName", "uuid": "uuid here"}
]
})
)
)There are a couple of components to note here in what's called an agentMessage:
UUID - This UUID varies based on the phase of the agent (initial checkin, staging, fully staged). This is a 36 character long of the format b50a5fe8-099d-4611-a2ac-96d93e6ec77b . Optionally, if your agent is dealing with more of a binary-level specification rather than strings, you can use a 16 byte big-endian value here for the binary representation of the UUID4 string.
EncBlob - This section is encrypted, typically by an AES256 key, but when agents are staging, this could be encrypted with RSA keys or as part of some other custom crypto/staging you're doing as part of your payload type container. .
JSON - This is the actual message that's being sent by the agent to Mythic or from Mythic to an agent. If you're doing your own custom message format and leveraging a translation container, this this format will obviously be different and will match up with your custom version; however, in your translation container you will need to convert back to this format so that Mythic can process the message.
action - This specifies what the rest of the message means. This can be one of the following:
staging_rsa
checkin
get_tasking
post_response
translation_staging (you're doing your own staging)
... - This section varies based on the action that's being performed. The different variations here can be found in Hooking Features , Initial Checkin, and Agent Responses
delegates - This section contains messages from other agents that are being passed along. This is how messages from nested peer-to-peer agents can be forwarded out through and egress callback. If your agent isn't forwarding messages on from others (such as in a p2p mesh or as an egress point), then you don't need this section. More info can be found here: Delegates (p2p)
+ - when you see something like UUID + EncBlob, that's referring to byte concatenation of the two values. You don't need to do any specific processing or whatnot, just right after the first elements bytes put the second elements bytes
Let's look at a few concrete examples without encryption and already base64 decoded:
a21bab2e-462e-49ab-9800-fbedaf53ad15
{
"action":"checkin",
"uuid":"a21bab2e-462e-49ab-9800-fbedaf53ad15",
"user":"bob",
"domain":"domain.com",
"pid":123,
}a21bab2e-462e-49ab-9800-fbedaf53ad15
{
"action":"get_tasking",
"tasking_size": -1
}a21bab2e-462e-49ab-9800-fbedaf53ad15
{
"action":"get_tasking",
"tasking_size": -1,
"delegates": [
{"message": agentMessage, "c2_profile": "tcp", "uuid": "uuid here"},
{"message": agentMessage, "c2_profile": "smb", "uuid": "uuid here"}
]
}a21bab2e-462e-49ab-9800-fbedaf53ad15
{
"action":"post_response",
"responses": [
{
"task_id": "c34bab2e-462e-49ab-9800-fbedaf53ad15",
"completed": true,
"user_output": "hello world",
},
{
"task_id": "bab3ab2e-462e-49ab-9800-fbedaf53ad15",
"completed": false,
"user_output": "downloading file...",
"download": {
"total_chunks": 12,
"chunk_size": 512000,
"filename": "test.txt",
"full_path": "C:\\Users\\test\\test.txt",
"host": "ABC.COM",
"is_screenshot": false
}
},
]
}If you want to have a completely custom agent message format (different format for JSON, different field names/formatting, a binary or otherwise formatted protocol, etc), then there's only two things you have to do for it to work with Mythic.
Base64 encode the message
The first bytes of the message must be the associated UUID (payload, staging, callback).
Mythic uses these first few bytes to do a lookup in its database to find out everything about the message. Specifically for this case, it looks up if the associated payload type has a translation container, and if so, ships the message off to it first before trying to process it.
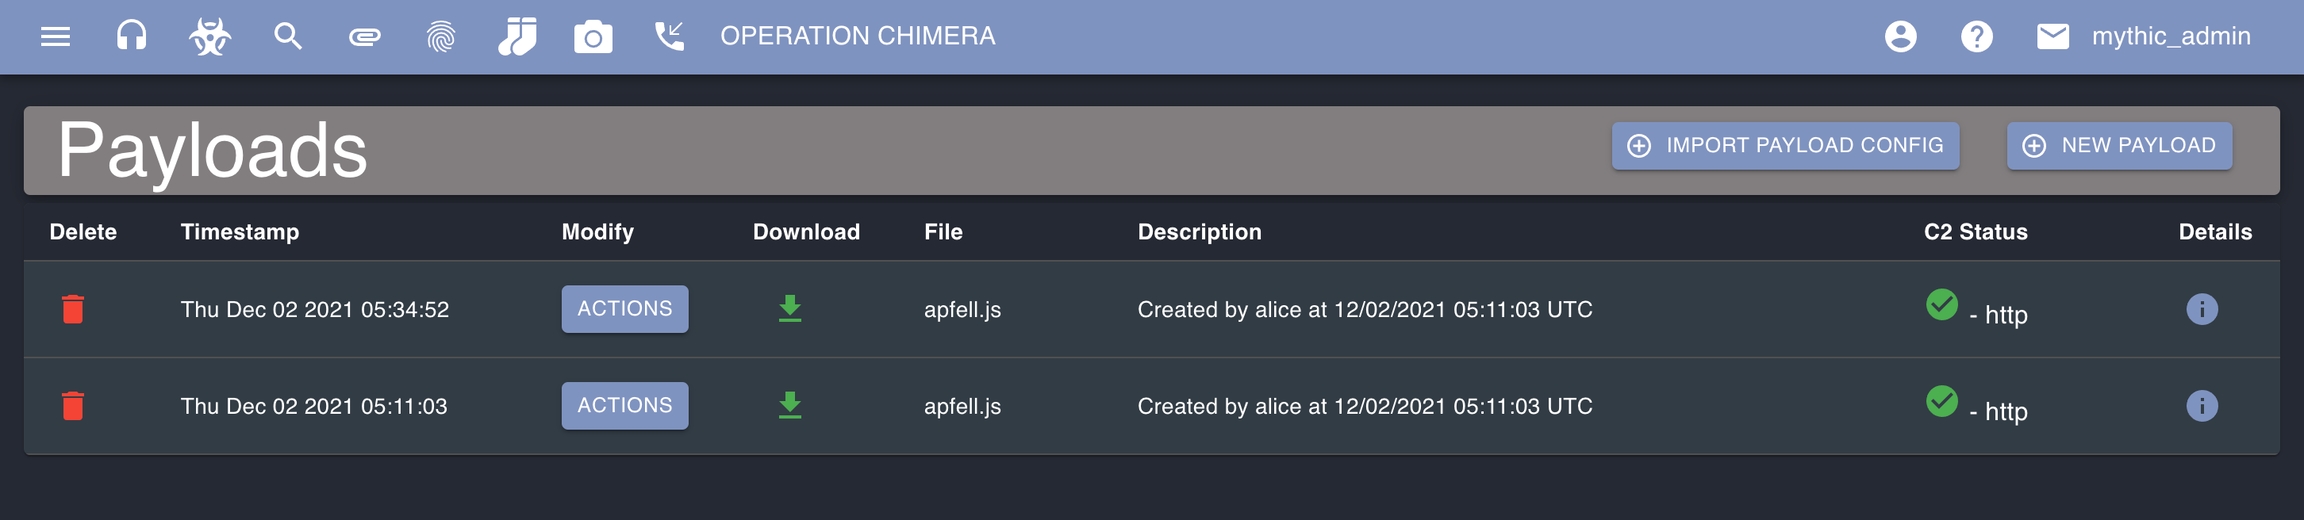


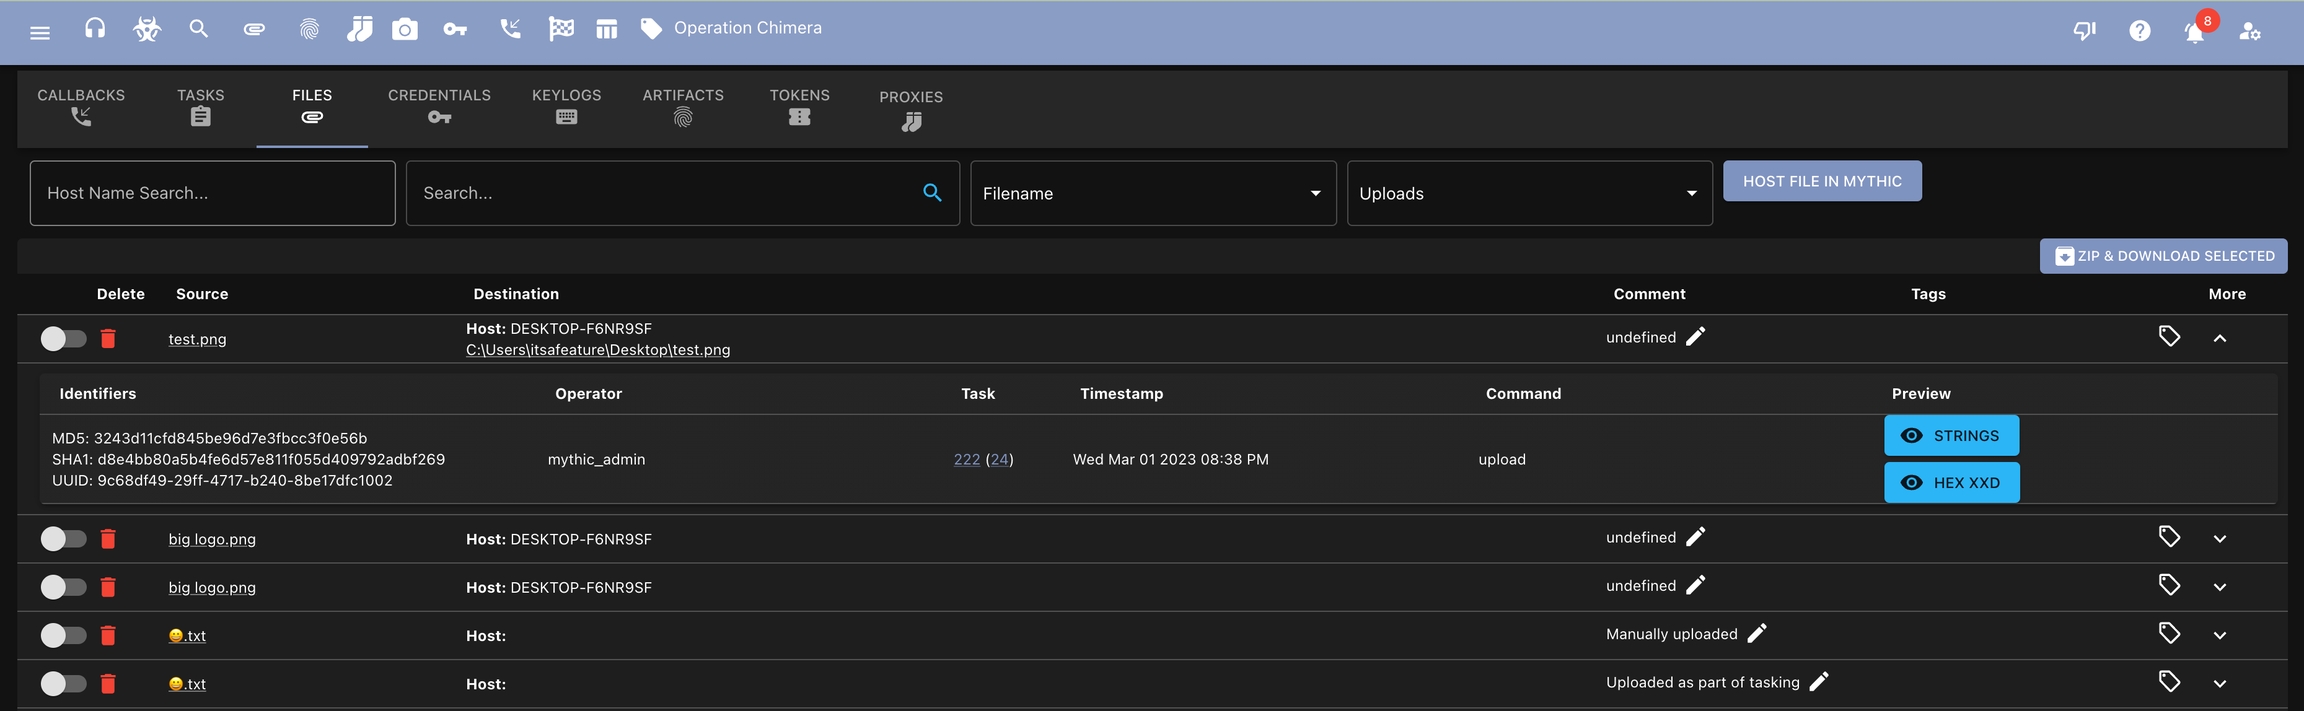
TaskFunctionCreateTasking: func(taskData *agentstructs.PTTaskMessageAllData) agentstructs.PTTaskCreateTaskingMessageResponse {
response := agentstructs.PTTaskCreateTaskingMessageResponse{
Success: true,
TaskID: taskData.Task.ID,
}
return response
},async def create_go_tasking(self, taskData: PTTaskMessageAllData) -> PTTaskCreateTaskingMessageResponse:
response = PTTaskCreateTaskingMessageResponse(
TaskID=taskData.Task.ID,
Success=True,
)
await SendMythicRPCTaskCreateSubtask(MythicRPCTaskCreateSubtaskMessage(
TaskID=taskData.Task.ID,
CommandName="run",
Params="cmd.exe /S /c {}".format(taskData.args.command_line)
))
return responseasync def downloads_complete(completionMsg: PTTaskCompletionFunctionMessage) -> PTTaskCompletionFunctionMessageResponse:
response = PTTaskCompletionFunctionMessageResponse(Success=True)
...
response.Success = False
response.TaskStatus = "error: Failed to search for files"
await SendMythicRPCResponseCreate(MythicRPCResponseCreateMessage(
TaskID=completionMsg.TaskData.Task.ID,
Response=f"error: Failed to search for files: {files.Error}".encode()
))
return response
async def create_go_tasking(self, taskData: MythicCommandBase.PTTaskMessageAllData) -> MythicCommandBase.PTTaskCreateTaskingMessageResponse:
response = MythicCommandBase.PTTaskCreateTaskingMessageResponse(
TaskID=taskData.Task.ID,
CompletionFunctionName="formulate_output",
Success=True,
)
return responsecompletion_functions = {"formulate_output": formulate_output}async def formulate_output( task: PTTaskCompletionFunctionMessage) -> PTTaskCompletionFunctionMessageResponse:
# Check if the task is complete
response = PTTaskCompletionFunctionMessageResponse(Success=True, TaskStatus="success")
if task.TaskData.Task.Completed is True:
# Check if the task was a success
if not task.TaskData.Task.Status.includes("error"):
# Get the interval and jitter from the task information
interval = task.TaskData.args.get_arg("interval")
jitter = task.TaskData.args.get_arg("interval")
# Format the output message
output = "Set sleep interval to {} seconds with a jitter of {}%.".format(
interval / 1000, jitter
)
else:
output = "Failed to execute sleep"
# Send the output to Mythic
resp = await SendMythicRPCResponseCreate(MythicRPCResponseCreateMessage(
TaskID=taskData.Task.ID,
Response=output.encode()
))
if not resp.Success:
raise Exception("Failed to execute MythicRPC function.")
return response
For the file browser, there are a few capabilities that need to be present and implemented correctly if you want to allow users to list, remove, download, or upload from the file browser. Specifically:
File Listing - there needs to be a command marked as supported_ui_features = ["file_browser:list"] with your payload type that sends information in the proper format.
File Removal - there needs to be a command marked as supported_ui_features = ["file_browser:remove"] with your payload type that reports back success properly
File Download - there needs to be a command marked as supported_ui_features = ["file_browser:download"] with your payload type
File Upload - there needs to be a command marked as supported_ui_features = ["file_browser:upload"] with your payload type
These components together allow an operator to browse the file system, request listings of new directories, track downloaded files, upload new files, and even remove files. Let's go into each of the components and see what they need to do specifically.
There are two components to file listing that need to be handled - what the file browser sends as initial tasking to the command marked as supported_ui_features = ["file_browser:list"]and what data is sent back to Mythic for processing.
When doing a file listing via the file browser, the command_line for tasking will always be the following as as JSON string (this is what gets sent as the self.command_line argument in your command's parse_arguments function):
This might be different than the normal parameters you take for the command marked as supported_ui_features = ["file_browser:list"]. Since the payload type's command handles the processing of arguments itself, we can handle this case and transform the parameters as needed. For example, the apfell payload takes a single parameter path as an argument for file listing, but that doesn't match up with what the file browser sends. So, we can modify it within the async def parse_arguments function:
In the above example we check if we are given a JSON string or not by checking that the self.command_line length is greater than 0 and that the first character is a {. We can then parse it into a Python dictionary and check for the two cases. If we're given something with host in it, then it must come from the file browser instead of the operator normally, so we take the supplied parameters and add them to what the command normally needs. In this case, since we only have the one argument path, we take the path and file variables from the file browser dictionary and combine them for our path variable.
Now that we know how to translate file browsing file listing tasking to whatever our command needs, what kind of output do we need to send back?
We have another component to the post_response for agents.
Most of this is pretty self-explanatory, but there are some nuances. Only list out the inner files for the initial folder/file listed (i.e. don't recursively do this listing). For the files array, you don't need to include host or parent_path because those are both inferred based on the info outside the files array, and the success flag won't be included since you haven't tried to actually list out the contents of any sub-folders. The permissions JSON blob allows you to include any additional information you want to show the user in the file browser. For example, with the apfell agent, this blob includes information about extended attributes, posix file permissions, and user/group information. Because this is heavily OS specific, there's no requirement here other than it being a JSON blob (not a string).
The set_as_user_output field is new as of Mythic 3.3.1-rc23. It was relatively common practice for people to return this file browser data, but also return a string version in the user_output field to be displayed to the user. This means that you're sending the same data back twice though and bloating the size of your messages. This new flag tells Mythic to take this structured data, turn it into a JSON string, and add it as a response output for this task. This way your agent doesn't have to explicitly send it, but you still get the benefit.
By having this information in another component within the responses array, you can display any information to the user that you want without being forced to also display this listing each time to the user. You can if you want, but it's not required. If you wanted to do that, you could simply turn all of the file_browser data into a JSON string and put it in the user_output field. In the above example, the user output is a simple message stating why the tasking was issued, but it could be anything (even left blank).
There's a special key in there that doesn't really match the rest of the normal "file" data in that file_browser response - update_deleted. If you include this key as True and your success flag is True, then Mythic will use the data presented here to update which files are deleted.
By default, if you list the contents of ~/Downloads twice, then the view you see in the UI is a merge of all the data from those two instance of listing that folder. However, that might not always be what you want. For instance, if a file was deleted between the first and second listing, that deletion won't be reflected in the UI because the data is simply merged together. If you want that delete to be automatically picked up and reported as a deleted file, use the update_deleted flag to say to Mythic "hey, this should be everything that's in the folder, if you have something else that used to be there but I'm not reporting back right now, assume it's deleted".
You might be wondering why this isn't just the default behavior for listing files. There are two main other scenarios that we want to support that are counter to this idea - paginated results (only return 20 files at a time) and filtered results (only return files in the folder that end in .txt). In these cases, we don't want the rest of the data to be automatically marked as deleted because we're clearly not returning the full picture of what's in a folder. That's why it's an optional flag to say to performing the automatic updates. If you want to be explicit with things though (for example, if you delete a file and want to report it back without having to re-list the entire contents of the directory), you can use the next section - FIle Removal.
There are two components to file listing that need to be handled - what the file browser sends as initial tasking to the command marked as supported_ui_features = ["file_browser:remove"]and what data is sent back to Mythic for processing.
This is the exact same as the supported_ui_features = ["file_browser:list"]and the section above.
Ok, so we listed files and tasked one for removal. Now, how is that removed file tracked back to the file browsing to mark it as removed? Nothing too crazy, there's another field in the post_response:
This removed_files section simply returns an array of dictionaries that spell out the host and paths of the files that were deleted. On the back-end, Mythic takes these two pieces of information and searches the file browsing data to see if there's a matching path for the specified host in the current operation that it knows about. If there is, it gets marked as deleted and in the UI you'll see a small trashcan next to it along with a strikethrough.
This response isn't ONLY for when a file is removed through the file browser though. You can return this from your normal removal commands as well and if there happens to be a matching file in the browser, it'll get marked as removed. This allows you to simply type things like rm /path/to/file on the command-line and still have this information tracked in the file browser without requiring you to remove it through the file browser specifically.
There are two components to file listing that need to be handled - what the file browser sends as initial tasking to the command marked as supported_ui_features = ["file_browser:download"]and what data is sent back to Mythic for processing.
This is the exact same as the supported_ui_features = ["file_browser:list"] and the section above.
There's nothing special here outside of normal file download processes described in the section. When a new file is tracked within Mythic, there's a "host" field in addition to the full_path that is reported. This information is used to look up if there's any matching browser objects and if so, they're linked together.
Having a command marked as supported_ui_features = ["file_browser:upload"]will cause that command's parameters to pop-up and allow the operator to supply in the normal file upload information. To see this information reflected in the file browser, the user will then need to issue a new file listing.
{
"host": "hostname of computer to list",
"path": "path to the parent folder",
"file": "name of the file or folder you're trying to list",
"full_path": "absolute path to the file/folder"
}async def parse_arguments(self):
if len(self.command_line) > 0:
if self.command_line[0] == '{':
temp_json = json.loads(self.command_line)
if 'host' in temp_json:
# this means we have tasking from the file browser rather than the popup UI
# the apfell agent doesn't currently have the ability to do _remote_ listings, so we ignore it
self.add_arg("path", temp_json['path'] + "/" + temp_json['file'])
else:
self.add_arg("path", temp_json['path'])
self.add_arg("file_browser", "true")
else:
self.add_arg("path", self.command_line)
self.add_arg("file_browser", "true"){
"action": "post_response",
"responses": [
{
"task_id": "UUID of task",
"user_output": "file browser issued listing", // optional
"file_browser": {
"host": "hostname of computer you're listing", // optional
"is_file": True or False,
"permissions": {json of permission values you want to present},
"name": "name of the file or folder you're listing",
"parent_path": "full path of the parent folder",
"success": True or False,
"access_time": unix epoc time in milliseconds,
"modify_time": unix epoc time in milliseconds,
"size": 1345, //size of the entity
"update_deleted": True, //optional
"set_as_user_output": False, // optional
"files": [ // if this is a folder, include data on the files within
{
"is_file": True or False,
"permissions": {json of data here that you want to show},
"name": "name of the entity",
"access_time": unix epoc time in milliseconds,
"modify_time": unix epoc time in milliseconds,
"size": 13567 // size of the entity
}
]
}
}
]
}{
"action": "post_response",
"responses": [
{
"task_id": "UUID of task",
"user_output": "File successfully deleted",
"removed_files": [
{
"host": "hostname where file was removed",
"path": "full path to the file"
}
]
}
]
}
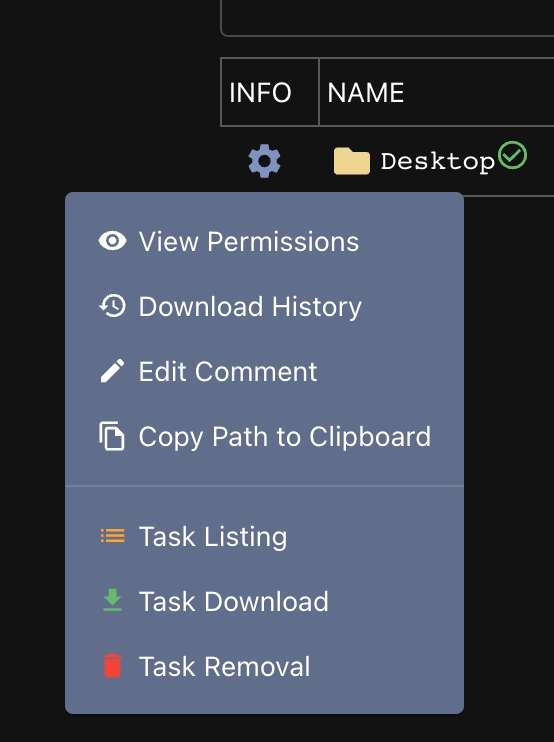

All of the following features describe information that can be included in responses. These sections describe some additional JSON formats and data that can be used to have your responses be tracked within Mythic or cause the creation of additional elements within Mythic (such as files, credentials, artifacts, etc).
You can hook multiple features in a single response because they're all unique. For example, to display something to the user, it should be in the user_outputfield, such as:
{
"user_output": "Still working",
}
or even
{
"user_output": "{\"key": \"nested json for user as string\"}"
}When we talk about Hooking Features in the Action: post_response message of an agent, we're really talking about a specific set of Dictionary key value pairs that have special meaning. All responses from the agent to the Mythic server already have to be in a structured format. Each of the following sections goes into what their reserved keywords mean, but some simpler ones are:
task_id - string - UUID associated with tasks
user_output - string - used with any command to display information back to the user
completed - boolean - used with any command to indicate that the task is done (switches to the green completed icon)
status - string - used to indicate that a command is not only done, but has encountered an error or some other status to return to the user
process_response - this is passed to your command's python file for processing in the process_response function.
As you're developing an agent to hook into these features, it's helpful to know where to look if you have questions. All of the Task, Command, and Parameter definitions/functions available to you are defined in the mythic_container PyPi package, which is hosted on the MythicMeta Organization on GitHub. Information about the Payload Type itself (BuildResponse, SupportedOS, BuildParameters, PayloadType, etc) can be found in the PayloadBuilder.py file in the same PyPi repo.
Throughout this section, the payload type development section, and the c2 message format sections, you'll see a lot of information about message structure. Here is a quick "cheat sheet" reference guide with links to the appropriate sections for more information. The following is an example of a get_tasking request to Mythic with almost every possible field added:
{
"action": "get_tasking",
"tasking_size": 1,
"responses": [
{
"task_id": "uuid",
"user_output": "something to show to the user",
"completed": false,
"status": "custom status here",
"file_browser": {
"host": "abc.com",
"is_file": false,
"permissions": {
"customField": customVal
},
"name": "C:\\",
"parent_path": "",
"success": true,
"access_time": 1700164038000,
"modify_time": 1700164038000,
"size": 2300,
"update_deleted": false,
"files": [
"is_file": false,
"permissions": {
"customField": customVal
},
"name": "Users",
"access_time": 1700164038000,
"modify_time": 1700164038000,
"size": 12345
]
},
"removed_files": [
{
"host": "abc.com",
"path": "C:\\Users\\itsafeature\\Desktop\\evil.exe"
}
],
"credentials": [
{
"credential_type": "plaintext",
"realm": "domain.com",
"account": "itsafeature",
"credential": "oh no my password!",
"comment": "scraped from lsass",
"metadata": "anything else you want to add"
}
],
"artifacts": [
{
"base_artifact": "Process Create",
"artifact": "cmd.exe /C evil.exe",
"host": "abc.com"
}
],
"processes": [
{
"host": "abc.com",
"process_id": 245,
"parent_process_id": 244,
"architecture": "x64",
"bin_path": "C:\\Users\\itsafeature\\Desktop\\evil.exe",
"name": "evil.exe",
"user": "itsafeature",
"command_line": "C:\\Users\\itsafeature\\Desktop\\evil.exe -f 2",
"integrity_level": 2,
"start_time": 1700164038000,
"description": "totally not malware: TM",
"signer": "",
"protected_process_level": 0,
"update_deleted": false,
}
],
"edges": [
{
"source": "my uuid",
"destination": "uuid of remote callback",
"action": "remove",
"c2_profile": "smb",
}
],
"commands": [
{
"action": "add",
"cmd": "shell"
}
],
"keylogs": [
{
"window_title": "Notepad",
"user": "itsafeature",
"keystrokes": "password: abc123"
}
],
"tokens": [
{
"action": "add",
"token_id": 34857,
"user": "acme\\bob",
"groups": "",
"privileges": "",
"thread_id": 12345,
"process_id": 2344,
"session_id": 1,
"logon_sid": "",
"integrity_level_sid": ""
"restricted": false,
"default_dacl": "",
"handle": 0,
"capabilities": "",
"app_container_sid": "",
"app_container_number": 0
}
],
"callback_tokens": [
{
"action": "add",
"host": "abc.com",
"token_id": 34857,
"token": {
// same info from tokens if you wanted to add/update that data
}
}
],
"download": {
"total_chunks": 4,
"chunk_size": 512000,
"host": "abc.com",
"is_screenshot": false,
"filename": "evil.exe",
"full_path": "C:\\Users\\itsafeature\\Desktop\\evil.exe",
},
"upload": {
"file_id": "uuid here",
"host": "abc.com",
"chunk_size": 512000,
"chunk_num": 1,
"full_path": "C:\\Users\\itsafeature\\Desktop\\replaced.exe"
},
"alerts": [{
"alert": "lost connection to remote agent",
"level": "warning",
"source": "disconnection warning",
"send_webhook": false,
}],
"process_response": {
"custom field": "custom val"
}
}
],
"alerts": [{
"alert": "edr detected",
"level": "warning",
"source": "edr detection",
"send_webhook": true,
"webhook_alert": {
"edr": "some edr name",
"pid": 345
}
}],
"edges": [{
"action": "add",
"source": "my uuid",
"destination": "remote uuid",
"c2_profile": "smb",
"metadata": "anything else you want to add about the connection"
}],
"delegates": [{
"c2_profile": "tcp",
"message": "base64 message",
"uuid": "some uuid tracker here"
}],
"socks": [{
"server_id": 2345,
"data": "base64",
"exit": false
}],
"rpfwd": [{
"server_id": 12345,
"data": "base64",
"exit": false
}],
"interactive": [{
"task_id": "uuid of task that started interactive session",
"message_type": 0,
"data": "base64"
}],
}RemovedFiles


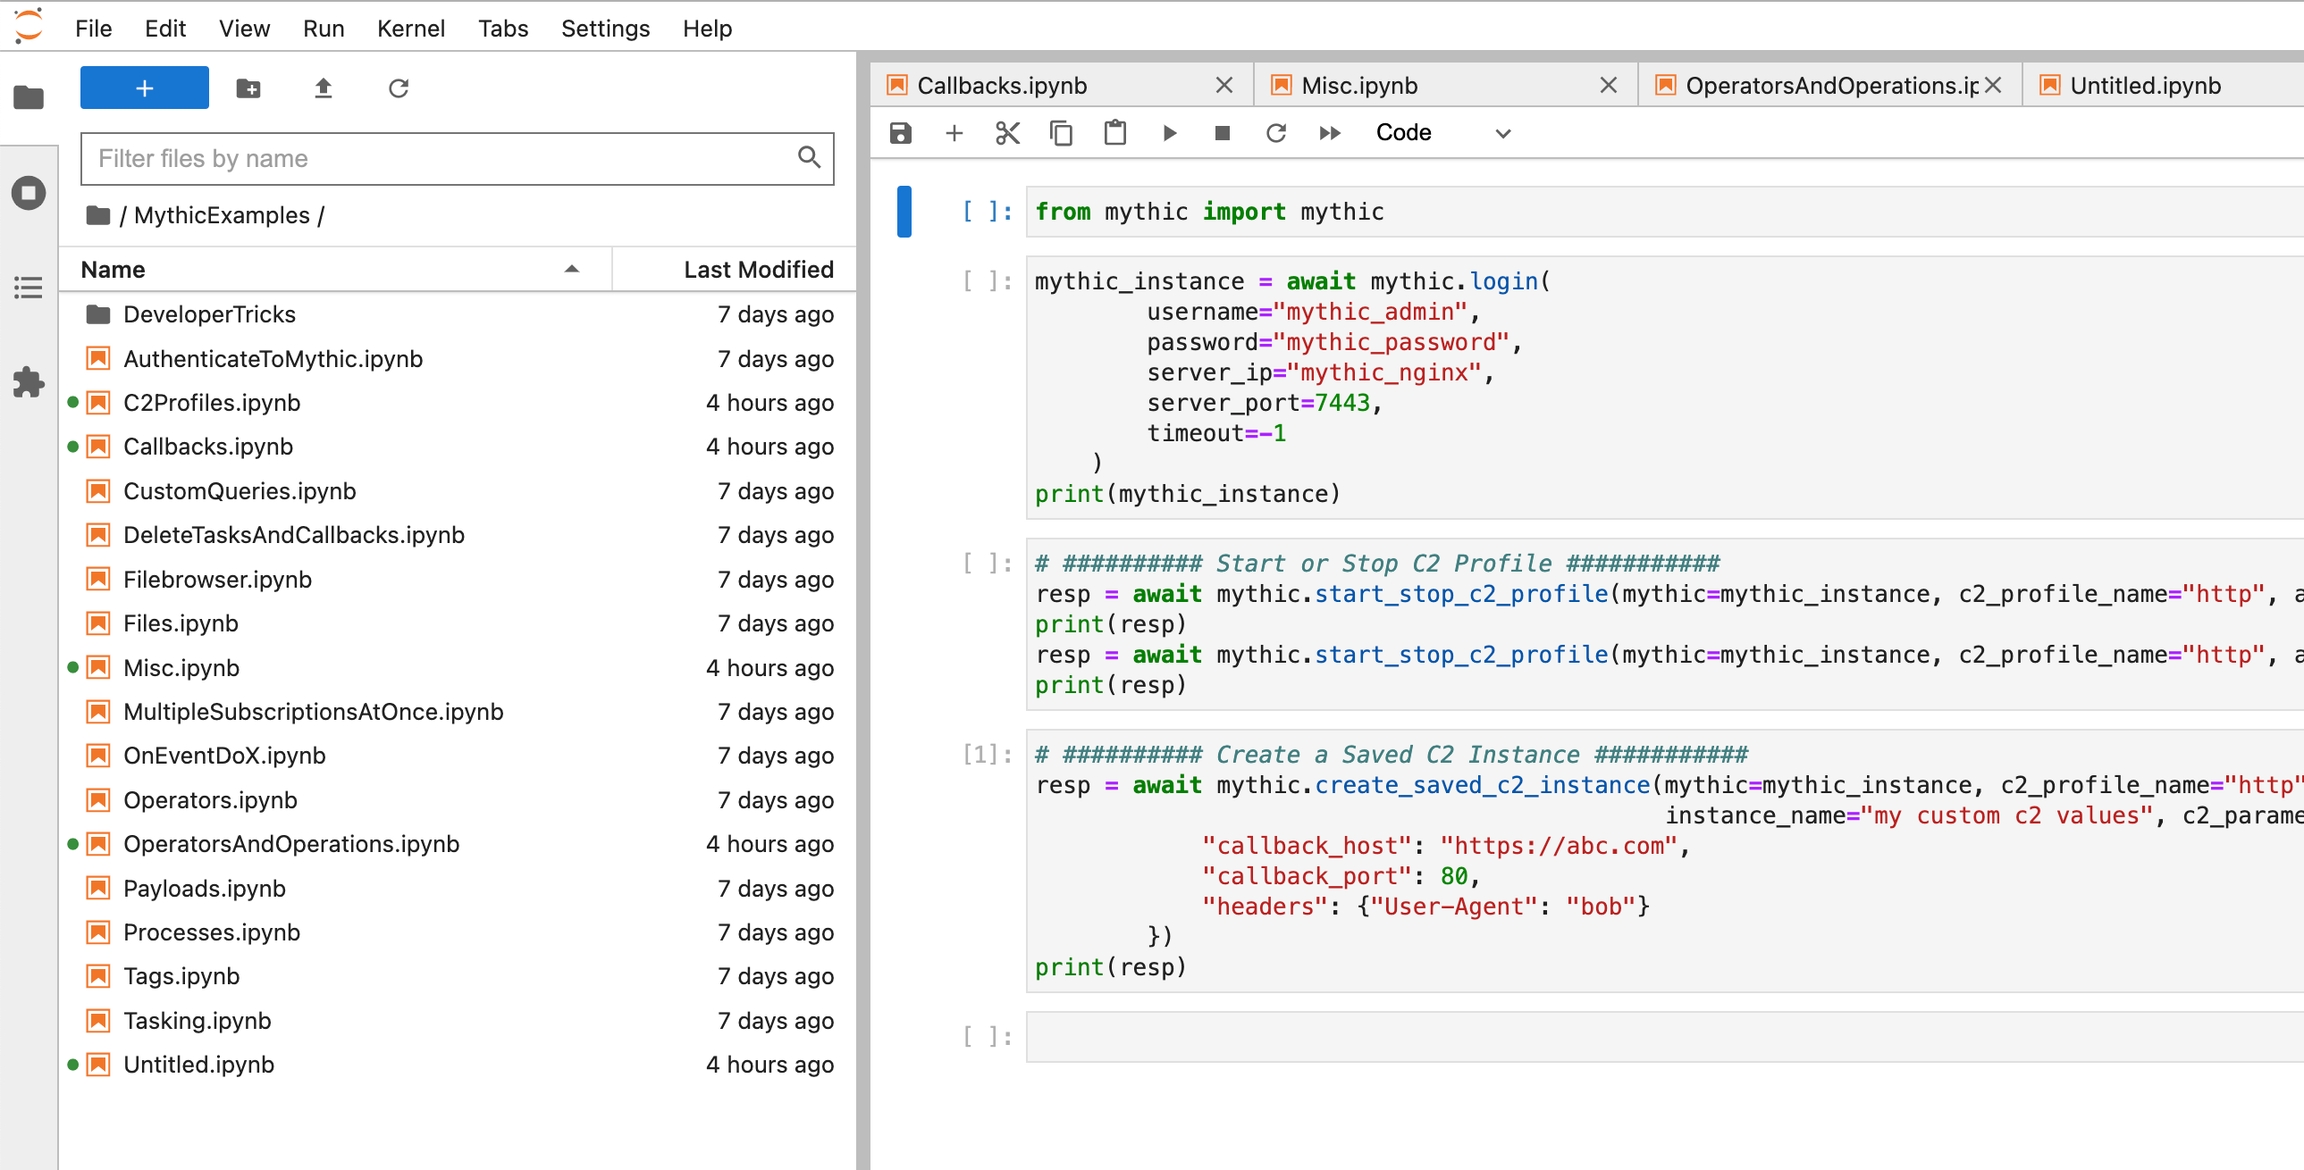

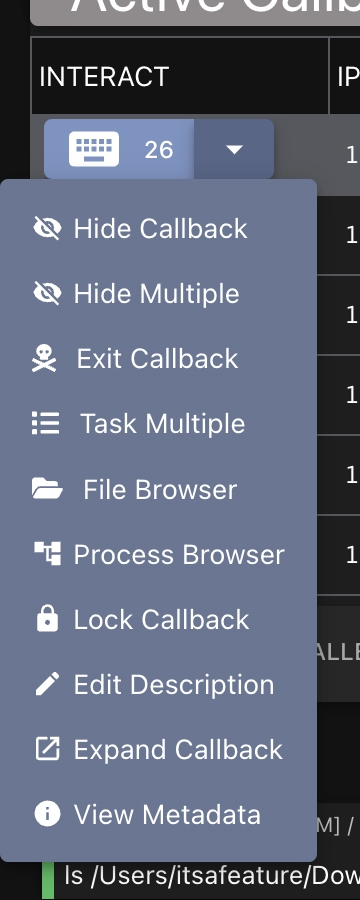
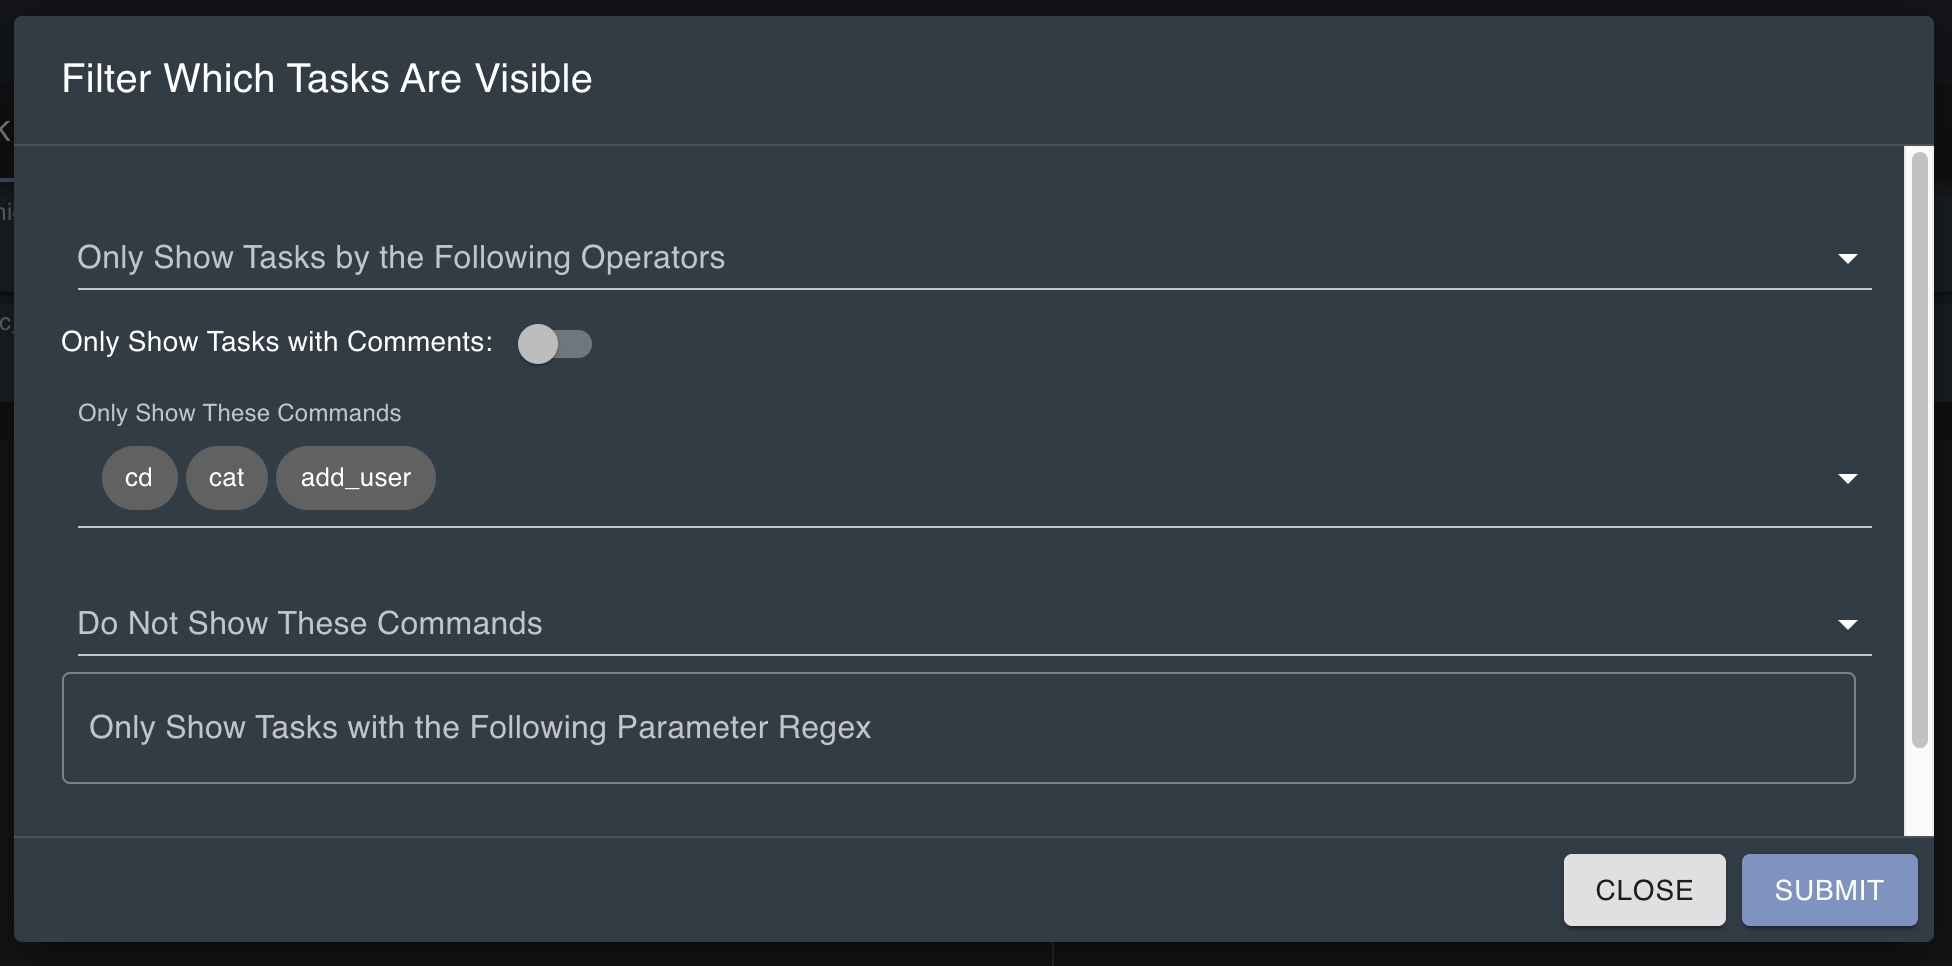
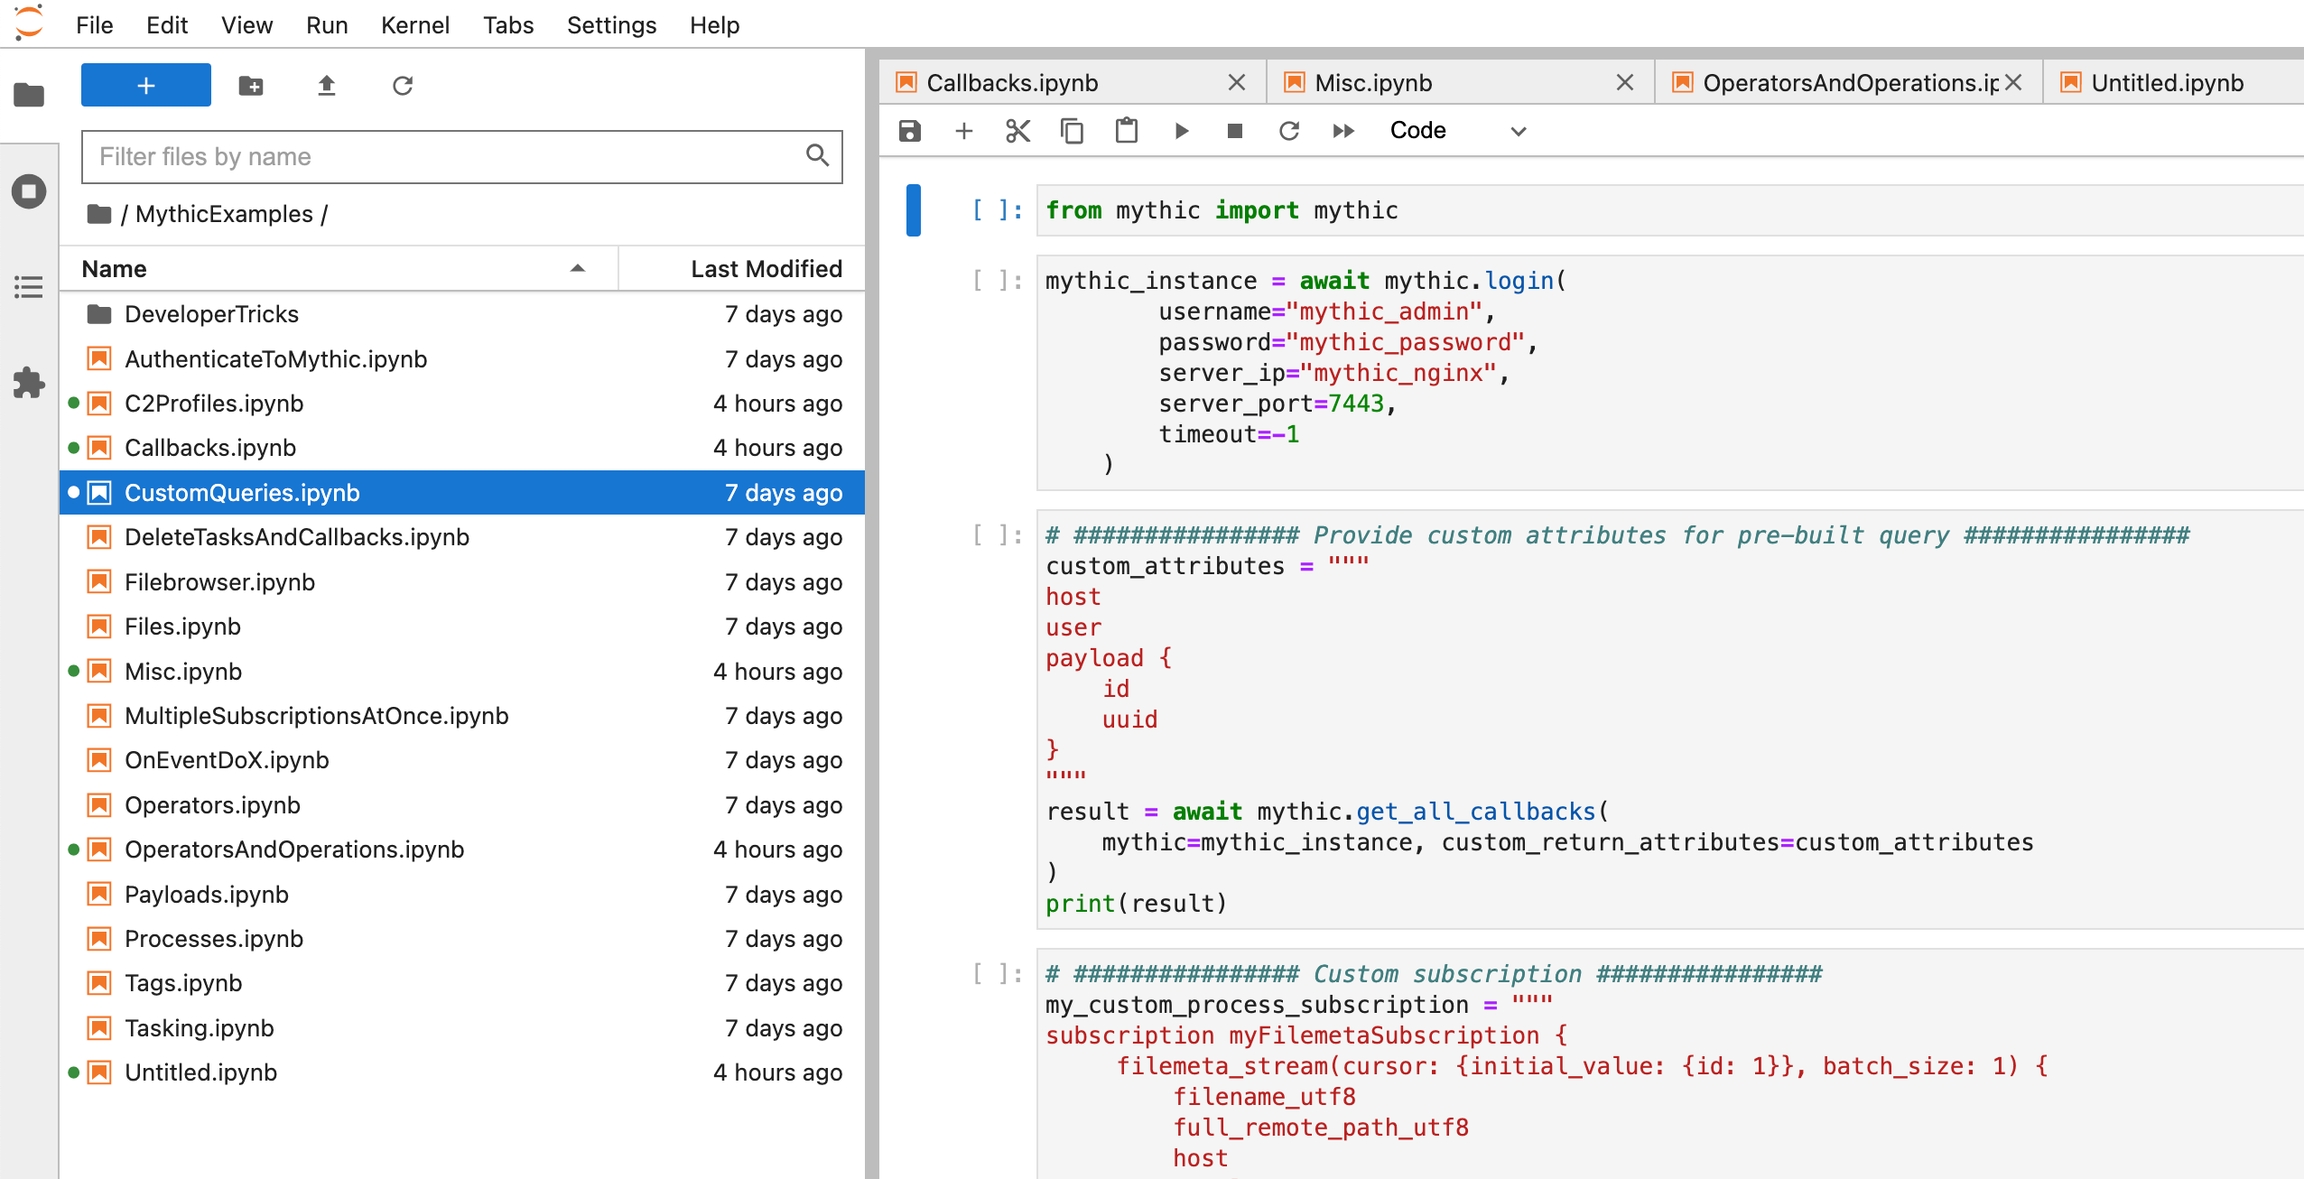
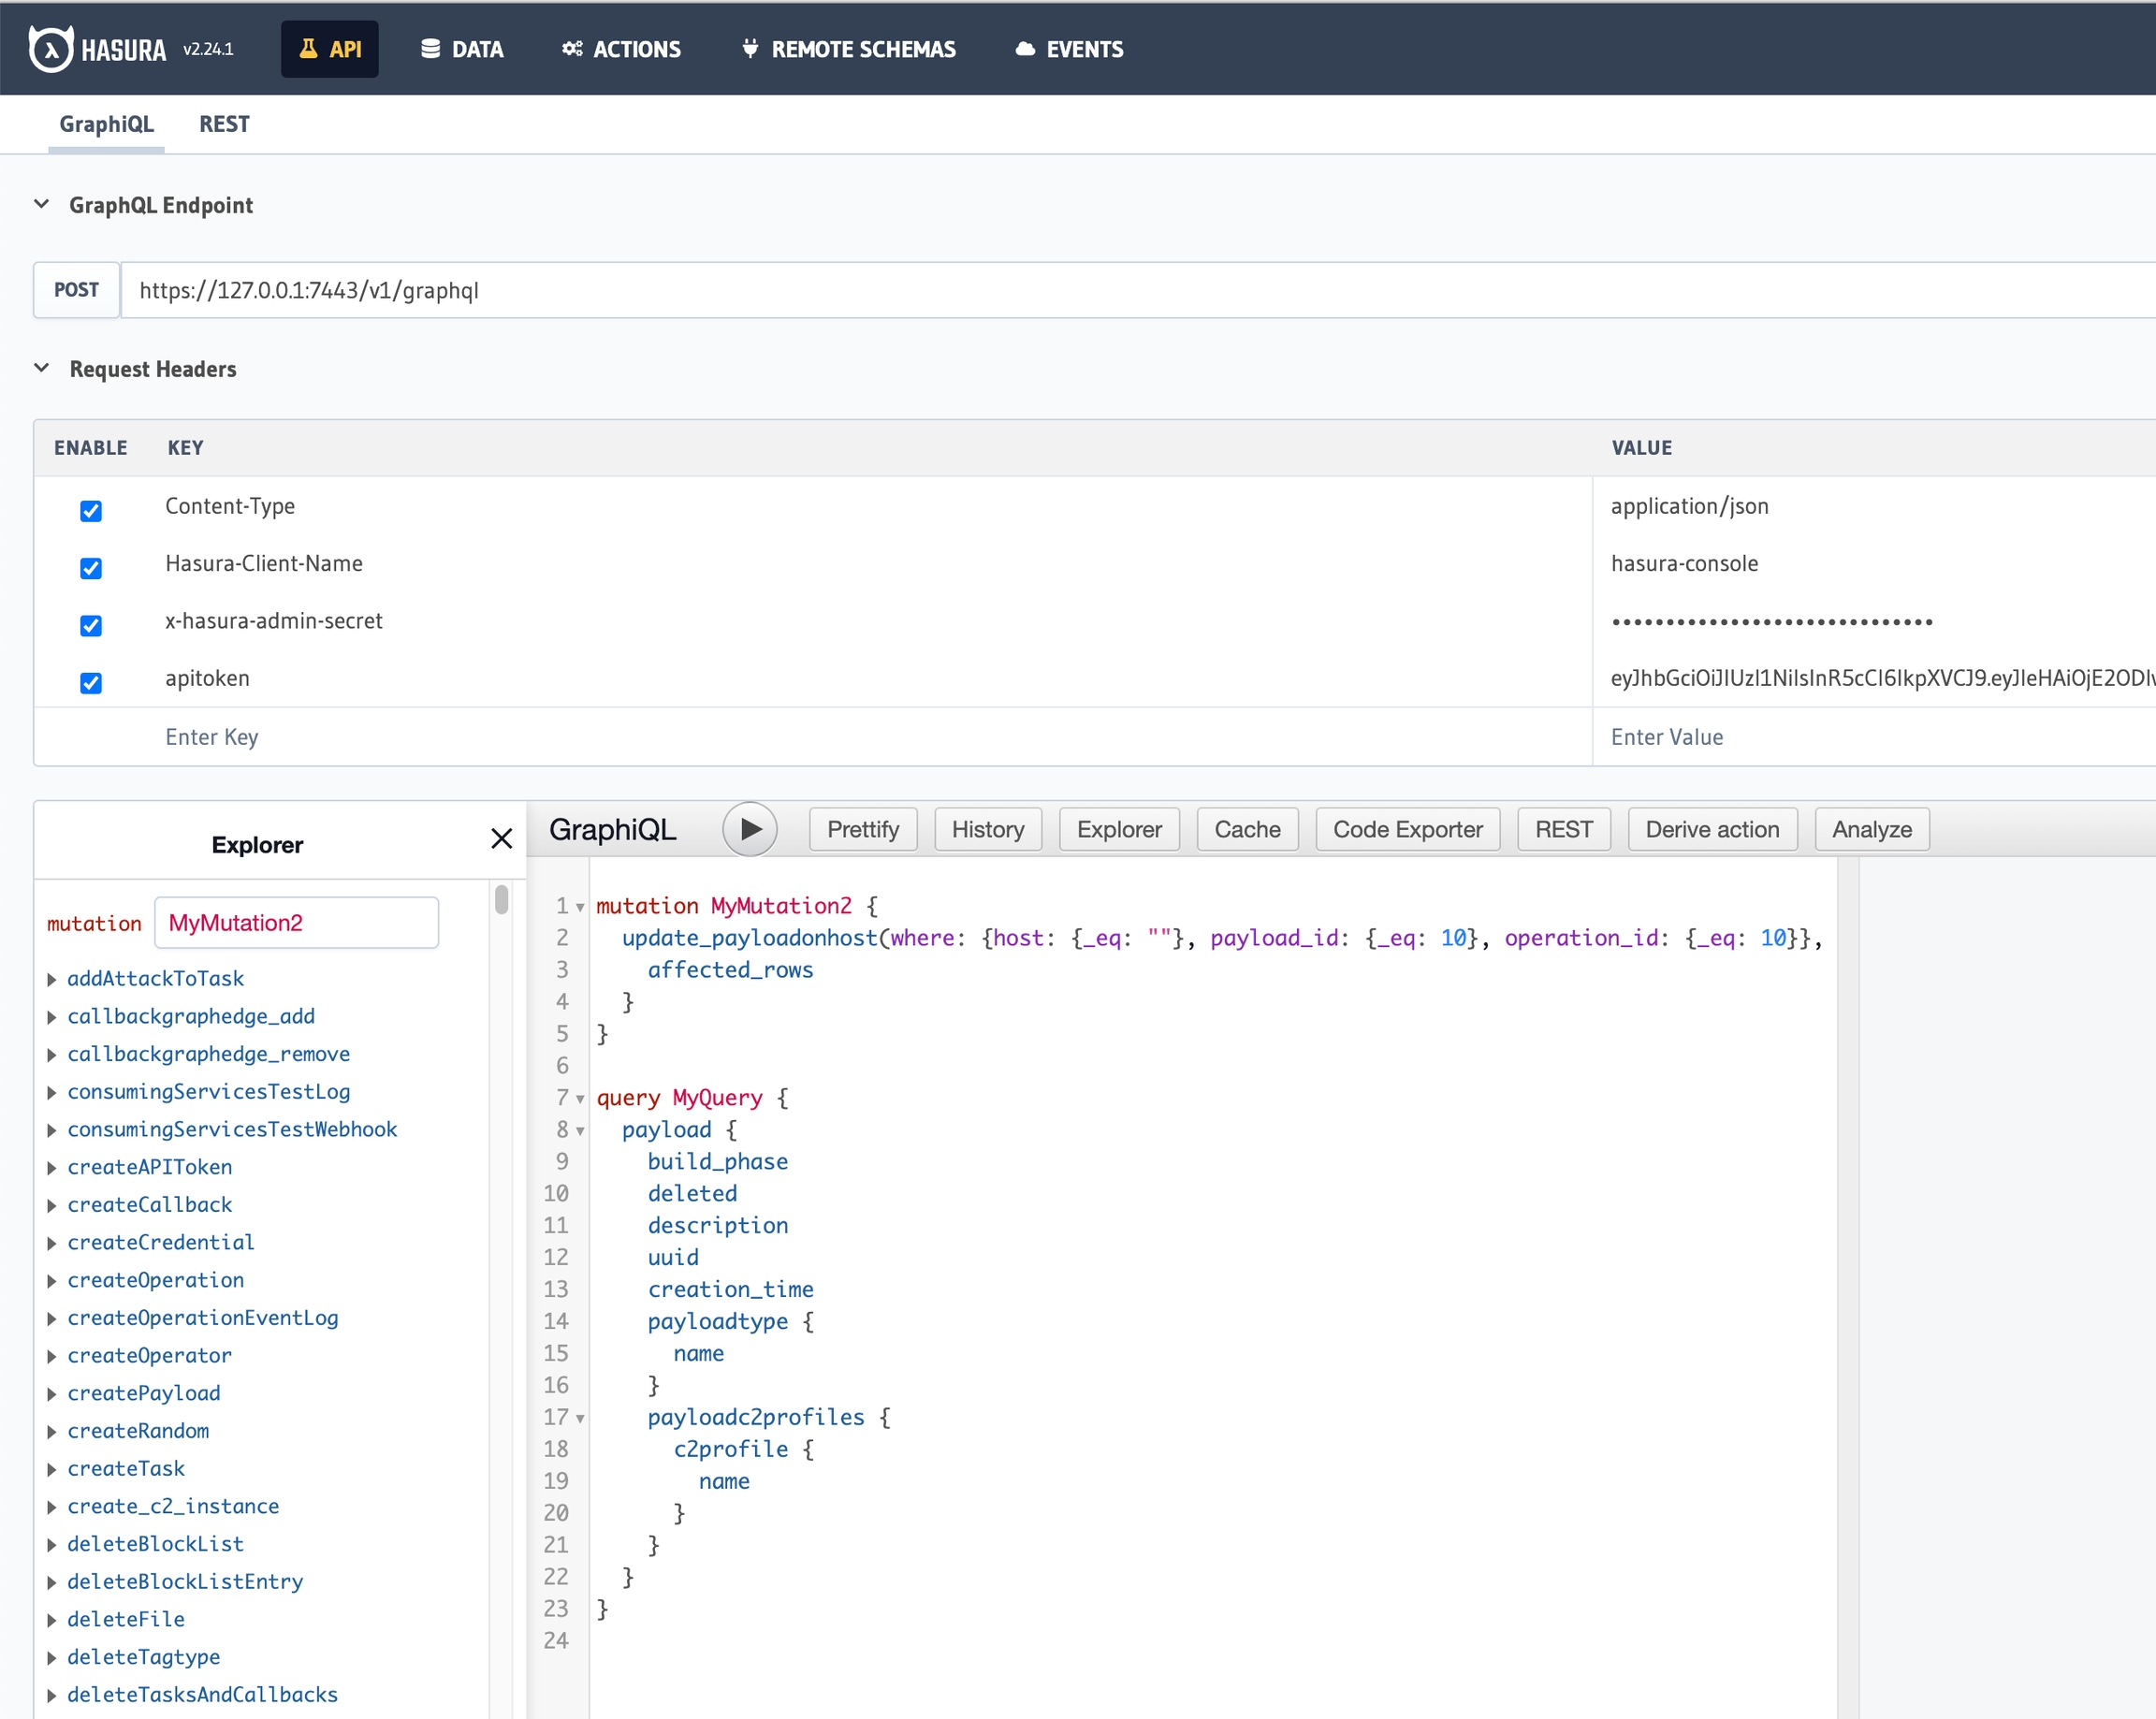
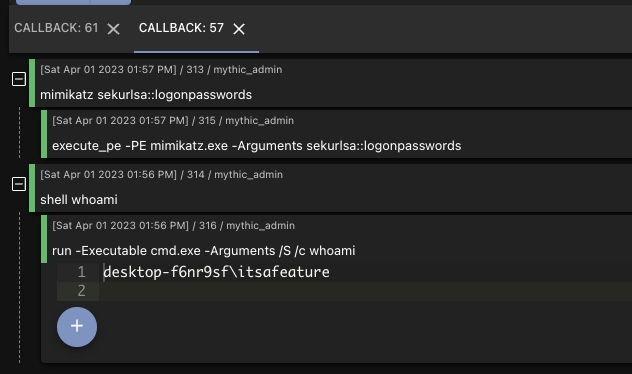
Pull the code from the official GitHub repository:
$ git clone https://github.com/its-a-feature/Mythic --depth 1You need to have Docker server version 20.10.22 or above (latest version is 23.0.1) for Mythic and the docker containers to work properly. If you do sudo apt upgrade and sudo apt install docker-compose-plugin on a new version of Ubuntu or Debian, then you should be good. You can check your version with sudo docker version.
Mythic is normally installed on Linux. If you want to install on macOS, you need to use orbstack (not Docker Desktop). This because macOS's Docker Desktop doesn't support host networking, which the C2 containers need to dynamically open up ports.
All configuration is done via the mythic-cli binary. However, to help with GitHub sizes, the mythic-cli binary is no longer distributed with the main Mythic repository. Instead, you will need to make the binary via sudo make from the main Mythic folder. This will create the build container for the mythic-cli, build the binary, and copy it into your main Mythic folder automatically. From there on, you can use the mythic-cli binary like normal. Make sure you use the mythic-cli binary from the main Mythic folder.
Mythic configuration is all done via Mythic/.env, which means for your configuration you can either add/edit values there or add them to your environment.
If you need to run mythic-cli as root for Docker and you set your environment variables as a user, be sure to run sudo -E ./mythic-cli so that your environment variables are carried over into your sudo call. The following are the default values that Mythic will generate on first execution of sudo ./mythic-cli start unless overridden:
ALLOWED_IP_BLOCKS="0.0.0.0/0,::/0"
COMPOSE_PROJECT_NAME="mythic"
DEBUG_LEVEL="debug"
DEFAULT_OPERATION_NAME="Operation Chimera"
DEFAULT_OPERATION_WEBHOOK_CHANNEL=
DEFAULT_OPERATION_WEBHOOK_URL=
DOCUMENTATION_BIND_LOCALHOST_ONLY="true"
DOCUMENTATION_HOST="mythic_documentation"
DOCUMENTATION_PORT="8090"
DOCUMENTATION_USE_BUILD_CONTEXT="false"
DOCUMENTATION_USE_VOLUME="true"
GLOBAL_DOCKER_LATEST="v0.0.3"
GLOBAL_MANAGER="docker"
GLOBAL_SERVER_NAME="mythic"
HASURA_BIND_LOCALHOST_ONLY="true"
HASURA_CPUS="2"
HASURA_EXPERIMENTAL_FEATURES="streaming_subscriptions"
HASURA_HOST="mythic_graphql"
HASURA_MEM_LIMIT="2gb"
HASURA_PORT="8080"
HASURA_SECRET="random password"
HASURA_USE_BUILD_CONTEXT="false"
HASURA_USE_VOLUME="true"
INSTALLED_SERVICE_CPUS="1"
INSTALLED_SERVICE_MEM_LIMIT=
JUPYTER_BIND_LOCALHOST_ONLY="true"
JUPYTER_CPUS="2"
JUPYTER_HOST="mythic_jupyter"
JUPYTER_MEM_LIMIT=
JUPYTER_PORT="8888"
JUPYTER_TOKEN="mythic"
JUPYTER_USE_BUILD_CONTEXT="false"
JUPYTER_USE_VOLUME="true"
JWT_SECRET="random password"
MYTHIC_ADMIN_PASSWORD="random password"
MYTHIC_ADMIN_USER="mythic_admin"
MYTHIC_API_KEY=
MYTHIC_DEBUG_AGENT_MESSAGE="false"
MYTHIC_REACT_BIND_LOCALHOST_ONLY="true"
MYTHIC_REACT_DEBUG="false"
MYTHIC_REACT_HOST="mythic_react"
MYTHIC_REACT_PORT="3000"
MYTHIC_REACT_USE_BUILD_CONTEXT="false"
MYTHIC_REACT_USE_VOLUME="true"
MYTHIC_SERVER_BIND_LOCALHOST_ONLY="true"
MYTHIC_SERVER_COMMAND=
MYTHIC_SERVER_CPUS="2"
MYTHIC_SERVER_DYNAMIC_PORTS="7000-7010,1080"
MYTHIC_SERVER_DYNAMIC_PORTS_BIND_LOCALHOST_ONLY="false"
MYTHIC_SERVER_GRPC_PORT="17444"
MYTHIC_SERVER_HOST="mythic_server"
MYTHIC_SERVER_MEM_LIMIT=
MYTHIC_SERVER_PORT="17443"
MYTHIC_SERVER_USE_BUILD_CONTEXT="false"
MYTHIC_SERVER_USE_VOLUME="true"
MYTHIC_SYNC_CPUS="2"
MYTHIC_SYNC_MEM_LIMIT=
NGINX_BIND_LOCALHOST_ONLY="false"
NGINX_HOST="mythic_nginx"
NGINX_PORT="7443"
NGINX_USE_BUILD_CONTEXT="false"
NGINX_USE_IPV4="true"
NGINX_USE_IPV6="false"
NGINX_USE_SSL="true"
NGINX_USE_VOLUME="true"
POSTGRES_BIND_LOCALHOST_ONLY="false"
POSTGRES_CPUS="2"
POSTGRES_DB="mythic_db"
POSTGRES_DEBUG="false"
POSTGRES_HOST="mythic_postgres"
POSTGRES_MEM_LIMIT=
POSTGRES_PASSWORD="random password"
POSTGRES_PORT="5432"
POSTGRES_USE_BUILD_CONTEXT="false"
POSTGRES_USE_VOLUME="true"
POSTGRES_USER="mythic_user"
RABBITMQ_BIND_LOCALHOST_ONLY="true"
RABBITMQ_CPUS="2"
RABBITMQ_HOST="mythic_rabbitmq"
RABBITMQ_MEM_LIMIT=
RABBITMQ_PASSWORD="random password"
RABBITMQ_PORT="5672"
RABBITMQ_USE_BUILD_CONTEXT="false"
RABBITMQ_USE_VOLUME="true"
RABBITMQ_USER="mythic_user"
RABBITMQ_VHOST="mythic_vhost"
REBUILD_ON_START="true"
WEBHOOK_DEFAULT_ALERT_CHANNEL=
WEBHOOK_DEFAULT_CALLBACK_CHANNEL=
WEBHOOK_DEFAULT_CUSTOM_CHANNEL=
WEBHOOK_DEFAULT_FEEDBACK_CHANNEL=
WEBHOOK_DEFAULT_STARTUP_CHANNEL=
WEBHOOK_DEFAULT_URL=A few important notes here:
MYTHIC_SERVER_PORT will be the port opened on the server where you're running Mythic. The NGINX_PORT is the one that's opened by Nginx and acts as a reverse proxy to all other services. The NGINX_PORT is the one you'll connect to for your web user interface and should be the only port you need to expose externally (unless you prefer to SSH port forward your web UI port).
The allowed_ip_blocks allow you to restrict access to everything within Mythic. This should be set as a series of netblocks with NO host bits set - i.e. 127.0.0.0/16,192.168.10.0/24,10.0.0.0/8
*_BIND_LOCALHOST_ONLY - these settings determine if the associated container binds the port to 127.0.0.1:port or 0.0.0.0:port. These are all set to true (except for the nginx container) by default so that you're not exposing these services externally.
If you want to have a services (agent, c2 profile, etc) on a host other than where the Mythic server is running, then you need to make sure that RABBITMQ_BIND_LOCALHOST_ONLY and MYTHIC_SERVER_BIND_LOCALHOST_ONLY are both set to false so that your remote services can access Mythic. If you change these, you will need to run sudo ./mythic-cli start to make sure these changes are leveraged by Docker.
The above configuration does NOT affect the port or SSL information related to your agents or callback information. It's strictly for your operator web UI.
When the mythic_server container starts for the first time, it goes through an initialization step where it uses the password and username from Mythic/.env to create the mythic_admin_user user. Once the database exists, the mythic_server container no longer uses that value.
The mythic-cli binary is used to start/stop/configure/install components of Mythic. You can see the help menu at any time with mythic-cli -h, mythic-cli --help or mythic-cli help.
Mythic CLI is a command line interface for managing the Mythic application and associated containers and services.
Commands are grouped by their use and all support '-h' for help.
For a list of available services to install, check out: https://mythicmeta.github.io/overview/
Usage:
mythic-cli [command]
Available Commands:
add Add local service folder to docker compose
backup Backup various volumes/data to a custom location on disk
build Build/rebuild a specific container
build_ui Build/rebuild the React UI
completion Generate the autocompletion script for the specified shell
config Display or adjust the configuration
database Interact with the database
health Check health status of containers
help Help about any command
install Install services via git or local folders
load Load tar versions of Mythic images from ./saved_images/mythic_save.tar
logs Get docker logs from a running service
mythic_sync Install/Uninstall mythic_sync
rabbitmq Interact with the rabbitmq service
remove Remove local service folder from docker compose
remove_container Remove running or exited containers
restart Start all of Mythic
restore Restore various volumes/data from a custom location on disk
save Save tar versions of the specified container's images
services List out installed services
start Start Mythic containers
status Get current Mythic container status
stop Stop all of Mythic
test Test mythic service connections
uninstall uninstall services locally and remove them from disk
update Check for Mythic updates
version Print information about the mythic-cli and Mythic versions
volume Interact with the mythic volumes
Flags:
-h, --help help for mythic-cli
Use "mythic-cli [command] --help" for more information about a command.By default, Mythic does not come with any Payload Types (agents) or C2 Profiles. This is for a variety of reasons, but one of the big ones being time/space requirements - all Payload Types and C2 Profiles have their own Docker containers, and as such, collectively they could eat up a lot of space on disk. Additionally, having them split out into separate repositories makes it much easier to keep them updated.
Available Mythic Agents can be found on GitHub at https://github.com/MythicAgents
Available Mythic C2 Profiles can be found on GitHub at https://github.com/MythicC2Profiles
To install a Payload Type or C2 Profile, use the mythic-cli binary with:
sudo ./mythic-cli install github <url>If you have an agent already installed, but want to update it, you can do the same command again. If you supply a -f at the end, then Mythic will automatically overwrite the current version that's installed, otherwise you'll be prompted for each piece.
If you're wanting to enable SIEM-based logging, install the basic_logger via the mythic cli sudo ./mythic-cli install github https://github.com/MythicC2Profiles/basic_logger. This profile listens to the emit_log RabbitMQ queue and allows you to configure how you want to save/modify the logs. By default they just go to stdout, but you can configure it to write out to files or even submit the events to your own SIEM.
file_upload (file staged on mythic as part of tasking with the intent to get sent to the agent)
file_manual_upload (file staged on mythic as part of a user manually hosting it)
file_screenshot (file is a screenshot from the agent)
file_download (file is downloaded from agent to mythic)
artifact_new (new artifact created - think IOC)
eventlog_new (new eventlog message)
eventlog_modified (eventlog was modified, like resolving an issue or changing their message)
payload_new (new payload created)
task_mitre_attack (a task was associated with a new mitre attack technique)
task_new (a new task was created)
task_completed (a task completed)
task_comment (somebody added/removed/edited a comment on a task)
credential_new (a new credential was added to the store)
credential_modified (a credential was modified)
response_new (a new response for the user to see)
keylog_new (a new keylog entry)
callback_new (new callback registered)If you came here right from the previous section, your Mythic instance should already be up and running. Check out the next section to confirm that's the case. If at any time you wish to stop Mythic, simply run sudo ./mythic-cli stop and if you want to start it again run sudo ./mythic-cli start. If Mythic is currently running and you need to make a change, you can run sudo ./mythic-cli restart again without any issue, that command will automatically stop things and then restart them.
The default username is mythic_admin, but that user's password is randomly generated when Mythic is started for the first time. You can find this random value in the Mythic/.env file. Once Mythic has started at least once, this value is no longer needed, so you can edit or remove this entry from the Mythic/.env file.
If something seems off, here's a few places to check:
Run sudo ./mythic-cli status to give a status update on all of the docker containers. They should all be up and running. If one is exited or has only been up for less than 30 seconds, that container might be your issue. All of the Mythic services will also report back a health check which can be useful to determine if a certain container is having issues. The status command gives a lot of information about what services are running, on which ports, and if they're externally accessible or not.
MYTHIC SERVICE WEB ADDRESS BOUND LOCALLY
Nginx (Mythic Web UI) https://127.0.0.1:7443 false
Mythic Backend Server http://127.0.0.1:17443 false
Hasura GraphQL Console http://127.0.0.1:8080 true
Jupyter Console http://127.0.0.1:8888 true
Internal Documentation http://127.0.0.1:8090 true
ADDITIONAL SERVICES IP PORT BOUND LOCALLY
Postgres Database 127.0.0.1 5432 false
React Server 192.168.53.152 3000 true
RabbitMQ 127.0.0.1 5672 false
Mythic Main Services
CONTAINER NAME STATE STATUS PORTS
mythic_documentation running Up 38 seconds (healthy) 8090/tcp -> 127.0.0.1:8090
mythic_graphql running Up 36 seconds (healthy) 8080/tcp -> 127.0.0.1:8080
mythic_jupyter running Up 41 seconds (healthy) 8888/tcp -> 127.0.0.1:8888
mythic_nginx running Up 35 seconds (healthy) 7443/tcp -> :::7443, 7443
mythic_postgres running Up 39 seconds (healthy) 5432/tcp -> :::5432, 5432
mythic_rabbitmq running Up 40 seconds (health: starting) 5672/tcp -> :::5672, 5672
mythic_server running Up 37 seconds (health: starting) 7000/tcp -> :::7000, 7001/tcp -> :::7001, 7002/tcp -> :::7002, 7003/tcp -> :::7003, 7004/tcp -> :::7004, 7005/tcp -> :::7005, 7006/tcp -> :::7006, 7007/tcp -> :::7007, 7008/tcp -> :::7008, 7009/tcp -> :::7009, 7010/tcp -> :::7010, 17443/tcp -> :::17443, 17444/tcp -> :::17444, 7000, 7001, 7002, 7003, 7004, 7005, 7006, 7007, 7008, 7009, 7010, 17443, 17444
Installed Services
CONTAINER NAME STATE STATUS PORTS
no_translator running Up 43 seconds
service_wrapper running Up 42 seconds To check the logs of any container, run sudo ./mythic-cli logs [container_name]. For example, to see the output of mythic_server, run sudo ./mythic-cli logs mythic_server. This will help track down if the last thing that happened was an error of some kind.
If all of that looks ok, but something still seems off, it's time to check the browser.
First open up the developer tools for your browser and see if there are any errors that might indicate what's wrong. If there's no error though, check the network tab to see if there are any 404 errors.
If that's not the case, make sure you've selected a current operation (more on this in the Quick Usage section). Mythic uses websockets that pull information about your current operation to provide data. If you're not currently in an active operation (indicated at the top of your screen in big letters), then Mythic cannot provide you any data.
If you run into an issue where mythic_nginx is failing to start, you can look at its logs with sudo ./mythic-cli logs mythic_nginx. If you see Address family not supported by protocol, then it likely means that the nginx container is trying to use IPv4 and IPv6, but your host doesn't support one of them. To fix this, you can edit the .env file to adjust the following as necessary:
NGINX_USE_IPV4="true"
NGINX_USE_IPV6="false"Then restart the container with sudo ./mythic-cli build mythic_nginx and it should come up.
Starting with Mythic 3.2.16, Mythic pre-builds its main service containers and hosts them on GitHub. You'll see ghcr.io/itsafeature in the FROM line in your Dockerfiles instead of the itsafeaturemythic/ line which is hosted on DockerHub. When Mythic gets a new tag, these images are pre-built, mythic-cli is updated, and the associated push on GitHub is updated with the new tag version.
When you use the new mythic-cli to start Mythic, the .env variable GLOBAL_DOCKER_LATEST is used to determine which version of the Docker images to use. This variable is written out and saved as part of mythic-cli itself, so make sure when you do a git pull that you always run sudo make to get the latest mythic-cli as well.
As part of this, there are two new variables for each container:
*_USE_BUILD_CONTEXT - This variable changes the docker-compose file to either set a build-context to read the local Dockerfile when building or to not use the local build context and just set the image to use to be the one hosted on GitHub. In most cases, you're fine to leave this as false and just use the image hosted on GitHub. If you wanted to use another image version or if you wanted add stuff to the image that gets generated for a container, you can set this to true and modify the Dockerfile associated with the service.
*_USE_VOLUME - This variable identifies if the local file system is mounted into the image at run-time or if a custom volume is created and mounted instead. When this is set to true, then a custom volume is created and mounted into the container at run time so that your local filesystem isn't used. When this is false, then your local filesystem is mounted like normal. One reason to mount the local file system instead of using a volume is if you wanted to make changes to something on disk and have it reflected in the container. Similarly, you can set this to false so that your database and downloaded files are all contained within the Mythic folder. Setting this to true will mean that volumes are used, so your saved files and database are in Docker's volume directory and not locally within the Mythic folder. It's just something to consider when it comes time to save things off or if you wanted to pull the files from disk.
Mythic is pre-building its containers so that it's faster and easier to get going while still keeping all of the flexibility of Dockerimages. This cuts down on the install/build time of the containers and reduces the general size of the images due to multi-stage Docker builds.
Agents on GitHub can also do this for free. It's pretty simple (all things considered) and provides a lot of flexibility to how you build your containers. You don't need to configure any special GitHub secrets - you just need to create the necessary yaml file as part of a certain directory of your repository so that things are kicked off on push and on tag. One of these changes is an automatic update to your config.json so that Mythic can also track the version associated with your agent.
Specifically, you need to create the .github/workflows/[name].yml file so that GitHub will be able to handle your actions. An example from the service_wrapper payload is shown below:
99% of this example should work for all agents and c2 profiles. Things to change:
RELEASE_BRANCH - This might need to change depending on if your branch name is master or main. (line 39)
Updating the remote_images.service_wrapper (line 112) to remote_images.[your name] so that your config.json is updated appropriately. If you have multiple installs (ex: a payload in the payload_type folder and a c2 profile in the c2_profiles folder), then you should include this action multiple times to add each entry to your remote_images dictionary.
Updating the files to update (line 121) - after building and pushing your container image, you'll need to update the corresponding files with the new version. Once they're updated, you need to make sure those changes actually get saved and pushed with your tag updated to that new pushed version. This line points to which files to add to the new commit.
There are a few places in this example that use a working_directory that points to where the Dockerfiles are to use for building and saving changes. Make sure those paths reflect your agent/c2 profiles paths. You can find them in this example if you search for service_wrapper.
In addition to this GitHub Actions file, you'll need two Dockerfiles - one that's used to pre-build your images, and one that's updated with a FROM ghcr.io/ to point to your newly created image. The common convention used here is to create a .docker folder with your agent/c2 profile and the full Dockerfile in there (along with any necessary resources). Below is the example build Dockerfile in the .docker/Dockerfile for the service_wrapper payload type:
There's a few things to note here:
we're using one of the Mythic DockerHub images as a builder and using a different, smaller stage (python3.11-slim-bullseye in this case) that we copy things over to. The main thing that's going to make the images smaller is to build what's needed ahead of time and then move to a smaller image and copy things over. This is easier for C2 Profiles since you can really limit what gets moved to that second stage. This is harder for Agents though because you might still need a lot of toolchains and SDKs installed to build your agent on-demand. The best thing you can do here is to pre-pull any necessary requirements (like nuget packages or golang packages) so that at build-time for a payload you don't have to fetch them and can just build.
Because the service_wrapper uses the Python mythic-container PyPi library instead of the Golang library, we need to make sure we have Python 3.11+ and the right PyPi packages installed. On lines 3-4 we're copying in the requirements into our builder container and generating wheels from them so that in the second stage, lines 18-19, we copy over those wheels and install those.
Always make sure to test out your docker images to confirm you still have everything needed to build your agent. Some good reference points are any of the .docker/Dockerfile references in the Mythic repo, or the apfell, service_wrapper, websocket, or http versions.
This section describes new Payload Types
You want to create a new agent that fully integrates with Mythic. Since everything in Mythic revolves around Docker containers, you will need to ultimately create one for your payload type. This can be done with docker containers on the same host as the Mythic server or with an external VM/host machine.
What does Mythic's setup look like? We'll use the diagram below - don't worry though, it looks complicated but isn't too bad really:
Mythic itself is a docker-compose file that stands up a bunch of microservices. These services expose various pieces of functionality like a database (PostgreSQL), the web UI (React Web UI), internal documentation (Hugo Documentation), and a way for the various services to communicate with each other (RabbitMQ). Don't worry though, you don't worry about 99% of this.
Mythic by itself doesn't have any agents or command-and-control profiles - these all are their own Docker containers that connect up via RabbitMQ and gRPC. This is what you're going to create - a separate container that connects in (the far right hand side set of containers in the above diagram).
When you clone down the Mythic repo, run make to generate the mythic-cli binary, and then run sudo ./mythic-cli start, you are creating a docker-compose file automatically that references a bunch of Dockerfile in the various folders within the Mythic folder. These folders within Mythic are generally self-explanatory for their purpose, such as postgres-docker , rabbitmq-docker, mythic-docker, and MythicReactUI.
When you use the mythic-cli to install an agent or c2 profile, these all go in the Mythic/InstalledServices folder. This makes it super easy to see what you have installed.
Throughout development you'll have a choice - do development remotely from the Mythic server and hook in manually, or do development locally on the Mythic server. After all, everything boils down to code that connects to RabbitMQ and gRPC - Mythic doesn't really know if the connection is locally from Docker or remotely from somewhere else.
The first step is to clone down the example repository https://github.com/MythicMeta/ExampleContainers. The format of the repository is that of the External Agent template. This is the format you'll see for all of the agents and c2 profiles on the overview page.
Inside of the Payload_Type folder, there are two folders - one for GoLang and one for Python depending on which language you prefer to code your agent definitions in (this has nothing to do with the language of your agent itself, it's simply the language to define commands and parameters). We're going to go step-by-step and see what happens when you install something via mythic-cli, but doing it manually.
Pick whichever service you're interested in and copy that folder into your Mythic/InstalledServices folder. When you normally install via mythic-cli, it clones down your repository and does the same thing - it copies what's in that repository's Payload_Type and C2_Profiles folders into the Mythic/InstalledServices folder.
Now that a folder is in the Mythic/InstalledServices folder, we need to let the docker-compose file know that it's there. Assuming you copied over python_services, you then need to run sudo ./mythic-cli add python_services. This adds that python_services folder to the docker-compose. This is automatically done normally as part of the install process.
As part of updating docker-compose, this process adds a bunch of environment variables to what will be the new container.
Now that docker-compose knows about the new service, we need to build the image that will be used to make the agent's container. We can use sudo ./mythic-cli build python_services. This tells docker to look in the Mythic/InstalledServices/python_services folder for a Dockerfile and use it to build a new image called python_services. As part of this, Mythic will automatically then use that new image to create a container and run it. If it doesn't, then you can create and start the container with sudo ./mythic-cli start python_services.
Again, all of this happens automatically as part the normal installation process when you use sudo ./mythic-cli install. We're doing this step-by-step though so you can see what happens.
At this point, your new example agent should be visible within Mythic. If it's not, we can check logs to see what the issue might be with sudo ./mythic-cli logs python-services (this is a wrapper around sudo docker logs python-services and truncates to the latest 500 lines).
Steps 2.1-2.4 all happen automatically when you install a service via mythic-cli. If you don't want to install via mythic-cli then you can do these steps manually like we did here.
Now that you've seen the pieces and steps for installing an existing agent, it's time to start diving into what's going on within that python_services folder.
The only thing that absolutely MUST exist within this folder is a Dockerfile so that docker-compose can build your image and start the container. You can use anything as your base image, but Mythic provides a few to help you get started with some various environments:
itsafeaturemythic/mythic_go_base has GoLang 1.21 installed
itsafeaturemythic/mythic_go_dotnet has GoLang 1.21 and .NET
itsafeaturemythic/mythic_go_macos has GoLang 1.21 and the macOS SDK
itsafeaturemythic/mythic_python_base has Python 3.11 and the mythic_container pypi package
itsafeaturemythic/mythic_python_go has Python 3.11, the mythic_container pypi package, and GoLang v1.21
itsafeaturemythic/mythic_python_macos has Python 3.11, the mythic_container pypi package, and the macOS SDK
This allows two payload types that might share the same language to still have different environment variables, build paths, tools installed, etc. Docker containers come into play for a few things:
Sync metadata about the payload type (this is in the form of python classes or GoLang structs)
Contains the payload type code base (whatever language your agent is in)
The code to create the payload based on all of the user supplied input (builder function)
Sync metadata about all of the commands associated with that payload type
The code for all of those commands (whatever language your agent is in)
Browser scripts for commands (JavaScript)
The code to take user supplied tasking and turn it into tasking for your agent
Start your Dockerfile off with one of the above images:
From itsafeaturemythic/mythic_python_base:latestOn the next lines, just add in any extra things you need for your agent to properly build, such as:
RUN pip install python_module_name
RUN shell_command
RUN apt-get install -y tool_nameThe latest container versions and their associated mythic_container PyPi versions can be found here: Container Syncing. The mythic_python_* containers will always have the latest PyPi version installed if you're using the :latest version.
If you're curious what else goes into these containers, look in the docker-templates folder within the Mythic repository.
Within the Dockerfile you will then need to do whatever is needed to kick off your main program that imports either the MythicContainer PyPi package or the MythicContainer GoLang package. As some examples, here's what you can do for Python and GoLang:
Mythic/InstalledServices/[agent name]/main.py <-- if you plan on using Python as your definition language, this main.py file is what will get executed by Python 3.11 assuming you use the Dockerfile shown below. If you want a different structure, just change the CMD line to execute whatever it is you want.
FROM itsafeaturemythic/mythic_python_base:latest
RUN python3 -m pip install donut-shellcode
WORKDIR /Mythic/
CMD ["python3", "main.py"]At that point, your main.py file should import any other folders/files needed to define your agent/commands and import the mythic_container PyPi package.
Any changes you make to your Python code is automatically reflected within the container. Simply do sudo ./mythic-cli start [agent name] to restart the container and have python reprocess your files.
If you want to do local testing without docker, then you can add a rabbitmq_config.json in the root of your directory (i.e. [agent name]/rabbitmq_config.json) that defines the environment parameters that help the container connect to Mythic:
{
"rabbitmq_host": "127.0.0.1",
"rabbitmq_password": "PqR9XJ957sfHqcxj6FsBMj4p",
"mythic_server_host": "127.0.0.1",
"webhook_default_channel": "#mythic-notifications",
"debug_level": "debug",
"rabbitmq_port": 5432,
"mythic_server_grpc_port": 17444,
"webhook_default_url": "",
"webhook_default_callback_channel": "",
"webhook_default_feedback_channel": "",
"webhook_default_startup_channel": "",
"webhook_default_alert_channel": "",
"webhook_default_custom_channel": "",
}Things are a little different here as we're compiling binaries. To keep things in a simplified area for building, running, and testing, a common file like a Makefile is useful. This Makefile would be placed at Mythic/InstalledServices/[agent name]/Makefile.
From here, that make file can have different functions for what you need to do. Here's an example of the Makefile that allows you to specify custom environment variables when debugging locally, but also support Docker building:
BINARY_NAME?=main
DEBUG_LEVEL?="warning"
RABBITMQ_HOST?="127.0.0.1"
RABBITMQ_PASSWORD?="password here"
MYTHIC_SERVER_HOST?="127.0.0.1"
MYTHIC_SERVER_GRPC_PORT?="17444"
WEBHOOK_DEFAULT_URL?=
WEBHOOK_DEFAULT_CHANNEL?=
WEBHOOK_DEFAULT_FEEDBACK_CHANNEL?=
WEBHOOK_DEFAULT_CALLBACK_CHANNEL?=
WEBHOOK_DEFAULT_STARTUP_CHANNEL?=
build:
go mod tidy
go build -o ${BINARY_NAME} .
cp ${BINARY_NAME} /
run:
cp /${BINARY_NAME} .
./${BINARY_NAME}
run_custom:
DEBUG_LEVEL=${DEBUG_LEVEL} \
RABBITMQ_HOST=${RABBITMQ_HOST} \
RABBITMQ_PASSWORD=${RABBITMQ_PASSWORD} \
MYTHIC_SERVER_HOST=${MYTHIC_SERVER_HOST} \
MYTHIC_SERVER_GRPC_PORT=${MYTHIC_SERVER_GRPC_PORT} \
WEBHOOK_DEFAULT_URL=${WEBHOOK_DEFAULT_URL} \
WEBHOOK_DEFAULT_CHANNEL=${WEBHOOK_DEFAULT_CHANNEL} \
WEBHOOK_DEFAULT_FEEDBACK_CHANNEL=${WEBHOOK_DEFAULT_FEEDBACK_CHANNEL} \
WEBHOOK_DEFAULT_CALLBACK_CHANNEL=${WEBHOOK_DEFAULT_CALLBACK_CHANNEL} \
WEBHOOK_DEFAULT_STARTUP_CHANNEL=${WEBHOOK_DEFAULT_STARTUP_CHANNEL} \
./${BINARY_NAME}
To go along with that, a sample Docker file for Golang is as follows:
FROM itsafeaturemythic/mythic_go_base:latest
WORKDIR /Mythic/
COPY [".", "."]
RUN make build
CMD make runIt's very similar to the Python version, except it runs make build when building and make run when running the code. The Python version doesn't need a Makefile or multiple commands because it's an interpreted language.
If your container/service is running on a different host than the main Mythic instance, then you need to make sure the rabbitmq_password is shared over to your agent as well. By default, this is a randomized value stored in the Mythic/.env file and shared across containers, but you will need to manually share this over with your agent either via an environment variable (MYTHIC_RABBITMQ_PASSWORD ) or by editing the rabbitmq_password field in your rabbitmq_config.json file. You also need to make sure that the MYTHIC_RABBITMQ_LISTEN_LOCALHOST_ONLY is set to false and restart Mythic to make sure the RabbitMQ port isn't bound exclusively to 127.0.0.1.
The folder that gets copied into Mythic/InstalledServices is what's used to create the docker image and container names. It doesn't necessarily have to be the same as the name of your agent / c2 profile (although that helps).
Docker does not allow capital letters in container names. So, if you plan on using Mythic's mythic-cli to control and install your agent, then your agent's name can't have any capital letters in it. Only lowercase, numbers, and _. It's a silly limitation by Docker, but it's what we're working with.
The example services has a single container that offers multiple options (Payload Type, C2 Profile, Translation Container, Webhook, and Logging). While a single container can have all of that, for now we're going to focus on just the payload type piece, so delete the rest of it.
For the python_services folder this would mean deleting the mywebhook, translator, and websocket folders. For the go_services folder, this would mean deleting the http, my_logger, my_webhooks, no_actual_translation folders. For both cases, this will result in removing some imports at the top of the remaining main.py and main.go files.
For the python_services folder, we'll update the basic_python_agent/agent_functions/builder.py file. This file can technically be anywhere that main.py can reach and import, but for convenience it's in a folder, agent_functions along with all of the command definitions for the agent. Below is an example from that builder that defines the agent:
#from mywebhook.webhook import *
import mythic_container
import asyncio
import basic_python_agent
#import websocket.mythic.c2_functions.websocket
#from translator.translator import *
#from my_logger import logger
mythic_container.mythic_service.start_and_run_forever()package main
import (
basicAgent "GoServices/basic_agent/agentfunctions"
//httpfunctions "GoServices/http/c2functions"
//"GoServices/my_logger"
//"GoServices/my_webhooks"
//mytranslatorfunctions "GoServices/no_actual_translation/translationfunctions"
"github.com/MythicMeta/MythicContainer"
)
func main() {
// load up the agent functions directory so all the init() functions execute
//httpfunctions.Initialize()
basicAgent.Initialize()
//mytranslatorfunctions.Initialize()
//my_webhooks.Initialize()
//my_logger.Initialize()
// sync over definitions and listen
MythicContainer.StartAndRunForever([]MythicContainer.MythicServices{
//MythicContainer.MythicServiceC2,
//MythicContainer.MythicServiceTranslationContainer,
//MythicContainer.MythicServiceWebhook,
//MythicContainer.MythicServiceLogger,
MythicContainer.MythicServicePayload,
})
}Check out the Payload Type page for information on what the various components in the agent definition means and how to start customizing how your agent looks within Mythic.
To make your agent installable via mythic-cli, the repo/folder needs to be in a common format. This format just makes it easier for mythic-cli to add things to the right places. This is based on the External Agent format here (https://github.com/MythicMeta/Mythic_External_Agent). If you're creating a new payload type, then add your entire folder into the Payload_Type folder. Similarly, when you get around to making documentation for your agent, you can add it to the documentation folder. If there's things you don't want to include, then in the config.json file you can mark specific sections to exclude.
If you want your new C2 profile or Agent to show up on the overview page (https://mythicmeta.github.io/overview/) then you need to reach out to @its_a_feature_ on twitter or @its_a_feature_ in the Bloodhound slack to get your agent added to the agents list here (https://github.com/MythicMeta/overview/blob/main/agent_repos.txt). You could also make a PR to that file if you wanted too.
Having your agent hosted on the https://github.com/MythicAgents organization means that it's easier for people to find your agent and we can collect stats on its popularity. For an example of what this means, check out the overview page and see the biweekly clone stats as well as the green chart icon for a historic list of view/clones of the repo.
If you don't want to have your agent hosted on the MythicAgents organization, but still want to make it available on that site, that's fine too. Just let me know or update the PR for that file appropriately.
In addition to simply hosting the agent/c2 profile, there's now a sub-page that shows off all of the agent's capabilities so it's easier to compare and see which ones meet your needs. That page is here (https://mythicmeta.github.io/overview/agent_matrix.html) and is populated based on a agent_capabilities.json file in the root of your repository. This is just a json file that gets ingested at midnight every day and used to update that matrix. The format is as follows:
The os key provides all the operating systems your agent supports. These are the things that would be available after installing your agent for the user to select when building a payload. The languages key identifies what languages your agent supports (typically only one, but could be multiple). The features section identifies which features your agent supports. For the mythic sub-key, the options are at the bottom of the matrix page, along with their descriptions and links to documentation for if you want to implement that feature in your agent. The custom sub-key is just additional features that your agent supports that you want to call out. The payload_output key identifies which output formats your agent supports as well as the architectures key identifying which architectures your agent can be built for. The c2 key identifies which C2 Profiles your agent supports and the supported_wrappers key identifies which wrapper payloads your agent supports. As you might expect, the mythic_version is which Mythic version your agent supports and the agent_version is the current agent version in use.
This page has the various different ways the initial checkin can happen and the encryption schemes used.
You will see a bunch of UUIDs mentioned throughout this section. All UUIDs are UUIDv4 formatted UUIDs (36 characters in length) and formatted like:
b446b886-ab97-49b2-b240-969a75393c06In general, the UUID concatenated with the encrypted message provides a way to give context to the encrypted message without requiring a lot of extra pieces and without having to do a bunch of nested base64 encodings. 99% of the time, your messages will use your callbackUUID in the outer message. The outer UUID gives Mythic information about how to decrypt or interpret the following encrypted blob. In general:
payloadUUID as the outer UUID tells Mythic to look up that payload UUID, then look up the C2 profile associated with it, find a parameter called AESPSK, and use that as the key to decrypt the message
tempUUID as the outer UUID tells Mythic that this is a staging process. So, look up the UUID in the staging database to see information about the blob, such as if it's an RSA encrypted blob or is part of a Diffie-Hellman key exchange
callbackUUID as the outerUUID tells Mythic that this is a full callback with an established encryption key or in plaintext.
However, when your payload first executes, it doesn't have a callbackUUID, it's just a payloadUUID. This is why you'll see clarifiers as to which UUID we're referring to when doing specific messages. The whole goal of the checkin process is to go from a payload (and thus payloadUUID) to a full callback (and thus callbackUUID), so at the end of staging and everything you'll end up with a new UUID that you'll use as the outer UUID.
The plaintext checkin is useful for testing or when creating an agent for the first time. When creating payloads, you can generate encryption keys per c2 profile. To do so, the C2 Profile will have a parameter that has an attribute called crypto_type=True. This will then signal to Mythic to either generate a new per-payload AES256_HMAC key or (if your agent is using a translation container) tell your agent's translation container to generate a new key. In the http profile for example, this is a ChooseOne option between aes256_hmac or none. If you're doing plaintext comms, then you need to set this value to none when creating your payload. Mythic looks at that outer PayloadUUID and checks if there's an associated encryption key with it in the database. If there is, Mythic will automatically try to decrypt the rest of the message, which will fail. This checkin has the following format:
Base64( PayloadUUID + JSON({
"action": "checkin", // required
"uuid": "payload uuid", //uuid of the payload - required
"ips": ["127.0.0.1"], // internal ip addresses - optional
"os": "macOS 10.15", // os version - optional
"user": "its-a-feature", // username of current user - optional
"host": "spooky.local", // hostname of the computer - optional
"pid": 4444, // pid of the current process - optional
"architecture": "x64", // platform arch - optional
"domain": "test", // domain of the host - optional
"integrity_level": 3, // integrity level of the process - optional
"external_ip": "8.8.8.8", // external ip if known - optional
"encryption_key": "base64 of key", // encryption key - optional
"decryption_key": "base64 of key", // decryption key - optional
"process_name": "osascript", // name of the current process - optional
})
)The JSON section is not encrypted in any way, it's all plaintext.
Here's an example checkin message message:
ODA4NDRkMTktOWJmYy00N2Y5LWI5YWYtYzZiOTE0NGMwZmRjeyJhY3Rpb24iOiJjaGVja2luIiwiaXBzIjpbIjE3Mi4xNi4xLjEiLCIxOTIuMTY4LjAuMTE4IiwiMTkyLjE2OC4yMjguMCIsIjE5Mi4xNjguNTMuMSIsIjE5OC4xOS4yNDkuMyIsImZkMDc6YjUxYTpjYzY2OjA6YTYxNzpkYjVlOmFiNzplOWYxIiwiZmQ1MzpkYTlmOjk4MWE6NWI0Mjo4YjA6MzNjOTplMGE1OjIyNTYiLCJmZTgwOjoxIiwiZmU4MDo6MTQ3ZDpkYWZmOmZlZWM6YjQ2NCIsImZlODA6OjE0N2Q6ZGFmZjpmZWVjOmI0NjUiLCJmZTgwOjoxNDdkOmRhZmY6ZmVlYzpiNDY2IiwiZmU4MDo6MTQ3ZDpkYWZmOmZlZWM6YjQ2NyIsImZlODA6OjIyOmQxYzk6MWMyZTo5Mjk3IiwiZmU4MDo6MzQ3ZDpkYWZmOmZlY2U6M2ExNyIsImZlODA6OjNjMmQ6ODZiYjo4ZDk5OjJjNjciLCJmZTgwOjo4ODU3OjJhZmY6ZmU2NToyNTExIiwiZmU4MDo6ODg1NzoyYWZmOmZlNjU6MjUxMSIsImZlODA6OmFlZGU6NDhmZjpmZTAwOjExMjIiLCJmZTgwOjpjZTgxOmIxYzpiZDJjOjY5ZSIsImZlODA6OmQxMDM6N2IyNDo2YzliOjhlMjIiXSwib3MiOiJWZXJzaW9uIDEzLjQgKEJ1aWxkIDIyRjY2KSIsInVzZXIiOiJpdHNhZmVhdHVyZSIsImhvc3QiOiJzcG9va3kubG9jYWwiLCJwaWQiOjY1ODYsInV1aWQiOiI4MDg0NGQxOS05YmZjLTQ3ZjktYjlhZi1jNmI5MTQ0YzBmZGMiLCJhcmNoaXRlY3R1cmUiOiJhbWQ2NCIsImRvbWFpbiI6IiIsImludGVncml0eV9sZXZlbCI6MiwiZXh0ZXJuYWxfaXAiOiIiLCJwcm9jZXNzX25hbWUiOiIvVXNlcnMvaXRzYWZlYXR1cmUvRG9jdW1lbnRzL015dGhpY0FnZW50cy9wb3NlaWRvbi9QYXlsb2FkX1R5cGUvcG9zZWlkb24vcG9zZWlkb24vYWdlbnRfY29kZS9wb3NlaWRvbl93ZWJzb2NrZXRfaHR0cC5iaW4ifQ==The checkin has the following response:
Base64( PayloadUUID + JSON({
"action": "checkin",
"id": "UUID", // new UUID for the agent to use
"status": "success"
})
)From here on, the agent messages use the new UUID instead of the payload UUID. This allows Mythic to track a payload trying to make a new callback vs a callback based on a payload.
This method uses a static AES256 key for all communications. This will be different for each payload that's created. When creating payloads, you can generate encryption keys per c2 profile. To do so, the C2 Profile will have a parameter that has an attribute called crypto_type=True. This will then signal to Mythic to either generate a new per-payload AES256_HMAC key or (if your agent is using a translation container) tell your agent's translation container to generate a new key. In the http profile for example, this is a ChooseOne option between aes256_hmac or none. The key passed down to your agent during build time will be the base64 encoded version of the 32Byte key.
The message sent will be of the form:
Base64( PayloadUUID + AES256(
JSON({
"action": "checkin", // required
"uuid": "payload uuid", //uuid of the payload - required
"ips": ["127.0.0.1"], // internal ip addresses - optional
"os": "macOS 10.15", // os version - optional
"user": "its-a-feature", // username of current user - optional
"host": "spooky.local", // hostname of the computer - optional
"pid": 4444, // pid of the current process - optional
"architecture": "x64", // platform arch - optional
"domain": "test", // domain of the host - optional
"integrity_level": 3, // integrity level of the process - optional
"external_ip": "8.8.8.8", // external ip if known - optional
"encryption_key": "base64 of key", // encryption key - optional
"decryption_key": "base64 of key", // decryption key - optional
"process_name": "osascript", // name of the current process - optional
})
)
)Here's an example message with encryption key of hfN9Nk29S8LsjrE9ffbT9KONue4uozk+/TVMyrxDvvM= and message:
ODA4NDRkMTktOWJmYy00N2Y5LWI5YWYtYzZiOTE0NGMwZmRjnZ/FcM9jnfvzAv/RYFPAvkGH8+nWHAGqxcBXSlPvq8jbCRoZrVvSSZOxNwg15q3Etz9hEb7Qunv1Sm3/8SSzp+ne4fxFObunQWzHo+7tS68csvn/uxqhiyvD83KK66xtPyGzPFlK1ZXD+wxDbo2M3iSYPEp0m5w+rQhzm5aTA6Gk6p0KSXovYvnY3TsJtdgVPlY1cFt75UzTd0iIFU8hJ+KbhyMUjJujLA6++sVrXuFps2TbAi21Z5Hr/g3/S6HAk/RSedKyXEZ6Hbbgx3gESsHa/QuVjP9Lz+Y6H9I4DtgEunCHddvruJUPqYxFGT2m8WbGc6AH6+m2ucexym0yBUryuFWfsrW6QSfcGUaVb4DWrVHtqHcXctYRNb7pOf0T/P26pFt77fgii4j0RgzTGod9QDWhSfvte+ffUWjsWKyixUffjIffj45sgDS0tvtT2Rej8gFiIpAs9F/oOH/ps5pRQeflULd1eH0GKh5WUcDwsjUa89KeOcts44J+E5+7trQ3q2q9Uy8S96DM8Nr5QryokeCD7J0goKZQPdutVXzwIvI9RT7zCQpV8CrRTpQ63L9P9IhIpyT+TDvorQd0v/I/DGb6Ev/ZUAxbyAR0JLJGjYYv1NUno5Ru2Plv1wsn82YanVF1V2LE1ii6DC7jclrkgfKN9Qhli+hIiUwSJ3YvFTT1ybHf/Fyw4ZZ6PiOIZIWgcJmHUHx//1TNvlTrmABitRpwb75yuJ6ZfYnKv/BlrQtJ9nFveNeYKP/rL7uYwPq3RY9IJRK7DBOqy53qiiysRfhimraW//sXc6duBmASW0ijZ21HKaqdVr72PMIJpEWghIznzpzEVpJqYj0uR9K/bL5W6kfIP43dyDBzGAGd87VBIcUTsIJLWaOHGPVmO3OmmtIfW34ivsX1TElTVjyrmKneQ+OTWww0RbXZdE5swvucXqC8wTuwybgwQWVPCvrBTBlv3iXgkP4dOjbvr1YZS+HpdbT5OEhwIqnDCXIqItVYx9Hz5BdfcBFbXUXk0SIQzWQj9xw+olYYQMrxomNvjuGxBkOmhTJf6yUyRK1Mp8b992FPBzLVRexYFc5FZxrI8CJeS91R3C21gb3SZH4EdKk1S3mR40O427TGYG5Hcqzqz5n0M6+cWORxUp7LKT34kDwgzHQK1h5kEoaGvGB1QDtx8GLsbfk/BqBoV2oHGJP1HHbVgYMgBTrkYObXOKFW8WyaUWcB1p/dSmW5Ww==The message response will be of the form:
Base64( PayloadUUID + AES256(
JSON({
"action": "checkin",
"id": "callbackUUID", // callback UUID for the agent to use
"status": "success"
})
)
)Here's that sample message's response:
ODA4NDRkMTktOWJmYy00N2Y5LWI5YWYtYzZiOTE0NGMwZmRjyHcKh56jliiv87ReJE7QqK8edpLcV5cfywt8Lg1jWJzPc8b37zB9/mliG1HKH0dyF/jZqiSzUfSWEjgfhKa3DoLUqJOvnbpOYYsL3GvfWrps3/HQhZogSjwXnQmTehbADhXrOqA4622YMFjJbpykxdq7kpufn+12GDidwNybOlbg9ej8D/PpZVVdqL2RdASeFrom here on, the agent messages use the new UUID instead of the payload UUID.
With that same example from above, the agent gets back a response of success with a new callback UUID. From there on, since it's a static encryption, we'll see a get tasking message like the following:
ODIyYmZmMWItYmRhMC00YmNlLWE0ZDMtYTZiZGIxMWI4YTVm3F56rkDEESX1GBAOQy3yaGiiAQABGkGxY66lNP7JS1rie8e7KbFHXwICOj67vvXpo5cik/9LYBqfQ8Ce5E3eUF1mExFX3EOzgAJd6Ey4fR93LoUTeMQQQZ3+ZMCnphaaDVbvJXCuWgoTMr/wO17H1k4zoAaMi+PHk0BXaaNyHMc=Notice how the outer UUID is different, but the encryption key is still the same.
Padding: PKCS7, block size of 16
Mode: CBC
IV is 16 random bytes
Final message: IV + Ciphertext + HMAC
where HMAC is SHA256 with the same AES key over (IV + Ciphertext)
There are two currently supported options for doing an encrypted key exchange in Mythic:
Client-side generated RSA keys
leveraged by the apfell-jxa and poseidon agents
Agent specific custom EKE
The agent starts running and generates a new 4096 bit Pub/Priv RSA key pair in memory. The agent then sends the following message to Mythic:
Base64( PayloadUUID + AES256(
JSON({
"action": "staging_rsa",
"pub_key": "base64 of public RSA key",
"session_id": "20char string", // unique session ID for this callback
})
)
)where the AES key initially used is defined as the initial encryption value when generating the payload. When creating payloads, you can generate encryption keys per c2 profile. To do so, the C2 Profile will have a parameter that has an attribute called crypto_type=True. This will then signal to Mythic to either generate a new per-payload AES256_HMAC key or (if your agent is using a translation container) tell your agent's translation container to generate a new key. In the http profile for example, this is a ChooseOne option between aes256_hmac or none.
When it says "base64 of public RSA key" you can do one of two things:
Base64 encode the entire PEM exported key (including the ---BEGIN and ---END blocks)
Use the already base64 encoded data that's inbetween the ---BEGIN and ---END blocks
Here is an example of the first message using encryption key hfN9Nk29S8LsjrE9ffbT9KONue4uozk+/TVMyrxDvvM=:
ODA4NDRkMTktOWJmYy00N2Y5LWI5YWYtYzZiOTE0NGMwZmRj8g4Anp52+vJpizSe8aymY4zNe2qz6xOMb1P69phayqfka57u2gdDBPzOKlkCEYjWlqIFr4Cpfa0krrXDTiaLLyT/wWKulFO8Z7h+/YqIi/6S8pW4hi+5Ht8543vJvlfuVMnK3YIL9ci/xJvkXoUPUI0Gb2fz2+AILD/+9mJrLx4OuJ/FAlVgSlfC4MOMJSOnOKX0D2Q2zsThJyfxzMs/sY9wUEOuYJMVZG5OZzupb7r7GPwZ0ZyeZrxDukR3r979E+2ZTSYWTDMv58PeyRUtLcaMhqPCZJTyDy4ZNJ04MxHbIQCYXsnlcybHczwMGUYw99/bqd1XVD9GKP5zmj3bP600+PbHg0G0N1qHhSrcagCQAIRka1ybSyYmlYILKYUwgmlVCmIT5ERmlXbJu9xqxzKCzfxYoBWpy6I72goDPpZDoK+LFsCIpQAJoRUA/u0KD61ujJCvr+gs/TRv9UIcd+AzR0r7m/ziawaoh6YdYJfPoJBEWi4eozNSaxrnQBOkCul3cOW/SZbZ/UVP84fThFlFLQdGiajmayoa0aLGDnKSh1l8pyX4Of1fajKX3XbY2bLALeU8Tw99E9daNSKhORqMAlmIrfvAHhDHs1vj3ZXj+rKl5We4JYSNSFOL9JzB5OlctV5bd+IuruFc3fLZVkdivjpGczz9iXh3p7Q3M5Xt6m+ZxUwuGa1otrJV55skF3Lns7p6owDw71weJH0h9JvvgoXOTtf1u9HI0ACBzHxThX+yMhmBBP0wU1Lngl6hF4o/1uwNk96fbAGLg0b9njziGC2OQ0D88kaqZ8jJ7C2XQyf4hetQCZCyYPSgtjMw1Yq1qRM0fHbU5cAkKvQmiJMeByHetctfDcs4SvnY28Tb1SfGCnxzxMJ+IQIbatKcQhwbhpq0iavsuG7NUVIPGBhB/8hw3PkkKDb3gqgoKuOD0y8zRK/+DrVbDT3DmzGrmJAkfFXqahjW/aaSNHmqdxxXoI/3Ft1FGocLYAj9bGclW4nzjarRpvtA8fUwMg/vX1RZqFVN15FTp8qsjzKsL8ld0aWlaGcRulfQr9oIKyC+P0EV3a0rMuBO2q2SuSWefyVRaMWCx0gY2Gtrm+bN3ddb+koyUsNdoI7lTY5HirQ3qG0unq28D6Clm8Cok91kMQEaGZ28pZvFZVs3iaLxiPxhmfj+UAQ95ncziJqGrbAiJgTVAmF0bUHAOSD2HORzVeGHxKgFsqSnJvK5B1NUCDIa1ok3sbGo8yg7tc/63pcUPBGcMRRQg3WBN8msj14fDoXAJg3MGG+qzomagdyRFQieMfFeOm1O8SU/a3U9uFwSqhwo4EsE5sIgKPTwN7OVEFbEzNA5tpr65lBxlzC4y1o9Juo25G5QXhuCuSN2frsu4QMlTnxi8P0HHed17hJjY8kaBG6Pm3h9HH098nxiIStZBWSYWQPSXy4AImrT+3vcovjLXPColbKd3M5wRog5WQ1j05O2NQGZwBFDktWioMqIDGCWECvHWgCvPiLmeeCwsWEncqnmrRCwLpI+DXxUVEX9oJFBZhlnfX2iaWeuDw==This message causes the following response:
Base64( PayloadUUID + AES256(
JSON({
"action": "staging_rsa",
"uuid": "UUID", // new UUID for the next message
"session_key": Base64( RSAPub( new aes session key ) ),
"session_id": "same 20 char string back"
})
)
)Here's that sample response from our above sample message:
ODA4NDRkMTktOWJmYy00N2Y5LWI5YWYtYzZiOTE0NGMwZmRjN6UJrODGAkQnyC4NyX2XVAzF9U95TS8xKaPdVd1MFVeWWDZE6f81wxuwzZBmZogjLzm+PNznszFvrSSXvRDiBy8ZpXUCirDOLlblL/LXMJ/aD8hzghvhf+q628NR9XX43IY2kNdQ2VMONDWpwwa1YLvrNe6YU2cCRmbE8mjrVhrj4j0t4tg1Kor6IXBhcZDTmFxBTHb19LSegwmjjr6Inmx8jCN0hnR77o5PsE6l4q+S9FPrlajMpsPKfs1fgdse0Qn6Fv/yJ3t6AyRAJJkxjtgRE64aHXm4cbSw73M9/QnCnzgFWVIlhwNKuHYfMo05XatXUOV76DXut9nkdzY288xQqRB7AV0mNkhR5BhuuUtHFJZ2/rgLl8Kp8B/9Izz4F7JZm4fyx4l1t0d0zAwx1lz32f4LUhX4cvhKm2qsICw7q34mcSgNYZVJu7KYgOZPb6D9GNtyTLWsnwK8mJmK+9xtVrtNM2ncdifcXVXhohVUAO+cWJUZyYQ2fu3Jx7zowAoUz/huSJ0SsvTYzifM8A+Ab6V2I2UE46TZwcnVBwsHCrVXLcDlHrzGLEynepq/RG5yNetx3nUka7hgX0sByWxTsiDwb6ks+TA9365GtKD351FTouEjraDbWYL6tOuqy/OtHVRenhuow7xH1vsUN/3bfCeaKCrow0SSxL12hNgDk/dbhQlV90F54EkYjFB7VKWjBlwngaF07akdQTgPhYy/bl94dwjHFzhWUDGWJBagzyQOHJo7UOrtN7qoWvbSRFwACd7yz7ugZmo7X6DVhcvIMFdeBA/nMmRSC4CbxSxvVYJWZwO4SFGYHDXLFmcpdM/MuPSXljMDZa+n4NqvWFpHV7bI0fAqut4oVv9Hd/X4q5gMzJnXhWgL+EwQbR3jSb0fR6iLK5jD3mRB4zIugkFHZFouhHJKKzjkMwCl8oPsZskN5INnFnqNz8+lBKcFd4Qh64CZAzLE5dZ62apb9GAG9DRPyxXqp1miCLKJsSENdPU80HQPQMxl01sehlC67RvFYM/8dc7VldDEP99Sa6l9/sJSfynnCA2lsPc5PsnSiCnnk9n85ZqDXy0daheEUA7DpJDO0pWl1f2U2edNKpXhn1oirsLOOSpaZbN/gFpVirfa0Vt8oe5FB2IHgw4B+K85eUuZsdFcGu+xhlRwE1pi34RspdBDeiWISyALXG0QRvRtviZmkX+gn41NrpmIFhOaDBCE3lrWzJjasHSr3H4kgRFrFy2qCDwtrdmVeh6Tpad8ZQN3DZQE6mtnpDgQLgT9/mRQr1/pyEn4CiRacIOvBu+xoiAhLrOcJoTAQI3pVYZaPDNQLyum9CTFXRmEEXTmRao0+qq/tCjYhF11b7u5BBB73gy+YLs1hT/RKNOFqBuQ/ywz+g0BOYJt1lvKU08FtVOJq6ddXhVtyvxQz7OriA1Giji1SayQNLIgVxUmEjhBkgccdD98YhTAMPBeeVru14cny/87Ohd8toqK9DW7MEYI4RyOYbVgpWSfdYAC6T2VbC/d87mb31vX4oCDOqZWL2nsvlybzWCObDi76hbPzhP2H6xcE81qo9QKGKG+2ZfNIwK/aHhPznO5fQ5Qcyuos/jzYVuwxau4S8vOnu7Wraivf8BoVZT+lLqC35bS3Xfhfz3yWqHcVJNjs9AlsC86HYwUfRPJDSrDFSMla7bhQ8fuJXAXKSxfjCspvaIu/5UQ7zFQl+jOEuCbmKcYhLJThEBXVJhTShYc/Euz4+I7wzmhBmfxueXlerB5Kg7tfQZDp8zsE+nccFpVJ5yTjKv+CgLFyRVNLpK9ISukKIKj3BXwhGjJEyY6A1BAwl6v4JnllLd+GLo4ZSWrBIkkednbImRATrFsHChkTkf4Crhj5Ihrc5objEx6sxC9ss3OvcagSbKZF8t/ojN5R1m7LyIXEInKuZktNwOY0tCRvCIEaObD+CRDLGx5sB6Jy8S+dLxmF3P2e9zs+/RG0qmPyKyuaSbkIPHB5mZh/GDbV+86n24QxpIk+udi0IDE2cgBBJBEhhEFF44+MX2E0DgY/f698RWpSNuZcWsOmpmcsk1vH9L2Mv3meairLxT3EptYLX2Tcg6RQDs+ZdFT5eoe3ld4NpHZgecr/RRy868jSPPNU5lL4DPsJSXNXz6cD1jvgqpLaOQCtq0fOreSgG1dL1F92lAeXkCf9P1UU4BeYST8Ar03/oZb+DlXrpzqJt9jE6zs+79ywV9ZSUwXoVMPaMre8p+anHf82qL6DVUMebzyI9JBEtMqsbEqrXuXgFOVj/GM1wqJjGXHb82BKtichi2QfxeS8vUxfxV+SBfJ7qT3i6jp5OC1na8xu+v6tME0ywlZd/LrOp2Rgqj0A58Jmw6HZ4b4SD4SOT2tyBkhIjyMrZiBvXAPwzesFdrYSA3hfj5VEJCHlr9dKo8q/emOmEb8womZ3qADTwzhKYu0fxGFY3vXqMgrpasHj6uoY6xrtNf1CBDCudq+dHQUclPx2PyRL7qcR+7f0ntbc1xEGgofhLdmFMiBskQSNSYnGZAEzOwdCFwiZlzwjqPltHgeThe response is encrypted with the same initial AESPSK value as before. However, the session_key value is encrypted with the public RSA key that was in the initial message and base64 encoded. The response also includes a new staging UUID for the agent to use. This is not the final UUID for the new callback, this is a temporary UUID to indicate that the next message will be encrypted with the new AES key.
The next message from the agent to Mythic is as follows:
Base64( tempUUID + AES256(
JSON({
"action": "checkin", // required
"uuid": "payload uuid", //uuid of the payload - required
"ips": ["127.0.0.1"], // internal ip addresses - optional
"os": "macOS 10.15", // os version - optional
"user": "its-a-feature", // username of current user - optional
"host": "spooky.local", // hostname of the computer - optional
"pid": 4444, // pid of the current process - optional
"architecture": "x64", // platform arch - optional
"domain": "test", // domain of the host - optional
"integrity_level": 3, // integrity level of the process - optional
"external_ip": "8.8.8.8", // external ip if known - optional
"encryption_key": "base64 of key", // encryption key - optional
"decryption_key": "base64 of key", // decryption key - optional
"process_name": "osascript", // name of the current process - optional
})
)
)With our new temp UUID, the agent sends the following:
MzAzMzY1M2UtMjlkOC00ZDRjLTkxMDgtNTZjMTUxZjc3OWQ34uGQ1yO25qWInocvzRCTRenTlUB7u1oRScx+09PeZZfUrJtdfiEeMD6Xz/kdKUsZjr9LWhFdFcu/AmHzAqH3LmIuSOxnMexmlGT9ngU7NuMvSdRlYvVcsIPYMLbRptletLttCBIu7LhDbuifYFRNQ21TBDkpVgYTXoUk5+JzzTesGdWAhOwLlWvijpKM4nrPLx0fZagEHH4SycHRUuHlei8T7F1YFPm8RhxbONMAd1ckjDnPm5kdUPx0JwpuP975MV4cuHdez+mR6C/JP4B9yeP9hhnHmSFKq7OghnHQQ39prPQ9WArSJ+N8UJ+XOiACpjYon2Qyf0FqhRDdoojrY4sCRrF3Khw9mry+5j5WlHubsICpfi52X9QQMAGzUNeuUve6jMKLQwSclb+IzJ2KKUHtA0qcsdvqyQ2mvXxicAn0OinnP6Vk7ktqsn35UQi3+uuPP0PWf53Iji25/mRCO9MbEa8WQ7epon4H4Erc1yw+Dvfb61BoasPbzspFFVtcuqRkeUYUiIHkR9uzVmSgUJqk/R4cRFico7nK+Q0E6gL1Qyk4P7yPLm3E98wkvoB1Y108r9tKyAFjfZ13MrZpZCsdt7y335hrymeZpt0V6/+ug3BIY1brcxE74fAnO4H5fUan7kPnvQmf/SsO4B9nHHRR/2pC1KYZF+vGw1My6alFPyyGZpzBnrsqyouFqhqOjS3iv8Yv3JY/IxpgJ/T4tXEs1MvgI19lufsBqX1PK9PiB04Y8+Igld6+6RTAwF+vf4utJTp4I/eeH8b0KZ9ABWzvjrPwj1nf1hN2Q0FU4YYBoXzKZ5kE8yZvYtfJpSqDGbsGW2gFr0nC2DybQ2QweLQ1RJAcBlU462jwP4h1ohuHRL2cynGqKaJa7XeILg5Da0ubMTg5fdEPoXMxaNYHdwbzV04WE7zKCru2T16AoncwWxzwcTqy6bRONdRPNFY72HlXmLgQ3R0a1J8VhlAt+7Z5I7rnz8S67rKL9xD1B4mJhhSeCj4k8y1/AgQ9i7ZIeLrcjsUcOo7Hw5Dl4QOBncuOn74DHWnZHgxUDQtB41GBwbJyeoi6ryHdMjUBEOK34f5msUh+HMDCHkLZi+4oM84K3L5oCQrPh1+b6FH5oXGO8pOXi2wHCAtzfF9LF5MfEAa5Lt6ZJpk9fzqZ6fPbFB0R/X/lKLyp6VaMGk5CBpLvwmyNGZnjSXra1r212sqIqFdGu9sVzMJ5daVLsjFPCg==This checkin data is the same as all the other methods of checking in, the key things here are that the tempUUID is the temp UUID specified in the other message, the inner uuid is the payload UUID, and the AES key used is the negotiated one. It's with this information that Mythic is able to track the new messages as belonging to the same staging sequence and confirm that all of the information was transmitted properly. The final response is as follows:
Base64( tempUUID + AES256(
JSON({
"action": "checkin",
"id": "UUID", // new UUID for the agent to use
"status": "success"
})
)
)With our example, the agent gets back the following:
MzAzMzY1M2UtMjlkOC00ZDRjLTkxMDgtNTZjMTUxZjc3OWQ3Xgjq3vE9vduJliEd24jskrB+0gcqLc1ROCegwkvSjrqBLGFhrurNCsQnKIFYZ+YP6AGNjgzIlAXbLAPlsRAa6ge6BLQOsywskyHsE/2+65etgEH9plUzOdEv/nknwfdJKV7n7PHQsQ9w4nsV7j9DkeiuIQ+CnlBBRaPpCGYKo8m8keswNY7DssL1FE1t0DQ5From here on, the agent messages use the new UUID instead of the payload UUID or temp UUID and continues to use the new negotiated AES key.
Lastly, here's an example after that exchange with the new callback UUID doing a get tasking request:
NTU4NWI2YzMtMmEzOC00ZGZlLWIwMDItNDI5ZjQ5Mzk4YzIxtpTh3cK5yOJ+RlbVJkeVLSRd8ExZbahaQoXg9AbW5SD+wdueD+tPhtB18kcJqy9s10qfsTx/8gMlcw5emRMVm+w9bnScW0BKARoldBlp+31La3/+HsqEKvYaEK9gGcBlEK7mDVqaJlYxgkwWRNGZs4i3eIHpKCc9Gyyz7dyaQUk=Padding: PKCS7, block size of 16
Mode: CBC
IV is 16 random bytes
Final message: IV + Ciphertext + HMAC
where HMAC is SHA256 with the same AES key over (IV + Ciphertext)
PKCS1_OAEP
This is specifically OAEP with SHA1
4096Bits in size
This section requires you to have a Translation Containers associated with your payload type. The agent sends your own custom message to Mythic:
Base64( payloadUUID + customMessage )Mythic looks up the information for the payloadUUID and calls your translation container's translate_from_c2_format function. That function gets a dictionary of information like the following:
{
"enc_key": None or base64 of key if Mythic knows of one,
"dec_key": None or base64 of key if Mythic knows of one,
"uuid": uuid of the message,
"profile": name of the c2 profile,
"mythic_encrypts": True or False if Mythic thinks Mythic does the encryption or not,
"type": None or a keyword for the type of encryption. currently only option besides None is "AES256"
"message": base64 of the message that's currently in c2 specific format
}To get the enc_key, dec_key, and type, Mythic uses the payloadUUID to then look up information about the payload. It uses the profile associated with the message to look up the C2 Profile parameters and look for any parameter with a crypto_type set to true. Mythic pulls this information and forwards it all to your translate_from_c2_format function.
Ok, so that message gets your payloadUUID/crypto information and forwards it to your translation container, but then what?
Normally, when the translate_to_c2_format function is called, you just translate from your own custom format to the standard JSON dictionary format that Mythic uses. No big deal. However, we're doing EKE here, so we need to do something a little different. Instead of sending back an action of checkin, get_tasking, post_response, etc, we're going to generate an action of staging_translation.
Mythic is able to do staging and EKE because it can save temporary pieces of information between agent messages. Mythic allows you to do this too if you generate a response like the following:
{
"action": "staging_translation",
"session_id": "some string session id you want to save",
"enc_key": the bytes of an encryption key for the next message,
"dec_key": the bytes of a decryption key for the next message,
"crypto_type": "what type of crypto you're doing",
"next_uuid": "the next UUID that'll be in front of the message",
"message": "the raw bytes of the message that'll go back to your agent"
}Let's break down these pieces a bit:
action - this must be "staging_translation". This is what indicates to Mythic once the message comes back from the translate_from_c2_format function that this message is part of staging.
session_id - this is some random character string you generate so that we can differentiate between multiple instances of the same payload trying to go through the EKE process at the same time.
enc_key / dec_key - this is the raw bytes of the encryption/decryption keys you want for the next message. The next time you get the translate_from_c2_format message for this instance of the payload going through staging, THESE are the keys you'll be provided.
crypto_type - this is more for you than anything, but gives you insight into what the enc_key and dec_key are. For example, with the http profile and the staging_rsa, the crypto type is set to aes256_hmac so that I know exactly what it is. If you're handling multiple kinds of encryption or staging, this is a helpful way to make sure you're able to keep track of everything.
next_uuid - this is the next UUID that appears in front of your message (instead of the payloadUUID). This is how Mythic will be able to look up this staging information and provide it to you as part of the next translate_from_c2_format function call.
message - this is the actual raw bytes of the message you want to send back to your agent.
This process just repeats as many times as you want until you finally return from translate_from_c2_format an actual checkin message.
What if there's other information you need/want to store though? There are three RPC endpoints you can hit that allow you to store arbitrary data as part of your build process, translation process, or custom c2 process:
create_agentstorage - this take a unique_id string value and the raw bytes data value. The unique_id is something that you need to generate, but since you're in control of it, you can make sure it's what you need. This returns a dictionary:
{"unique_id": "your unique id", "data": "base64 of the data you supplied"}
get_agentstorage - this takes the unique_id string value and returns a dictionary of the stored item:
{"unique_id": "your unique id", "data": "base64 of the data you supplied"}
delete_agentstorage - this takes the unique_id string value and removes the entry from the database
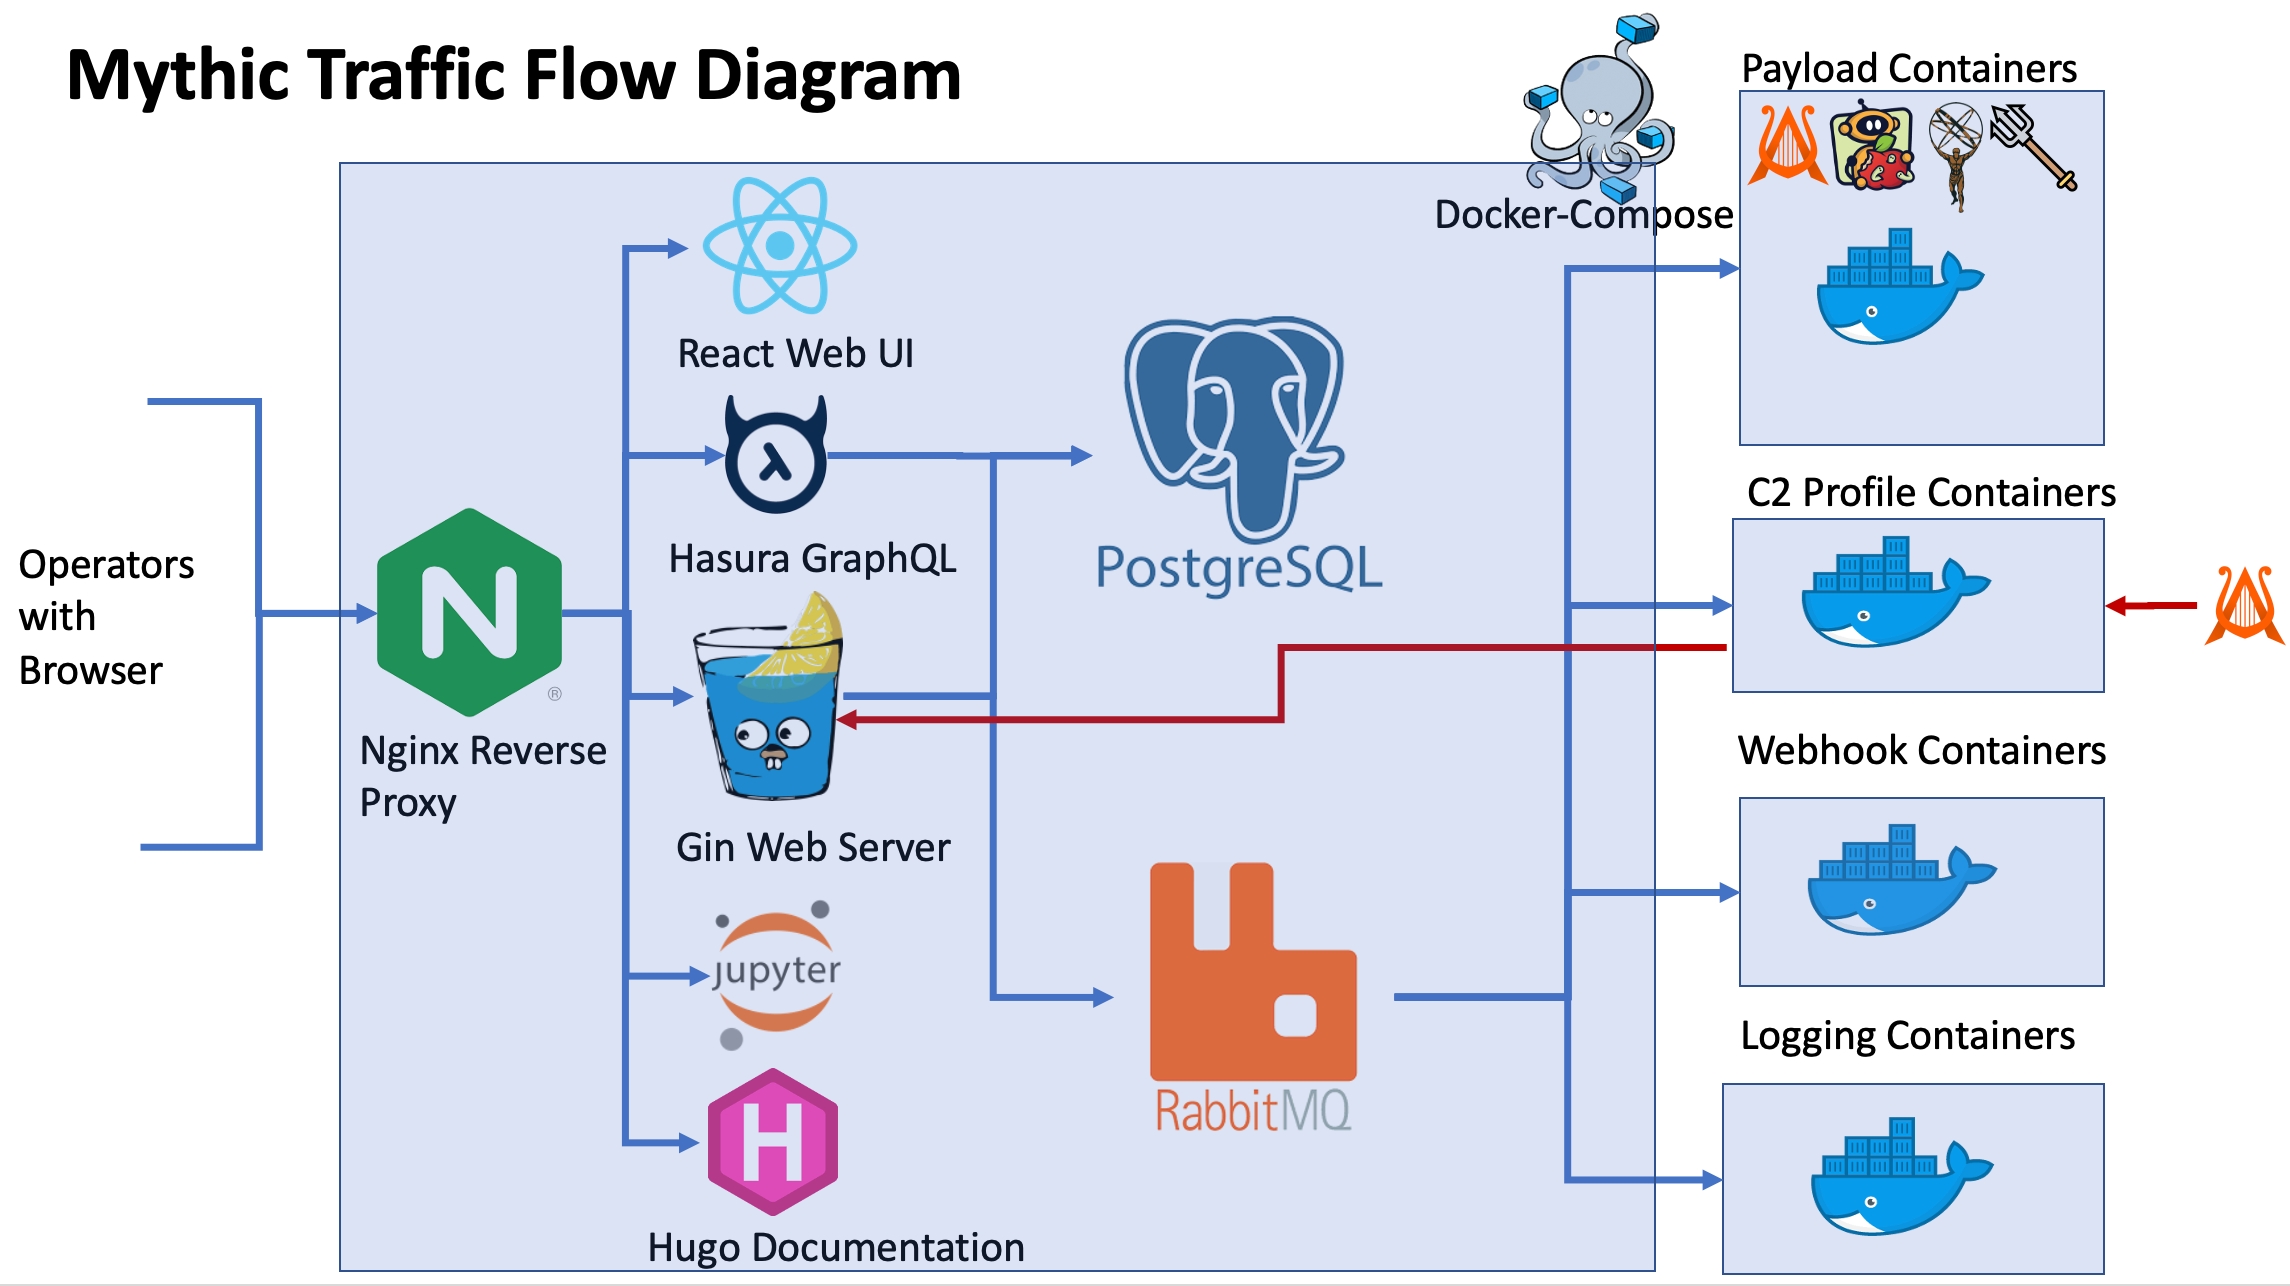
Command information is tracked in your Payload Type's container. Each command has its own Python class or GoLang struct. In Python, you leverage CommandBase and TaskArguments to define information about the command and information about the command's arguments.
CommandBase defines the metadata about the command as well as any pre-processing functionality that takes place before the final command is ready for the agent to process. This class includes the create_go_tasking (Create_Tasking) and process_response (Process Response) functions.
****TaskArguments does two things:
defines the parameters that the command needs
verifies / parses out the user supplied arguments into their proper components
this includes taking user supplied free-form input (like arguments to a sleep command - 10 4) and parsing it into well-defined JSON that's easier for the agent to handle (like {"interval": 10, "jitter": 4}). This can also take user-supplied dictionary input and parse it out into the rightful CommandParameter objects.
This also includes verifying all the necessary pieces are present. Maybe your command requires a source and destination, but the user only supplied a source. This is where that would be determined and error out for the user. This prevents you from requiring your agent to do that sort of parsing in the agent.
If you're curious how this all plays out in a diagram, you can find one here: Message Flow.
from mythic_payloadtype_container.PayloadBuilder import *
from mythic_payloadtype_container.MythicCommandBase import *
class ScreenshotCommand(CommandBase):
cmd = "screenshot"
needs_admin = False
help_cmd = "screenshot"
description = "Use the built-in CGDisplay API calls to capture the display and send it back over the C2 channel. No need to specify any parameters as the current time will be used as the file name"
version = 1
author = ""
attackmapping = ["T1113"]
argument_class = ScreenshotArguments
browser_script = BrowserScript(script_name="screenshot", author="@its_a_feature_")
attributes = CommandAttributes(
spawn_and_injectable=True,
supported_os=[SupportedOS.MacOS],
builtin=False,
load_only=False,
suggested_command=False,
)
script_only = False
async def create_go_tasking(self, taskData: MythicCommandBase.PTTaskMessageAllData) -> MythicCommandBase.PTTaskCreateTaskingMessageResponse:
response = MythicCommandBase.PTTaskCreateTaskingMessageResponse(
TaskID=taskData.Task.ID,
Success=True,
)
return response
async def process_response(self, task: PTTaskMessageAllData, response: any) -> PTTaskProcessResponseMessageResponse:
resp = PTTaskProcessResponseMessageResponse(TaskID=task.Task.ID, Success=True)
return respCreating your own command requires extending this CommandBase class (i.e. class ScreenshotCommand(CommandBase) and providing values for all of the above components.
cmd - this is the command name. The name of the class doesn't matter, it's this value that's used to look up the right command at tasking time
needs_admin - this is a boolean indicator for if this command requires admin permissions
help_cmd - this is the help information presented to the user if they type help [command name] from the main active callbacks page
description - this is the description of the command. This is also presented to the user when they type help.
supported_ui_features - This is an array of values that indicates where this command might be used within the UI. For example, from the active callbacks page, you see a table of all the callbacks. As part of this, there's a dropdown you can use to automatically issue an exit task to the callback. How does Mythic know which command to actually send? It's this array that dictates that. The following are used by the callback table, file browser, and process listing, but you're able to add in any that you want and leverage them via browser scripts for additional tasking:
supported_ui_features = ["callback_table:exit"]
supported_ui_features = ["file_browser:list"]
supported_ui_features = ["process_browser:list"]
supported_ui_features = ["file_browser:download"]
supported_ui_features = ["file_browser:remove"]
supported_ui_features = ["file_browser:upload"]
supported_ui_features = ["task_response:interactive"]
version - this is the version of the command you're creating/editing. This allows a helpful way to make sure your commands are up to date and tracking changes
argument_class - this correlates this command to a specific TaskArguments class for processing/validating arguments
attackmapping - this is a list of strings to indicate MITRE ATT&CK mappings. These are in "T1113" format.
agent_code_path is automatically populated for you like in building the payload. This allows you to access code files from within commands in case you need to access files, functions, or create new pieces of payloads. This is really useful for a load command so that you can find and read the functions you're wanting to load in.
You can optionally add in the attributes variable. This is a new class called CommandAttributes where you can set whether or not your command supports being injected into a new process (some commands like cd or exit don't make sense for example). You can also provide a list of supported operating systems. This is helpful when you have a payload type that might compile into multiple different operating system types, but not all the commands work for all the possible operating systems. Instead of having to write "not implemented" or "not supported" function stubs, this will allow you to completely filter this capability out of the UI so users don't even see it as an option.
Available options are:
supported_os an array of SupportedOS fields (ex: [SupportedOS.MacOS]) (in Python for a new SupportedOS you can simply do SupportedOS("my os name").
spawn_and_injectable is a boolean to indicate if the command can be injected into another process
builtin is a boolean to indicate if the command should be always included in the build process and can't be unselected
load_only is a boolean to indicate if the command can't be built in at the time of payload creation, but can be loaded in later
suggested_command is a boolean to indicate if the command should be pre-selected for users when building a payload
filter_by_build_parameter is a dictionary of parameter_name:value for what's required of the agent's build parameters. This is useful for when some commands are only available depending on certain values when building your agent (such as agent version).
You can also add in any other values you want for your own processing. These are simply key=value pairs of data that are stored. Some people use this to identify if a command has a dependency on another command. This data can be fetched via RPC calls for things like a load command to see what additional commands might need to be included.
This ties into the CommandParameter fields choice_filter_by_command_attributes, choices_are_all_commands, and choices_are_loaded_commands.
The create_go_tasking function is very broad and covered in Create_Tasking
The process_response is similar, but allows you to specify that data shouldn't automatically be processed by Mythic when an agent checks in, but instead should be passed to this function for further processing and to use Mythic's RPC functionality to register the results into the system. The data passed here comes from the post_response message (Process Response).
The script_only flag indicates if this Command will be use strictly for things like issuing subtasking, but will NOT be compiled into the agent. The nice thing here is that you can now generate commands that don't need to be compiled into the agent for you to execute. These tasks never enter the "submitted" stage for an agent to pick up - instead they simply go into the create_tasking scenario (complete with subtasks and full RPC functionality) and then go into a completed state.
The TaskArguments class defines the arguments for a command and defines how to parse the user supplied string so that we can verify that all required arguments are supplied. Mythic now tracks where tasking came from and can automatically handle certain instances for you. Mythic now tracks a tasking_location field which has the following values:
command_line - this means that the input you're getting is just a raw string, like before. It could be something like x86 13983 200 with a series of positional parameters for a command, it could be {"command": "whoami"} as a JSON string version of a dictionary of arguments, or anything else. In this case, Mythic really doesn't know enough about the source of the tasking or the contents of the tasking to provide more context.
parsed_cli - this means that the input you're getting is a dictionary that was parsed by the new web interface's CLI parser. This is what happens when you type something on the command line for a command that has arguments (ex: shell whoami or shell -command whoami). Mythic can successfully parse out the parameters you've given into a single parameter_group and gives you a dictionary of data.
modal - this means that the input you're getting is a dictionary that came from the tasking modal. Nothing crazy here, but it does at least mean that there shouldn't be any silly shenanigans with potential parsing issues.
browserscript - if you click a tasking button from a browserscript table and that tasking button provides a dictionary to Mythic, then Mythic can forward that down as a dictionary. If the tasking button from a browserscript table submits a String instead, then that gets treated as command_line in terms of parsing.
With this ability to track where tasking is coming from and what form it's in, an agent's command file can choose to parse this data differently. By default, all commands must supply a parse_arguments function in their associated TaskArguments subclass. If you do nothing else, then all of these various forms will get passed to that function as strings (if it's a dictionary it'll get converted into a JSON string). However, you can provide another function, parse_dictionary that can handle specifically the cases of parsing a given dictionary into the right CommandParameter objects as shown below:
async def parse_arguments(self):
if len(self.command_line) == 0:
raise ValueError("Must supply arguments")
if self.command_line[0] == "{":
try:
self.load_args_from_json_string(self.command_line)
return
except Exception as e:
pass
# if we got here, we weren't given a JSON string but raw text to parse
# here's an example, though error prone because it splits on " " characters
pieces = self.command_line.split(" ")
self.add_arg("arg1", pieces[0])
self.add_arg("arg2", pieces[1])
async def parse_dictionary(self, dictionary_arguments):
self.load_args_from_dictionary(dictionary_arguments)In self.args we define an array of our arguments and what they should be along with default values if none were provided.
In parse_arguments we parse the user supplied self.command_line into the appropriate arguments. The hard part comes when you allow the user to type arguments free-form and then must parse them out into the appropriate pieces.
class LsArguments(TaskArguments):
def __init__(self, command_line, **kwargs):
super().__init__(command_line, **kwargs)
self.args = [
CommandParameter(
name="path",
type=ParameterType.String,
default_value=".",
description="Path of file or folder on the current system to list",
parameter_group_info=[ParameterGroupInfo(
required=False
)]
)
]
async def parse_arguments(self):
self.add_arg("path", self.command_line)
async def parse_dictionary(self, dictionary):
if "host" in dictionary:
# then this came from the file browser
self.add_arg("path", dictionary["path"] + "/" + dictionary["file"])
self.add_arg("file_browser", type=ParameterType.Boolean, value=True)
else:
self.load_args_from_dictionary(dictionary)The main purpose of the TaskArguments class is to manage arguments for a command. It handles parsing the command_line string into CommandParameters, defining the CommandParameters, and providing an easy interface into updating/accessing/adding/removing arguments as needed.
As part of the TaskArguments subclass, you have access to the following pieces of information:
self.command_line - the parameters sent down for you to parse
self.raw_command_line - the original parameters that the user typed out. This is useful in case you have additional pieces of information to process or don't want information processed into the standard JSON/Dictionary format that Mythic uses.
self.tasking_location - this indicates where the tasking came from
self.task_dictionary - this is a dictionary representation of the task you're parsing the arguments for. You can see things like the initial parameter_group_name that Mythic parsed for this task, the user that issued the task, and more.
self.parameter_group_name - this allows you to manually specify what the parameter group name should be. Maybe you don't want Mythic to do automatic parsing to determine the parameter group name, maybe you have additional pieces of data you're using to determine the group, or maybe you plan on adjusting it later on. Whatever the case might be, if you set self.parameter_group_name = "value", then Mythic won't continue trying to identify the parameter group based on the current parameters with values.
The class must implement the parse_arguments method and define the args array (it can be empty). This parse_arguments method is the one that allows users to supply "short hand" tasking and still parse out the parameters into the required JSON structured input. If you have defined command parameters though, the user can supply the required parameters on the command line (via -commandParameterName or via the popup tasking modal via shift+enter).
When syncing the command with the UI, Mythic goes through each class that extends the CommandBase, looks at the associated argument_class, and parses that class's args array of CommandParameters to create the pop-up in the UI.
While the TaskArgument's parse_arguments method simply parses the user supplied input and sets the values for the named arguments, it's the CommandParameter's class that actually verifies that every required parameter has a value, that all the values are appropriate, and that default values are supplied if necessary.
CommandParameters, similar to BuildParameters, provide information for the user via the UI and validates that the values are all supplied and appropriate.
class CommandParameter:
def __init__(
self,
name: str,
type: ParameterType,
display_name: str = None,
cli_name: str = None,
description: str = "",
choices: [any] = None,
default_value: any = None,
validation_func: callable = None,
value: any = None,
supported_agents: [str] = None,
supported_agent_build_parameters: dict = None,
choice_filter_by_command_attributes: dict = None,
choices_are_all_commands: bool = False,
choices_are_loaded_commands: bool = False,
dynamic_query_function: callable = None,
parameter_group_info: [ParameterGroupInfo] = None
):
self.name = name
if display_name is None:
self.display_name = name
else:
self.display_name = display_name
if cli_name is None:
self.cli_name = name
else:
self.cli_name = cli_name
self.type = type
self.user_supplied = False # keep track of if this is using the default value or not
self.description = description
if choices is None:
self.choices = []
else:
self.choices = choices
self.validation_func = validation_func
if value is None:
self._value = default_value
else:
self.value = value
self.default_value = default_value
self.supported_agents = supported_agents if supported_agents is not None else []
self.supported_agent_build_parameters = supported_agent_build_parameters if supported_agent_build_parameters is not None else {}
self.choice_filter_by_command_attributes = choice_filter_by_command_attributes if choice_filter_by_command_attributes is not None else {}
self.choices_are_all_commands = choices_are_all_commands
self.choices_are_loaded_commands = choices_are_loaded_commands
self.dynamic_query_function = dynamic_query_function
if not callable(dynamic_query_function) and dynamic_query_function is not None:
raise Exception("dynamic_query_function is not callable")
self.parameter_group_info = parameter_group_info
if self.parameter_group_info is None:
self.parameter_group_info = [ParameterGroupInfo()]name - the name of the parameter that your agent will use. cli_name is an optional variation that you want user's to type when typing out commands on the command line, and display_name is yet another optional name to use when displaying the parameter in a popup tasking modal.
type- this is the parameter type. The valid types are:
String - gets a string value
Boolean - gets a boolean value
File
Upload a file through your browser. In your create tasking though, you get a String UUID of the file that can be used via SendMythicRPC* calls to get more information about the file or the file contents
Array
An Array of string values
TypedArray
An array of arrays, ex: [ ["int": "5"], ["char*", "testing"] ]
ChooseOne - gets a string value
ChooseMultiple
An Array of string values
ChooseOneCustom - gets a string value from a list of choices OR a user supplied value
Credential_JSON
Select a specific credential that's registered in the Mythic credential store. In your create tasking, get a JSON representation of all data for that credential
Number
Payload
Select a payload that's already been generated and get the UUID for it. This is helpful for using that payload as a template to automatically generate another version of it to use as part of lateral movement or spawning new agents.
ConnectionInfo
Select the Host, Payload/Callback, and P2P profile for an agent or callback that you want to link to via a P2P mechanism. This allows you to generate random parameters for payloads (such as named-pipe names) and not require you to remember them when linking. You can simply select them and get all of that data passed to the agent.
When this is up in the UI, you can also track new payloads on hosts in case Mythic isn't aware of them (maybe you moved and executed payloads in a method outside of Mythic). This allows Mythic to track that payload X is now on host Y and you can use the same selection process as the first bullet to filter down and select it for linking.
LinkInfo
Get a list of all active/dead P2P connections for a given agent. Selecting one of these links gives you all the same information that you'd get from the ConnectionInfo parameter. The goal here is to allow you to easily select to "unlink" from an agent or to re-link to a very specific agent on a host that you were previously connected to.
description - this is the description of the parameter that's presented to the user when the modal pops up for tasking
choices - this is an array of choices if the type is ChooseOne or ChooseMultiple
If your command needs you to pick from the set of commands (rather than a static set of values), then there are a few other components that come into play. If you want the user to be able to select any command for this payload type, then set choices_are_all_commands to True. Alternatively, you could specify that you only want the user to choose from commands that are already loaded into the callback, then you'd set choices_are_loaded_commands to True. As a modifier to either of these, you can set choice_filter_by_command_attributes to filter down the options presented to the user even more based on the parameters of the Command's attributes parameter. This would allow you to limit the user's list down to commands that are loaded into the current callback that support MacOS for example. An example of this would be:
CommandParameter(name="test name",
type=ParameterType.ChooseMultiple,
description="so many choices!",
choices_are_all_commands=True,
choice_filter_by_command_attributes={"supported_os": [SupportedOS.MacOS]}),choices - for the TypedArray type, the choices here is the list of options you want to provide in the dropdown for the user. So if you have choices as ["int", "char*"], then when the user adds a new array entry in the modal, those two will be the options. Additionally, if you set the default_value to char*, then char* will be the value selected by default.
validation_func - this is an additional function you can supply to do additional checks on values to make sure they're valid for the command. If a value isn't valid, an exception should be raised
value - this is the final value for the parameter; it'll either be the default_value or the value supplied by the user. This isn't something you set directly.
default_value - this is a value that'll be set if the user doesn't supply a value
supported_agents - If your parameter type is Payload then you're expecting to choose from a list of already created payloads so that you can generate a new one. The supported_agents list allows you to narrow down that dropdown field for the user. For example, if you only want to see agents related to the apfell payload type in the dropdown for this parameter of your command, then set supported_agents=["apfell"] when declaring the parameter.
supported_agent_build_parameters - allows you to get a bit more granular in specifying which agents you want to show up when you select the Payload parameter type. It might be the case that a command doesn't just need instance of the atlas payload type, but maybe it only works with the Atlas payload type when it's compiled into .NET 3.5. This parameter value could then be supported_agent_build_parameters={"atlas": {"version":"3.5"}} . This value is a dictionary where the key is the name of the payload type and the value is a dictionary of what you want the build parameters to be.
dynamic_query_function - More information can be found here, but you can provide a function here for ONLY parameters of type ChooseOne or ChooseMultiple where you dynamically generate the array of choices you want to provide the user when they try to issue a task of this type.
typedarray_parse_function - This allows you to have typed arrays more easily displayed and parsed throughout Mythic (useful for BOF/COFF work). More information for this can be found here.
Most command parameters are pretty straight forward - the one that's a bit unique is the File type (where a user is uploading a file as part of the tasking). When you're doing your tasking, this value will be the base64 string of the file uploaded.
To help with conditional parameters, Mythic 2.3 introduced parameter groups. Every parameter must belong to at least one parameter group (if one isn't specified by you, then Mythic will add it to the Default group and make the parameter required).
You can specify this information via the parameter_group_info attribute on CommandParameter class. This attribute takes an array of ParameterGroupInfo objects. Each one of these objects has three attributes: group_name (string), required(boolean) ui_position (integer). These things together allow you to provide conditional parameter groups to a command.
Let's look at an example - the new apfell agent's upload command now leverages conditional parameters. This command allows you to either:
specify a remote_path and a filename - Mythic then looks up the filename to see if it's already been uploaded to Mythic before. If it has, Mythic can simply use the same file identifier and pass that along to the agent.
specify a remote_path and a file - This is uploading a new file, registering it within Mythic, and then passing along that new file identifier
Notice how both options require the remote_path parameter, but the file and filename parameters are mutually exclusive.
class UploadArguments(TaskArguments):
def __init__(self, command_line, **kwargs):
super().__init__(command_line, **kwargs)
self.args = [
CommandParameter(
name="file", cli_name="new-file", display_name="File to upload", type=ParameterType.File, description="Select new file to upload",
parameter_group_info=[
ParameterGroupInfo(
required=True,
group_name="Default"
)
]
),
CommandParameter(
name="filename", cli_name="registered-filename", display_name="Filename within Mythic", description="Supply existing filename in Mythic to upload",
type=ParameterType.ChooseOne,
dynamic_query_function=self.get_files,
parameter_group_info=[
ParameterGroupInfo(
required=True,
group_name="specify already uploaded file by name"
)
]
),
CommandParameter(
name="remote_path",
cli_name="remote_path",
display_name="Upload path (with filename)",
type=ParameterType.String,
description="Provide the path where the file will go (include new filename as well)",
parameter_group_info=[
ParameterGroupInfo(
required=True,
group_name="Default",
ui_position=1
),
ParameterGroupInfo(
required=True,
group_name="specify already uploaded file by name",
ui_position=1
)
]
),
]So, the file parameter has one ParameterGroupInfo that calls out the parameter as required. The filename parameter also has one ParameterGroupInfo that calls out the parameter as required. It also has a dynamic_query_function that allows the task modal to run a function to populate the selection box. Lastly, the remote_path parameter has TWO ParameterGroupInfo objects in its array - one for each group. This is because the remote_path parameter applies to both groups. You can also see that we have a ui_position specified for these which means that regardless of which option you're viewing in the tasking modal, the parameter remote_path will be the first parameter shown. This helps make things a bit more consistent for the user.
If you're curious, the function used to get the list of files for the user to select is here:
async def get_files(self, inputMsg: PTRPCDynamicQueryFunctionMessage) -> PTRPCDynamicQueryFunctionMessageResponse:
fileResponse = PTRPCDynamicQueryFunctionMessageResponse(Success=False)
file_resp = await MythicRPC().execute("get_file", callback_id=inputMsg.Callback,
limit_by_callback=False,
filename="",
max_results=-1)
if file_resp.status == MythicRPCStatus.Success:
file_names = []
for f in file_resp.response:
if f["filename"] not in file_names and f["filename"].endswith(".exe"):
file_names.append(f["filename"])
fileResponse.Success = True
fileResponse.Choices = file_names
return fileResponse
else:
fileResponse.Error = file_resp.error
return fileResponseIn the above code block, we're searching for files, not getting their contents, not limiting ourselves to just what's been uploaded to the callback we're tasking, and looking for all files (really it's all files that have "" in the name, which would be all of them). We then go through to de-dupe the filenames and return that list to the user.
So, with all that's going on, it's helpful to know what gets called, when, and what you can do about it.
When you send a task to Mythic (from a modal, typing it out, via scripting, etc), the first thing that happens is Mythic stores it in the database. A bunch of data around a task (associated callback, payload, c2, etc) is sent to the PayloadType container for processing. This container first creates an instance of your command's TaskArguments function and passes it the database data. It then calls either the parse_dictionary or parse_arguments functions depending on if the params it has are JSON or not and if the parse_dictionary function is even provided. At this point, your code has been invoked to help fill out and set some of the parameters.
The PayloadType container then does a check to see which parameters were explicitly set, and based on that, which parameter group is being used. If that can't be determined, then an exception is thrown. Otherwise, any non-required parameters for that parameter group get their default values that weren't already explicitly set. If there's a required parameter that hasn't been explicitly set though, then another exception is thrown.
Once all of that parsing is done, that finalized TaskArguments class is attached to an instance of your Command's class and first, that Command's opsec_pre function is called. If that returns that everything is good to go, all of the above stuff happens again, but then your Command's create_go_tasking function is called. If that one returns success, then your Command's opsec_post function is called. If that also returns success, then your task is finally in the Submitted state and ready for an agent to pick it up. If your command is script_only=True though, then at this point your task is flipped to completed and not picked up by the agent.
This page describes how the HTTP profile works and configuration options
This profile uses HTTP Get and Post messages to communicate with the main Mythic server. Unlike the default HTTP though, this profile allows a lot of customization from both the client and server. There are two pieces to this as with most C2 profiles - Server side code and Agent side code. In general, the flow looks like:
From the UI perspective, there are only two parameters - a JSON configuration and the auto-populated operation specific AES key. For the JSON configuration, there is a generic structure:
{
"GET": {
"ServerBody": [
],
"ServerHeaders": {
"Server": "NetDNA-cache/2.2",
},
"ServerCookies": {},
"AgentMessage": []
},
"POST": {
"ServerBody": [],
"ServerCookies": {},
"ServerHeaders": {
"Server": "NetDNA-cache/2.2",
},
"AgentMessage": []
},
"jitter": 50,
"interval": 10,
"chunk_size": 5120000,
"key_exchange": true,
"kill_date": "2019-12-31"
}There are some important pieces to notice here:
GET - this block defines what "GET" messages look like. This section is used for requesting tasking.
ServerBody - this block defines what the body of the server's response will look like
ServerHeaders - this block defines what the server's headers will look like
ServerCookies - this block defines what the server's cookies will look like
AgentMessage - This block defines the different forms of agent messages for doing GET requests. This defines what query parameters are used, what cookies, headers, URLs, etc.The format here is generally the same as the "POST" messages and will be described in the next section.
POST - this block defines what "POST" messages look like
ServerBody - this block defines what the body of the server's response will look like
ServerHeaders - this block defines what the server's headers will look like
ServerCookies - this block defines what the server's cookies will look like
AgentMessage - This block defines the different forms of agent messages for doing POST requests. This defines what query parameters are used, what cookies, headers, URLs, etc.
jitter - this is the jitter percentage for callbacks
interval - this is the interval in seconds between callbacks
chunk_size - this is the chunk size used for uploading/downloading files
key_exchange - this specifies if Apfell does an encrypted key exchange or just uses a static encryption key
kill_date - this defines the date agents should stop checking in. This date is checked when the agent first starts and before each tasking request, if it is the specified date or later, the agent will automatically exit. This is in the YYYY-MM-DD format.
Now let's talk about the AgentMessage parameter. This is where you define all of the key components about how your GET and POST messages from agent to Mythic look, as well as indicating where in those requests you want to put the actual message the agent is trying to send. The format in general looks like this:
{
"urls": ["http://192.168.0.11:9001"],
"uri": "/<test:string>",
"urlFunctions": [
{
"name": "<test:string>",
"value": "",
"transforms": [
{
"function": "choose_random",
"parameters": ["jquery-3.3.1.min.js","jquery-3.3.1.map"]
}
]
}
],
"AgentHeaders": {
"Accept": "text/html,application/xhtml+xml,application/xml;q=0.9,*/*;q=0.8",
"Host": "code.jquery.com",
"Referer": "http://code.jquery.com/",
"Accept-Encoding": "gzip, deflate",
"User-Agent": "Mozilla/5.0 (Windows NT 6.3; Trident/7.0; rv:11.0) like Gecko"
},
"QueryParameters": [
{
"name": "q",
"value": "message",
"transforms": [
]
}
],
"Cookies": [
{
"name": "__cfduid",
"value": "",
"transforms": [
{
"function": "random_alpha",
"parameters": [30]
},
{
"function": "base64",
"parameters": []
}
]
}
],
"Body": []
}In the AgentMessage section for the "GET"s and "POST"s, you can have 1 or more instances of the above AgentMessage format (the above is an example of one instance). When the agent goes to make a GET or POST request, it randomly picks one of the formats listed and uses it. Let's look into what's actually being described in this AgentMessage:
urls - this is a list of URLs. One of these is randomly selected each time this overall AgentMessage is selected. This allows you to supply fallback mechanisms in case one IP or domain gets blocked.
uri - This is the URI to be used at the end of each of the URLs specified. This can be a static value, like /downloads.php, or can be one that's changed for each request. For example, in the above scenario we supply /<test:string>. The meaning behind that format is explained in the HTTP for the server side configuration, but the point here to look at is the next piece - urlFunctions
urlFunctions - This describes transforms for modifying the URI of the request. In the above example, we replace the <test:string> with a random selection from ["jquery-3.3.1.min.js", "jquery-3.3.1.map"].
AgentHeaders - This defines the different headers that the agent will set when making requests
Note: if you're doing domain fronting, this is where you'd set that value
QueryParameters - This defines the query parameters (if any) that will be sent with the request. When doing transforms and dynamic modifications, there is a standard format that's described in the next section.
When doing query parameters, if you're going to do anything base64 encoded, make sure it's URL safe encoding. Specifically, /, +, =, and characters need to be URL encoded (i.e. with their %hexhex equivalents)
Cookies - This defines any cookies that are sent with the agent messages
Body - This defines any modifications to the body of the request that should be made
The defining feature of the HTTP profile is being able to do transforms on the various elements of HTTP requests. What does this look like though?
"Cookies": [
{
"name": "__cfduid",
"value": "",
"transforms": [
{
"function": "random_alpha",
"parameters": [30]
},
{
"function": "base64",
"parameters": []
}
]
}
]These transforms have a few specific parts:
name - this is the parameter name supplied in the request. For query parameters, this is the name in front of the = sign (ex:/test.php?q=abc123). For cookie parameters, this is the name of the cookie (ex: q=abc123;id=abc1).
value - this is the starting value before the transforms take place. You can set this to whatever you want, but if you set it to message, then the starting value for the transforms will be the message that the agent is trying to send to Apfell.
transforms - this is a list of transforms that are executed. The value starts off as indicated in the value field, then each resulting value is passed on to the next parameter. In this case, the value starts as "", then gets 30 random alphabet letters, then those letters are base64 encoded.
Transforms have 2 parameters: the name of the function to execute and an array of parameters to pass in to it.
The initial set of supported functions are:
base64
takes no parameters
prepend
takes a single parameter of the thing to prepend to the input value
append
takes a single parameter of the thing to append to the input value
random_mixed
takes a single parameter of the number of elements to append to the input value. The elements are chosen from upper case, lower case, and numbers.
random_number
takes a single parameter of the number of elements to append to the input value. The elements are chosen from numbers 0-9.
random_alpha
takes a single parameter of the number of elements to append to the input value. The elements are chosen from upper case and lower case letters.
choose_random
takes an array of elements to choose from
To add new transforms, a few things need to happen:
In the HTTP profile's server code, the function and a reverse of the function need to be added. The options need to be added to the create_value and get_value functions.
This allows the server to understand the new transforms
If you look in the server code, you'll see functions like prepend (which prepends the value) and r_prepend which does the reverse.
In the agent's HTTP profile code, the options for the functions need to also be added so that the agent understands the functions. Ideally, when you do this you add the new functions to all agents, otherwise you start to lose parity.
A final example of an agent configuration can be seen below:
{
"GET": {
"ServerBody": [
{
"function": "base64",
"parameters": []
},
{
"function": "prepend",
"parameters": ["!function(e,t){\"use strict\";\"object\"==typeof module&&\"object\"==typeof module.exports?module.exports=e.document?t(e,!0):function(e){if(!e.document)throw new Error(\"jQuery requires a window with a document\");return t(e)}:t(e)}(\"undefined\"!=typeof window?window:this,function(e,t){\"use strict\";var n=[],r=e.document,i=Object.getPrototypeOf,o=n.slice,a=n.concat,s=n.push,u=n.indexOf,l={},c=l.toString,f=l.hasOwnProperty,p=f.toString,d=p.call(Object),h={},g=function e(t){return\"function\"==typeof t&&\"number\"!=typeof t.nodeType},y=function e(t){return null!=t&&t===t.window},v={type:!0,src:!0,noModule:!0};function m(e,t,n){var i,o=(t=t||r).createElement(\"script\");if(o.text=e,n)for(i in v)n[i]&&(o[i]=n[i]);t.head.appendChild(o).parentNode.removeChild(o)}function x(e){return null==e?e+\"\":\"object\"==typeof e||\"function\"==typeof e?l[c.call(e)]||\"object\":typeof e}var b=\"3.3.1\",w=function(e,t){return new w.fn.init(e,t)},T=/^[\\s\\uFEFF\\xA0]+|[\\s\\uFEFF\\xA0]+$/g;w.fn=w.prototype={jquery:\"3.3.1\",constructor:w,length:0,toArray:function(){return o.call(this)},get:function(e){return null==e?o.call(this):e<0?this[e+this.length]:this[e]},pushStack:function(e){var t=w.merge(this.constructor(),e);return t.prevObject=this,t},each:function(e){return w.each(this,e)},map:function(e){return this.pushStack(w.map(this,function(t,n){return e.call(t,n,t)}))},slice:function(){return this.pushStack(o.apply(this,arguments))},first:function(){return this.eq(0)},last:function(){return this.eq(-1)},eq:function(e){var t=this.length,n=+e+(e<0?t:0);return this.pushStack(n>=0&&n<t?[this[n]]:[])},end:function(){return this.prevObject||this.constructor()},push:s,sort:n.sort,splice:n.splice},w.extend=w.fn.extend=function(){var e,t,n,r,i,o,a=arguments[0]||{},s=1,u=arguments.length,l=!1;for(\"boolean\"==typeof a&&(l=a,a=arguments[s]||{},s++),\"object\"==typeof a||g(a)||(a={}),s===u&&(a=this,s--);s<u;s++)if(null!=(e=arguments[s]))for(t in e)n=a[t],a!==(r=e[t])&&(l&&r&&(w.isPlainObject(r)||(i=Array.isArray(r)))?(i?(i=!1,o=n&&Array.isArray(n)?n:[]):o=n&&w.isPlainObject(n)?n:{},a[t]=w.extend(l,o,r)):void 0!==r&&(a[t]=r));return a},w.extend({expando:\"jQuery\"+(\"3.3.1\"+Math.random()).replace(/\\D/g,\"\"),isReady:!0,error:function(e){throw new Error(e)},noop:function(){},isPlainObject:function(e){var t,n;return!(!e||\"[object Object]\"!==c.call(e))&&(!(t=i(e))||\"function\"==typeof(n=f.call(t,\"constructor\")&&t.constructor)&&p.call(n)===d)},isEmptyObject:function(e){var t;for(t in e)return!1;return!0},globalEval:function(e){m(e)},each:function(e,t){var n,r=0;if(C(e)){for(n=e.length;r<n;r++)if(!1===t.call(e[r],r,e[r]))break}else for(r in e)if(!1===t.call(e[r],r,e[r]))break;return e},trim:function(e){return null==e?\"\":(e+\"\").replace(T,\"\")},makeArray:function(e,t){var n=t||[];return null!=e&&(C(Object(e))?w.merge(n,\"string\"==typeof e?[e]:e):s.call(n,e)),n},inArray:function(e,t,n){return null==t?-1:u.call(t,e,n)},merge:function(e,t){for(var n=+t.length,r=0,i=e.length;r<n;r++)e[i++]=t[r];return e.length=i,e},grep:function(e,t,n){for(var r,i=[],o=0,a=e.length,s=!n;o<a;o++)(r=!t(e[o],o))!==s&&i.push(e[o]);return i},map:function(e,t,n){var r,i,o=0,s=[];if(C(e))for(r=e.length;o<r;o++)null!=(i=t(e[o],o,n))&&s.push(i);else for(o in e)null!=(i=t(e[o],o,n))&&s.push(i);return a.apply([],s)},guid:1,support:h}),\"function\"==typeof Symbol&&(w.fn[Symbol.iterator]=n[Symbol.iterator]),w.each(\"Boolean Number String Function Array Date RegExp Object Error Symbol\".split(\" \"),function(e,t){l[\"[object \"+t+\"]\"]=t.toLowerCase()});function C(e){var t=!!e&&\"length\"in e&&e.length,n=x(e);return!g(e)&&!y(e)&&(\"array\"===n||0===t||\"number\"==typeof t&&t>0&&t-1 in e)}var E=function(e){var t,n,r,i,o,a,s,u,l,c,f,p,d,h,g,y,v,m,x,b=\"sizzle\"+1*new Date,w=e.document,T=0,C=0,E=ae(),k=ae(),S=ae(),D=function(e,t){return e===t&&(f=!0),0},N={}.hasOwnProperty,A=[],j=A.pop,q=A.push,L=A.push,H=A.slice,O=function(e,t){for(var n=0,r=e.length;n<r;n++)if(e[n]===t)return n;return-1},P=\"\r"]
},
{
"function": "prepend",
"parameters": ["/*! jQuery v3.3.1 | (c) JS Foundation and other contributors | jquery.org/license */"]
},
{
"function": "append",
"parameters": ["\".(o=t.documentElement,Math.max(t.body[\"scroll\"+e],o[\"scroll\"+e],t.body[\"offset\"+e],o[\"offset\"+e],o[\"client\"+e])):void 0===i?w.css(t,n,s):w.style(t,n,i,s)},t,a?i:void 0,a)}})}),w.each(\"blur focus focusin focusout resize scroll click dblclick mousedown mouseup mousemove mouseover mouseout mouseenter mouseleave change select submit keydown keypress keyup contextmenu\".split(\" \"),function(e,t){w.fn[t]=function(e,n){return arguments.length>0?this.on(t,null,e,n):this.trigger(t)}}),w.fn.extend({hover:function(e,t){return this.mouseenter(e).mouseleave(t||e)}}),w.fn.extend({bind:function(e,t,n){return this.on(e,null,t,n)},unbind:function(e,t){return this.off(e,null,t)},delegate:function(e,t,n,r){return this.on(t,e,n,r)},undelegate:function(e,t,n){return 1===arguments.length?this.off(e,\"**\"):this.off(t,e||\"**\",n)}}),w.proxy=function(e,t){var n,r,i;if(\"string\"==typeof t&&(n=e[t],t=e,e=n),g(e))return r=o.call(arguments,2),i=function(){return e.apply(t||this,r.concat(o.call(arguments)))},i.guid=e.guid=e.guid||w.guid++,i},w.holdReady=function(e){e?w.readyWait++:w.ready(!0)},w.isArray=Array.isArray,w.parseJSON=JSON.parse,w.nodeName=N,w.isFunction=g,w.isWindow=y,w.camelCase=G,w.type=x,w.now=Date.now,w.isNumeric=function(e){var t=w.type(e);return(\"number\"===t||\"string\"===t)&&!isNaN(e-parseFloat(e))},\"function\"==typeof define&&define.amd&&define(\"jquery\",[],function(){return w});var Jt=e.jQuery,Kt=e.$;return w.noConflict=function(t){return e.$===w&&(e.$=Kt),t&&e.jQuery===w&&(e.jQuery=Jt),w},t||(e.jQuery=e.$=w),w});"]
}
],
"ServerHeaders": {
"Server": "NetDNA-cache/2.2",
"Cache-Control": "max-age=0, no-cache",
"Pragma": "no-cache",
"Connection": "keep-alive",
"Content-Type": "application/javascript; charset=utf-8"
},
"ServerCookies": {},
"AgentMessage": [{
"urls": ["http://192.168.0.11:9001"],
"uri": "/<test:string>",
"urlFunctions": [
{
"name": "<test:string>",
"value": "",
"transforms": [
{
"function": "choose_random",
"parameters": ["jquery-3.3.1.min.js","jquery-3.3.1.map"]
}
]
}
],
"AgentHeaders": {
"Accept": "text/html,application/xhtml+xml,application/xml;q=0.9,*/*;q=0.8",
"Host": "code.jquery.com",
"Referer": "http://code.jquery.com/",
"Accept-Encoding": "gzip, deflate",
"User-Agent": "Mozilla/5.0 (Windows NT 6.3; Trident/7.0; rv:11.0) like Gecko"
},
"QueryParameters": [
{
"name": "q",
"value": "message",
"transforms": [
]
}
],
"Cookies": [
{
"name": "__cfduid",
"value": "",
"transforms": [
{
"function": "random_alpha",
"parameters": [30]
},
{
"function": "base64",
"parameters": []
}
]
}
],
"Body": []
}]
},
"POST": {
"ServerBody": [],
"ServerCookies": {},
"ServerHeaders": {
"Server": "NetDNA-cache/2.2",
"Cache-Control": "max-age=0, no-cache",
"Pragma": "no-cache",
"Connection": "keep-alive",
"Content-Type": "application/javascript; charset=utf-8"
},
"AgentMessage": [{
"urls": ["http://192.168.0.11:9001"],
"uri": "/download.php",
"urlFunctions": [],
"QueryParameters": [
{
"name": "bob2",
"value": "justforvalidation",
"transforms": []
}
],
"AgentHeaders": {
"Accept": "text/html,application/xhtml+xml,application/xml;q=0.9,*/*;q=0.8",
"Host": "code.jquery.com",
"Referer": "http://code.jquery.com/",
"Accept-Encoding": "gzip, deflate",
"User-Agent": "Mozilla/5.0 (Windows NT 6.3; Trident/7.0; rv:11.0) like Gecko"
},
"Cookies": [
{
"name": "BobCookie",
"value": "splat",
"transforms": [
{
"function": "prepend",
"parameters": [
"splatity_"
]
}
]
}
],
"Body": [
{
"function": "base64",
"parameters": []
},
{
"function": "prepend",
"parameters": ["<html>"]
},
{
"function": "append",
"parameters": ["</html>"]
}
]
}]
},
"jitter": 50,
"interval": 10,
"chunk_size": 5120000,
"key_exchange": true,
"kill_date": "2020-01-20"
}Like with all C2 profiles, the HTTP profile has its own docker container that handles connections. The purpose of this container is to accept connections from HTTP agents, undo all of the special configurations you specified for your agent to get the real message back out, then forward that message to the actual Mythic server. Upon getting a response from Mythic, the container performs more transforms on the message and sends it back to the Agent.
The docker container just abstracts all of the C2 features out from the actual Mythic server so that you're free to customize and configure the C2 as much as you want without having to actually adjust anything in the main server.
There is only ONE HTTP docker container per Mythic instance though, not one per operation. Because of this, the HTTP profile's server-side configuration will have to do that multiplexing for you. Below is an example of the setup:
Let's look into what this sort of configuration entails. We already discussed the agent side configuration above, so now let's look into what's going on in the HTTP C2 Docker container. The Server configuration has the following general format:
{
"instances": [
{
"GET": {
},
"POST": {
},
"no_match": {
"action": "return_file",
"redirect": "http://example.com",
"proxy_get": {
"url": "https://www.google.com",
"status": 200
},
"proxy_post": {
"url": "https://www.example.com",
"status": 200
},
"return_file": {
"name": "fake.html",
"status": 404
}
},
"port": 9001,
"key_path": "",
"cert_path": "",
"debug": true
}
],
}There are a couple key things to notice here:
instances - You generally have one instance per operation, but there's no strict limit there. This is an array of configurations, so when the Docker server starts up, it loops through these instances and starts each one
no_match - this allows you to specify what happens if there's an issue reaching the main apfell server or if you get a request to the docker container that doesn't match one of your specified endpoints. This is also what happens if you get a message to the right endpoint, but it's not properly encoded with the proper agent message (ex: fails to decrypt the agent message or fails to get the agent message from the url)
action - this allows you to specify which of the options you want to leverage
redirect - this simply returns a 302 redirect to the specified url
proxy_get - this proxies the request to the following url and returns that url's contents with the status code specified
proxy_post - this proxies the request to the following url and returns that url's contents with the specified status code
return_file - this allows you to return the contents of a specified file. This is useful to have a generic 404 page or saved static page for a sight you might be faking.
port - which port this instance should listen on
key_path - the path locally to where the key file is located for an SSL connection. If you upload the file through the web UI then the path here should simply be the name of the file.
cert_path - the path locally to where the cert file is located for an SSL connection.If you upload the file through the web UI, then the path here should simply be the name of the file. Both this and the key_path must be specified and have valid files for the connection to the container to be SSL.
debug - set this to true to allow debug messages to be printed. There can be a lot though, so once you have everything working, be sure to set this to false to speed things up a bit.
GET and POST - simply take the GET and POST sections from your agent configuration mentioned above and paste those here. No changes necessary.
When it comes to the URIs you choose to use for this, there's an additional feature you can leverage. You can choose to keep them static (like /download.php) and specify/configure the query parameters/cookies/body, but you can also choose to register more dynamic URIs. There's an example of this above:
"uri": "/<test:string>"What this does for the server side is register a pattern via Sanic's Request Parameters. This allows you to register URIs that can change every time, but still be valid. For example:
"uri": "/downloads/category/<c:string>/page/<i:int>"this would require you to have the URI of something like /downloads/category/abcdefh/page/5 or the docker container will hit a not_found case and follow that action path. Combine this with the urlFunctions and you can have something to always generate unique URIs as follows:
"uri": "/downloads/category/<c:string>/page/<i:int>",
"urlFunctions": [
{
"name": "<c:string>",
"value": "",
"transforms": [
{
"function": "random_alpha",
"parameters": [15]
}
]
},
{
"name": "<i:int>",
"value": "",
"transforms": [
{
"function": "random_number",
"parameters": [3]
}
]
}
]One last thing to note about this. You cannot have two URIs in a single instance within the GET or the POST that collide. For example, you can't have two URIs that are /download.php but vary in query parameters. As far as the docker container's service is concerned, the differentiation is between the URIs, not the query parameters, cookies, or body configuration. Now, in two different instances you can have overlapping URIs, but that's because they are different web servers bound to different ports.
What if you want all of your messages to be "POST" requests or "GET" requests? Well, Apfell by default tries to do GET requests when getting tasking and POST requests for everything else; however, if there are no GET agent_message instances in that array (i.e. {"GET":{"AgentMessage":[]}}) then the agent should use POST messages instead and vise versa. This allows you to have yet another layer of customization in your profiles.
Because this is a profile that offers a LARGE amount of flexibility, it can get quite confusing. So, included with the dynamicHTTP is a linter (a program to check your configurations for errors). In C2_Profiles/dynamicHTTP/c2_code/ is a config_linter.py file. Run this program with ./config_linter.py [path_to_agent_config.json] where [path_to_agent_config.json] is a saved version of the configuration you'd supply your agent. The program will then check that file for errors, will check your server's config.json for errors, and then verify that there's a match between the agent config and server config (if there was no match, then your server wouldn't be able to understand your agent's messages). Here's an example:
its-a-feature@ubuntu:~/Desktop/Mythic/C2_Profiles/dynamicHTTP/c2_code$ ./config_linter.py agent_config.json
[*] Checking server config for layout structure
[+] Server config layout structure is good
[*] Checking agent config for layout structure
[+] Agent config layout structure is good
[*] Looking into GET AgentMessages
[*] Current URLs: ['http://192.168.205.151:9000']
Current URI: /<test:string>
[*] Found 'message' keyword in QueryParameter q
[*] Now checking server config for matching section
[*] Found matching URLs and URI, checking rest of AgentMessage
[+] FOUND MATCH
[*] Looking into POST AgentMessages
[*] Current URLs: ['http://192.168.205.151:9000']
Current URI: /download.php
[*] Didn't find message keyword anywhere, assuming it to be the Body of the message
[*] Now checking server config for matching section
[*] Found matching URLs and URI, checking rest of AgentMessage
[*] Checking for matching Body messages
[+] FOUND MATCHUnexpected error with integration github-files: Integration is not installed on this space
Unexpected error with integration github-files: Integration is not installed on this space
Unexpected error with integration github-files: Integration is not installed on this space


Browser scripting is a way for you, the agent developer or the operator, to dynamically adjust the output that an agent reports back. You can turn data into tables, download buttons, screenshot viewers, and even buttons for additional tasking.
As a developer, your browser scripts live in a folder called browser_scripts in your mythic folder. These are simply JavaScript files that you then reference from within your command files such as:
browser_script = BrowserScript(script_name="download_new", author="@its_a_feature_", for_new_ui=True)As an operator, they exist in the web interface under "Operations" -> "Browser Scripts". You can enable and disable these for yourself at any time, and you can even modify or create new ones from the web interface as well. If you want these changes to be persistent or available for a new Mythic instance, you need to save it off to disk and reference it via the above method.
Browser Scripts are JavaScript files that take in a reference to the task and an array of the responses available, then returns a Dictionary representing what you'd like Mythic to render on your behalf. This is pretty easy if your agent returns structured output that you can then parse and process. If you return unstructured output, you can still manipulate it, but it will just be harder for you.
The most basic thing you can do is return plaintext for Mythic to display for you. Let's take an example that simply aggregates all of the response data and asks Mythic to display it:
function(task, responses){
const combined = responses.reduce( (prev, cur) => {
return prev + cur;
}, "");
return {'plaintext': combined};
}This function reduces the Array called responses and aggregates all of the responses into one string called combined then asks Mythic to render it via: {'plaintext': combined}.
Plaintext is also used when you don't have a browserscript set for a command in general or when you toggle it off. This uses the react-ace text editor to present the data. This view will also try to parse the output as JSON and, if it can, will re-render the output in pretty print format.
A slightly more complex example is to render a button for Mythic to display a screenshot.
function(task, responses){
if(task.status.toLowercase().includes("error")){
const combined = responses.reduce( (prev, cur) => {
return prev + cur;
}, "");
return {'plaintext': combined};
}else if(task.completed){
if(responses.length > 0){
let data = JSON.parse(responses[0]);
return {"screenshot":[{
"agent_file_id": [data["agent_file_id"]],
"variant": "contained",
"name": "View Screenshot",
"hoverText": "View screenshot in modal"
}]};
}else{
return {"plaintext": "No data to display..."}
}
}else if(task.status === "processed"){
// this means we're still downloading
if(responses.length > 0){
let data = JSON.parse(responses[0]);
return {"screenshot":[{
"agent_file_id": [data["agent_file_id"]],
"variant": "contained",
"name": "View Partial Screenshot",
"hoverText": "View partial screenshot in modal"
}]};
}
return {"plaintext": "No data yet..."}
}else{
// this means we shouldn't have any output
return {"plaintext": "Not response yet from agent..."}
}
}This function does a few things:
If the task status includes the word "error", then we don't want to process the response like our standard structured output because we returned some sort of error instead. In this case, we'll do the same thing we did in the first step and simply return all of the output as plaintext.
If the task is completed and isn't an error, then we can verify that we have our responses that we expect. In this case, we simply expect a single response with some of our data in it. The one piece of information that the browser script needs to render a screenshot is the agent_file_id or file_id of the screenshot you're trying to render. If you want to return this information from the agent, then this will be the same file_id that Mythic returns to you for transferring the file. If you display this information via process_response output from your agent, then you're likely to pull the file data via an RPC call, and in that case, you're looking for the agent_file_id value. You'll notice that this is an array of identifiers. This allows you to supply multiple at once (for example: you took 5 screenshots over a few minutes or you took screenshots of multiple monitors) and Mythic will create a modal where you can easily click through all of them.
To actually create a screenshot, we return a dictionary with a key called screenshot that has an array of Dictionaries. We do this so that you can actually render multiple screenshots at once (such as if you fetched information for multiple monitors at a time). For each screenshot, you just need three pieces of information: the agent_file_id, the name of the button you want to render, and the variant is how you want the button presented (contained is a solid button and outlined is just an outline for the button).
If we didn't error and we're not done, then the status will be processed. In that case, if we have data we want to also display the partial screenshot, but if we have no responses yet, then we want to just inform the user that we don't have anything yet.
When downloading files from a target computer, the agent will go through a series of steps to register a file id with Mythic and then start chunking and transferring data. At the end of this though, it's super nice if the user is able to click a button in-line with the tasking to download the resulting file(s) instead of then having to go to another page to download it. This is where the download browser script functionality comes into play.
With this script, you're able to specify some plaintext along with a button that links to the file you just downloaded. However, remember that browser scripts run in the browser and are based on the data that's sent to the user to view. So, if the agent doesn't send back the new agent_file_id for the file, then you won't be able to link to it in the UI. Let's take an example and look at what this means:
function(task, responses){
if(task.status.includes("error")){
const combined = responses.reduce( (prev, cur) => {
return prev + cur;
}, "");
return {'plaintext': combined};
}else if(task.completed){
if(responses.length > 0){
try{
let data = JSON.parse(responses[0]);
return {"download":[{
"agent_file_id": data["file_id"],
"variant": "contained",
"name": "Download",
"plaintext": "Download the file here: ",
"hoverText": "download the file"
}]};
}catch(error){
const combined = responses.reduce( (prev, cur) => {
return prev + cur;
}, "");
return {'plaintext': combined};
}
}else{
return {"plaintext": "No data to display..."}
}
}else if(task.status === "processed"){
if(responses.length > 0){
const task_data = JSON.parse(responses[0]);
return {"plaintext": "Downloading a file with " + task_data["total_chunks"] + " total chunks..."};
}
return {"plaintext": "No data yet..."}
}else{
// this means we shouldn't have any output
return {"plaintext": "Not response yet from agent..."}
}
}So, from above we can see a few things going on:
Like many other browser scripts, we're going to modify what we display to the user based on the status of the task as well as if the agent has returned anything for us to view or not. That's why there's checks based on the task.status and task.completed fields.
Assuming the agent returned something back and we completed successfully, we're going to parse what the agent sent back as JSON and look for the file_id field.
We can then make the download button with a few fields:
agent_file_id is the file UUID of the file we're going to download through the UI
variant allows you to control if the button is a solid or just outlined button (contained or outlined)
name is the text inside the button
plaintext is any leading text data you want to dispaly to the user instead of just a single download button
So, let's look at what the agent actually sent for this message as well as what this looks like visually:
Notice here in what the agent sends back that there are two main important pieces: file_id which we use to pass in as agent_file_id for the browser script, and total_chunks. total_chunks isn't strictly necessary for anything, but if you look back at the script, you'll see that we display that as plaintext to the user while we're waiting for the download to finish so that the user has some sort of idea how long it'll take (is it 1 chunk, 5, 50, etc).
And here you can see that we have our plaintext leading up to our button. You'll also notice how the download key is an array. So yes, if you're downloading multiple files, as long as you can keep track of the responses you're getting back from your agent, you can render and show multiple download buttons.
Sometimes you'll want to link back to the "search" page (tasks, files, screenshots, tokens, credentials, etc) with specific pieces of information so that the user can see a list of information more cleanly. For example, maybe you run a command that generated a lot of credentials (like mimikatz) and rather than registering them all with Mythic and displaying them in the task output, you'd rather register them with Mythic and then link the user over to them. Thats where the search links come into play. They're formatted very similar to the download button, but with a slight tweak.
function(task, responses){
if(task.status.includes("error")){
const combined = responses.reduce( (prev, cur) => {
return prev + cur;
}, "");
return {'plaintext': combined};
}else if(task.completed){
if(responses.length > 0){
try{
let data = JSON.parse(responses[0]);
return {"search": [{
"plaintext": "View on the search page here: ",
"hoverText": "opens a new search page",
"search": "tab=files&searchField=Filename&search=" + task.display_params,
"name": "Click Me!"
}]};
}catch(error){
const combined = responses.reduce( (prev, cur) => {
return prev + cur;
}, "");
return {'plaintext': combined};
}
}else{
return {"plaintext": "No data to display..."}
}
}else if(task.status === "processed"){
if(responses.length > 0){
const task_data = JSON.parse(responses[0]);
return {"plaintext": "Downloading a file with " + task_data["total_chunks"] + " total chunks..."};
}
return {"plaintext": "No data yet..."}
}else{
// this means we shouldn't have any output
return {"plaintext": "Not response yet from agent..."}
}
}This is almost exactly the same as the download example, but the actual dictionary we're returning is a little different. Specifically, we have:
plaintext as a string we want to display before our actual link to the search page
hoverText as a string for what to display as a tooltip when you hover over the link to the search page
search is the actual query parameters for the search we want to do. In this case, we're showing that we want to be on the files tab, with the searchField of Filename, and we want the actual search parameter to be what is shown to the user in the display parameters (display_params). If you're ever curious about what you should include here for your specific search, whenever you're clicking around on the search page, the URL will update to reflect what's being shown. So, you can navigate to what you'd want, then copy and paste it here.
name is the text represented that is the link to the search page.
Just like with the download button, you can have multiple of these search responses.
Creating tables is a little more complicated, but not by much. The biggest thing to consider is that you're asking Mythic to create a table for you, so there's a few pieces of information that Mythic needs such as what are the headers, are there any custom styles you want to apply to the rows or specific cells, what are the rows and what's the column value per row, in each cell do you want to display data, a button, issue more tasking, etc. So, while it might seem overwhelming at first, it's really nothing too crazy.
Let's take an example and then work through it - we're going to render the following screenshot
function(task, responses){
if(task.status.includes("error")){
const combined = responses.reduce( (prev, cur) => {
return prev + cur;
}, "");
return {'plaintext': combined};
}else if(task.completed && responses.length > 0){
let folder = {
backgroundColor: "mediumpurple",
color: "white"
};
let file = {};
let data = "";
try{
data = JSON.parse(responses[0]);
}catch(error){
const combined = responses.reduce( (prev, cur) => {
return prev + cur;
}, "");
return {'plaintext': combined};
}
let ls_path = "";
if(data["parent_path"] === "/"){
ls_path = data["parent_path"] + data["name"];
}else{
ls_path = data["parent_path"] + "/" + data["name"];
}
let headers = [
{"plaintext": "name", "type": "string", "fillWidth": true},
{"plaintext": "size", "type": "size", "width": 200,},
{"plaintext": "owner", "type": "string", "width": 400},
{"plaintext": "group", "type": "string", "width": 400},
{"plaintext": "posix", "type": "string", "width": 100},
{"plaintext": "xattr", "type": "button", "width": 100, "disableSort": true},
{"plaintext": "DL", "type": "button", "width": 100, "disableSort": true},
{"plaintext": "LS", "type": "button", "width": 100, "disableSort": true},
{"plaintext": "CS", "type": "button", "width": 100, "disableSort": true}
];
let rows = [{
"rowStyle": data["is_file"] ? file : folder,
"name": {
"plaintext": data["name"],
"copyIcon": true,
"startIcon": data["is_file"] ? "file":"openFolder",
"startIconHoverText": data["name",
"startIconColor": "gold",
},
"size": {"plaintext": data["size"]},
"owner": {"plaintext": data["permissions"]["owner"]},
"group": {"plaintext": data["permissions"]["group"]},
"posix": {"plaintext": data["permissions"]["posix"]},
"xattr": {"button": {
"name": "View XATTRs",
"type": "dictionary",
"value": data["permissions"],
"leftColumnTitle": "XATTR",
"rightColumnTitle": "Values",
"title": "Viewing XATTRs",
"hoverText": "View more attributes"
}},
"DL": {"button": {
"name": "DL",
"type": "task",
"disabled": !data["is_file"],
"ui_feature": "file_browser:download",
"parameters": ls_path
}},
"LS": {"button": {
"name": "LS",
"type": "task",
"ui_feature": "file_browser:list",
"parameters": ls_path
}},
"CS": {"button": {
"name": "CS",
"type": "task",
"ui_feature": "code_signatures:list",
"parameters": ls_path
}}
}];
for(let i = 0; i < data["files"].length; i++){
let ls_path = "";
if(data["parent_path"] === "/"){
ls_path = data["parent_path"] + data["name"] + "/" + data["files"][i]["name"];
}else{
ls_path = data["parent_path"] + "/" + data["name"] + "/" + data["files"][i]["name"];
}
let row = {
"rowStyle": data["files"][i]["is_file"] ? file: folder,
"name": {"plaintext": data["files"][i]["name"]},
"size": {"plaintext": data["files"][i]["size"]},
"owner": {"plaintext": data["files"][i]["permissions"]["owner"]},
"group": {"plaintext": data["files"][i]["permissions"]["group"]},
"posix": {"plaintext": data["files"][i]["permissions"]["posix"],
"cellStyle": {
}
},
"xattr": {"button": {
"name": "View XATTRs",
"type": "dictionary",
"value": data["files"][i]["permissions"],
"leftColumnTitle": "XATTR",
"rightColumnTitle": "Values",
"title": "Viewing XATTRs"
}},
"DL": {"button": {
"name": "DL",
"type": "task",
"disabled": !data["files"][i]["is_file"],
"ui_feature": "file_browser:download",
"parameters": ls_path
}},
"LS": {"button": {
"name": "LS",
"type": "task",
"ui_feature": "file_browser:list",
"parameters": ls_path
}},
"CS": {"button": {
"name": "CS",
"type": "task",
"ui_feature": "code_signatures:list",
"parameters": ls_path
}}
};
rows.push(row);
}
return {"table":[{
"headers": headers,
"rows": rows,
"title": "File Listing Data"
}]};
}else if(task.status === "processed"){
// this means we're still downloading
return {"plaintext": "Only have partial data so far..."}
}else{
// this means we shouldn't have any output
return {"plaintext": "Not response yet from agent..."}
}
}This looks like a lot, but it's nothing crazy - there's just a bunch of error handling and dealing with parsing errors or task errors. Let's break this down into a few easier to digest pieces:
return {"table":[{
"headers": headers,
"rows": rows,
"title": "File Listing Data"
}]};In the end, we're returning a dictionary with the key table which has an array of Dictionaries. This means that you can have multiple tables if you want. For each one, we need three things: information about headers, the rows, and the title of the table itself. Not too bad right? Let's dive into the headers:
let headers =[
{"plaintext": "name", "type": "string", "fillWidth": true},
{"plaintext": "size", "type": "size", "width": 200,},
{"plaintext": "owner", "type": "string", "width": 400},
{"plaintext": "group", "type": "string", "width": 400},
{"plaintext": "posix", "type": "string", "width": 100},
{"plaintext": "xattr", "type": "button", "width": 100, "disableSort": true},
{"plaintext": "DL", "type": "button", "width": 100, "disableSort": true},
{"plaintext": "LS", "type": "button", "width": 100, "disableSort": true},
{"plaintext": "CS", "type": "button", "width": 100, "disableSort": true}
];Headers is an array of Dictionaries with three values each - plaintext, type, and optionally width. As you might expect, plaintext is the value that we'll actually use for the title of the column. type is controlling what kind of data will be displayed in that column's cells. There are a few options here: string (just displays a standard string), size (takes a size in bytes and converts it into something human readable - i.e. 1024 -> 1KB), date (process date values and display them and sort them properly), number (display numbers and sort them properly), and finally button (display a button of some form that does something). The last value here is width - this is a pixel value of how much width you want the column to take up by default. If you want one or more columns to take up the remaining widths, specify "fillWidth": true. Columns by default allow for sorting, but this doesn't always make sense. If you want to disable this ( for example, for a button column), set "disableSort": true in the header information.
Now let's look at the actual rows to display:
let rows = [{
"rowStyle": data["is_file"] ? file : folder,
"name": {
"plaintext": data["name"],
"copyIcon": true,
"startIcon": data["is_file"] ? "file":"openFolder",
"startIconHoverText": data["name",
"startIconColor": "gold",
},
"size": {"plaintext": data["size"]},
"owner": {"plaintext": data["permissions"]["owner"]},
"group": {"plaintext": data["permissions"]["group"]},
"posix": {"plaintext": data["permissions"]["posix"]},
"xattr": {"button": {
"name": "View XATTRs",
"type": "dictionary",
"value": data["permissions"],
"leftColumnTitle": "XATTR",
"rightColumnTitle": "Values",
"title": "Viewing XATTRs",
"hoverText": "View more attributes"
}},
"DL": {"button": {
"name": "DL",
"type": "task",
"disabled": !data["is_file"],
"ui_feature": "file_browser:download",
"parameters": ls_path
}},
"LS": {"button": {
"name": "LS",
"type": "task",
"ui_feature": "file_browser:list",
"parameters": ls_path
}},
"CS": {"button": {
"name": "CS",
"type": "task",
"ui_feature": "code_signatures:list",
"parameters": ls_path
}}
}];Ok, lots of things going on here, so let's break it down:
As you might expect, you can use this key to specify custom styles for the row overall. In this example, we're adjusting the display based on if the current row is for a file or a folder.
If we're displaying anything other than a button for a column, then we need to include the plaintext key with the value we're going to use. You'll notice that aside from rowStyle, each of these other keys match up with the plaintext header values so that we know which values go in which columns.
In addition to just specifying the plaintext value that is going to be displayed, there are a few other properties we can specify:
startIcon - specify the name of an icon to use at the beginning of the plaintext value. The available startIcon values are:
folder/openFolder, closedFolder, archive/zip, diskimage, executable, word, excel, powerpoint, pdf/adobe, database, key, code/source, download, upload, png/jpg/image, kill, inject, camera, list, delete
^ the above values also apply to the endIcon attribute
startIconHoverText - this is text you want to appear when the user hovers over the icon
endIcon this is the same as the startIcon except it's at the end of the text
endIconHoverText this is the text you want to appear when the user hovers over the icon
plaintextHoverText this is the text you want to appear when the user hovers over the plaintext value
copyIcon - use this to indicate true/false if you want a copy icon to appear at the front of the text. If this is present, this will allow the user to copy all of the text in plaintext to the clipboard. This is handy if you're displaying exceptionally long pieces of information.
startIconColor - You can specify the color for your start icon. You can either do a color name, like "gold" or you can do an rgb value like "rgb(25,142,117)".
endIconColor - this is the same as the startIconColor but applies to any icon you want to have at the end of your text
The first kind of button we can do is just a popup to display additional information that doesn't fit within the table. In this example, we're displaying all of Apple's extended attributes via an additional popup.
{
"button":
{
"name": "View XATTRs",
"type": "dictionary",
"value": data["permissions"],
"leftColumnTitle": "XATTR",
"rightColumnTitle": "Values",
"title": "Viewing XATTRs",
"hoverText": "View additional attributes"
}
}The button field takes a few values, but nothing crazy. name is the name of the button you want to display to the user. the type field is what kind of button we're going to display - in this case we use dictionary to indicate that we're going to display a dictionary of information to the user. The other type is task that we'll cover next. The value here should be a Dictionary value that we want to display. We'll display the dictionary as a table where the first column is the key and the second column is the value, so we can provide the column titles we want to use. We can optionally make this button disabled by providing a disabled field with a value of true. Just like with the normal plaintext section, we can also specify startIcon, startIconColor.Lastly, we provide a title field for what we want to title the overall popup for the user.
If the data you want to display to the user isn't structured (not a dictionary, not an array), then you probably just want to display it as a string. This is pretty common if you have long file paths or other data you want to display but don't fit nicely in a table form.
{
"button":
{
"name": "View Strings",
"type": "string",
"value": "my data string\nwith newlines as well",
"title": "Viewing XATTRs",
"hoverText": "View additional attributes"
}
}Just like with the other button types, we can use startIcon, startIconColor, and hoverText for this button as well.
This button type allows you to issue additional tasking.
{
"button":
{
"name": "DL",
"type": "task",
"disabled": !data["is_file"],
"ui_feature": "file_browser:download",
"parameters": ls_path,
"hoverText": "List information about the file/folder",
"openDialog": false,
"getConfirmation": false
}
}This button has the same name and type fields as the dictionary button. Just like with the dictionary button we can make the button disabled or not with the disabled field. You might be wondering which task we'll invoke with the button. This works the same way we identify which command to issue via the file browser or the process browser - ui_feature. These can be anything you want, just make sure you have the corresponding feature listed somewhere in your commands or you'll never be able to task it. Just like with the dictionary button, we can specify startIcon and startIconColor. The openDialog flag allows you to specify that the tasking popup modal should open and be partially filled out with the data you supplied in the parameters field. Similarly, the getConfirmation flag allows you to force an accept/cancel dialog to get the user's confirmation before issuing a task. This is handy, especially if the tasking is something potentially dangerous (killing a process, removing a file, etc). If you're setting getConfirmation to true, you can also set acceptText to something that makes sense for your tasking, like "yes", "remove", "delete", "kill", etc.
The last thing here is the parameters. If you provide parameters, then Mythic will automatically use them when tasking. In this example, we're pre-creating the full path for the files in question and passing that along as the parameters to the download function.
Remember: your parse_arguments function gets called when your input isn’t a dictionary or if your parse_dictionary function isn’t defined. So keep that in mind - string arguments go here
when you issue ls -Path some_path on the command line, Mythic’s UI is automatically parsing that into {"Path": "some_path"} for you and since you have a dictionary now, it goes to your parse_dictionary function
when you set the parameters in the browser script, Mythic doesn’t first try to pre-process them like it does when you’re typing on the command.
If you want to pass in a parsed parameter set, then you can just pass in a dictionary. So, "parameters": {"Path": "my path value"}.
If you set "parameters": "-Path some_path" just like you would type on the command line, then you need to have a parse_arguments function that will parse that out into the appropriate command parameters you have. If your command doesn't take any parameters and just uses the input as a raw command line, then you can do like above and have "parameters": "path here"
Sometimes the data you want to display is an array rather than a dictionary or big string blob. In this case, you can use the table button type and provide all of the same data you did when creating this table to create a new table (yes, you can even have menu buttons on that table).
{
"button":
{
"name": "view table",
"type": "table",
"title": "my custom new table",
"value": {
"headers": [
{"plaintext": "test1", "width": 100, "type": "string"}, {"plaintext": "Test2", "type": "string"}
],
"rows": [
{"test1": {"plaintext": "row1 col 1"}, "Test2": {"plaintext": "row 1 col 2"}}
]
}
}
}Tasking and extra data display button is nice and all, but if you have a lot of options, you don't want to have to waste all that valuable text space with buttons. To help with that, there's one more type of button we can do: menu. With this we can wrap the other kinds of buttons:
"button": {
"name": "Actions",
"type": "menu",
"value": [
{
"name": "View XATTRs",
"type": "dictionary",
"value": data["files"][i]["permissions"],
"leftColumnTitle": "XATTR",
"rightColumnTitle": "Values",
"title": "Viewing XATTRs"
},
{
"name": "Get Code Signatures",
"type": "task",
"ui_feature": "code_signatures:list",
"parameters": ls_path
},
{
"name": "LS Path",
"type": "task",
"ui_feature": "file_browser:list",
"parameters": ls_path
},
{
"name": "Download File",
"type": "task",
"disabled": !data["files"][i]["is_file"],
"ui_feature": "file_browser:download",
"parameters": ls_path
}
]
}Notice how we have the exact same information for the task and dictionary buttons as before, but they're just in an array format now. It's as easy as that. You can even keep your logic for disabling entries or conditionally not even add them. This allows us to create a dropdown menu like the following screenshot:
These menu items also support the startIcon , startIconColor , and hoverText, properties.
If you have certain kinds of media you'd like to display right inline with your tasking, you can do that. All you need is the agent_file_id (the UUID value you get back when registering a file with Mythic) and the filename of whatever media it is you're trying to show.
return { "media": [{
"filename": `${task.display_params}`,
"agent_file_id": data["file_id"],
}]};Above is an example using the media key that sets the filename to be the display parameters for the task (in this case it was a download command so the display parameters are the path to the file to download) and the agent_file_id is set to the file_id that was returned as part of the agent's tasking. In this case, the raw agent user_output was:
{"file_id": "ff41f25d-fcaa-4d5b-a573-061d40238e33", "total_chunks": "1"}
File Transfer Update: 100% complete
Finished DownloadingIf you don't want to have media auto-render for you as part of this browser script, you can either disable the browser script or go to your user settings and there's a new toggle for if you want to auto-render media. If you set that to off and save it, then the next time a browser script (or anything else) tries to auto-render media, it'll first give you a button to click to authorize it before showing.
This also applies to the new media button on the file downloads page.
If you want to render your data in a graph view rather than a table, then you can do that now too! This uses the same graphing engine that the active callback's graph view uses. There are three main pieces for returning graph data: nodes, edges, and a group_by string where you can optionally group your nodes via certain properties.
Each node has a few properties:
id - this is a unique way to identify this node compared to others. This is also how you'll identify the node when it comes to creating edges.
img - if you want to display an image for your node, you give the name of the image here. Because this is React, we need to identify these all ahead of time. For now, the available images are as follows: group, computer, user, lan, language, list, container, help, diamond, skull. We can always add more though - if you find a free icon on Font Awesome or Material UI then let me know and I can get that added.
style - this is where you can provide React styles that you want applied to your image. These are the same as CSS styles, except that - are removed and camel casing is used instead. For example, instead of an attribute of background-color like normal CSS, you'd define it as backgroundColor.
overlay_img - this is the same as img except that you can define a SECOND image to have overlayed on the top right of your original one.
overlay_style - this is the same as style except that it applied to overlay_image instead of img.
data - this is where any information about your actual node lives
there should be a label value in here that's used to display the text under your node
buttons - this is an array of button actions you'd like to add to the context menu of your node. This is the same as the normal buttons from Tables, except there's no need for a menu button.
Each edge has a few properties:
source - all of the data (as a dictionary) about the source node. Mythic will try to do things like source.id to get the ID for the source node.
destination - all of the data (as a dictionary) about the destination/target node.
label - the text to display as a label on the edge
data - dictionary of information about your edge
animate - boolean true/false if you want the edge the be animated or a solid color
color - the color you want the edge to be
buttons - this is an array of button actions you'd like to add to the context menu of your edge.

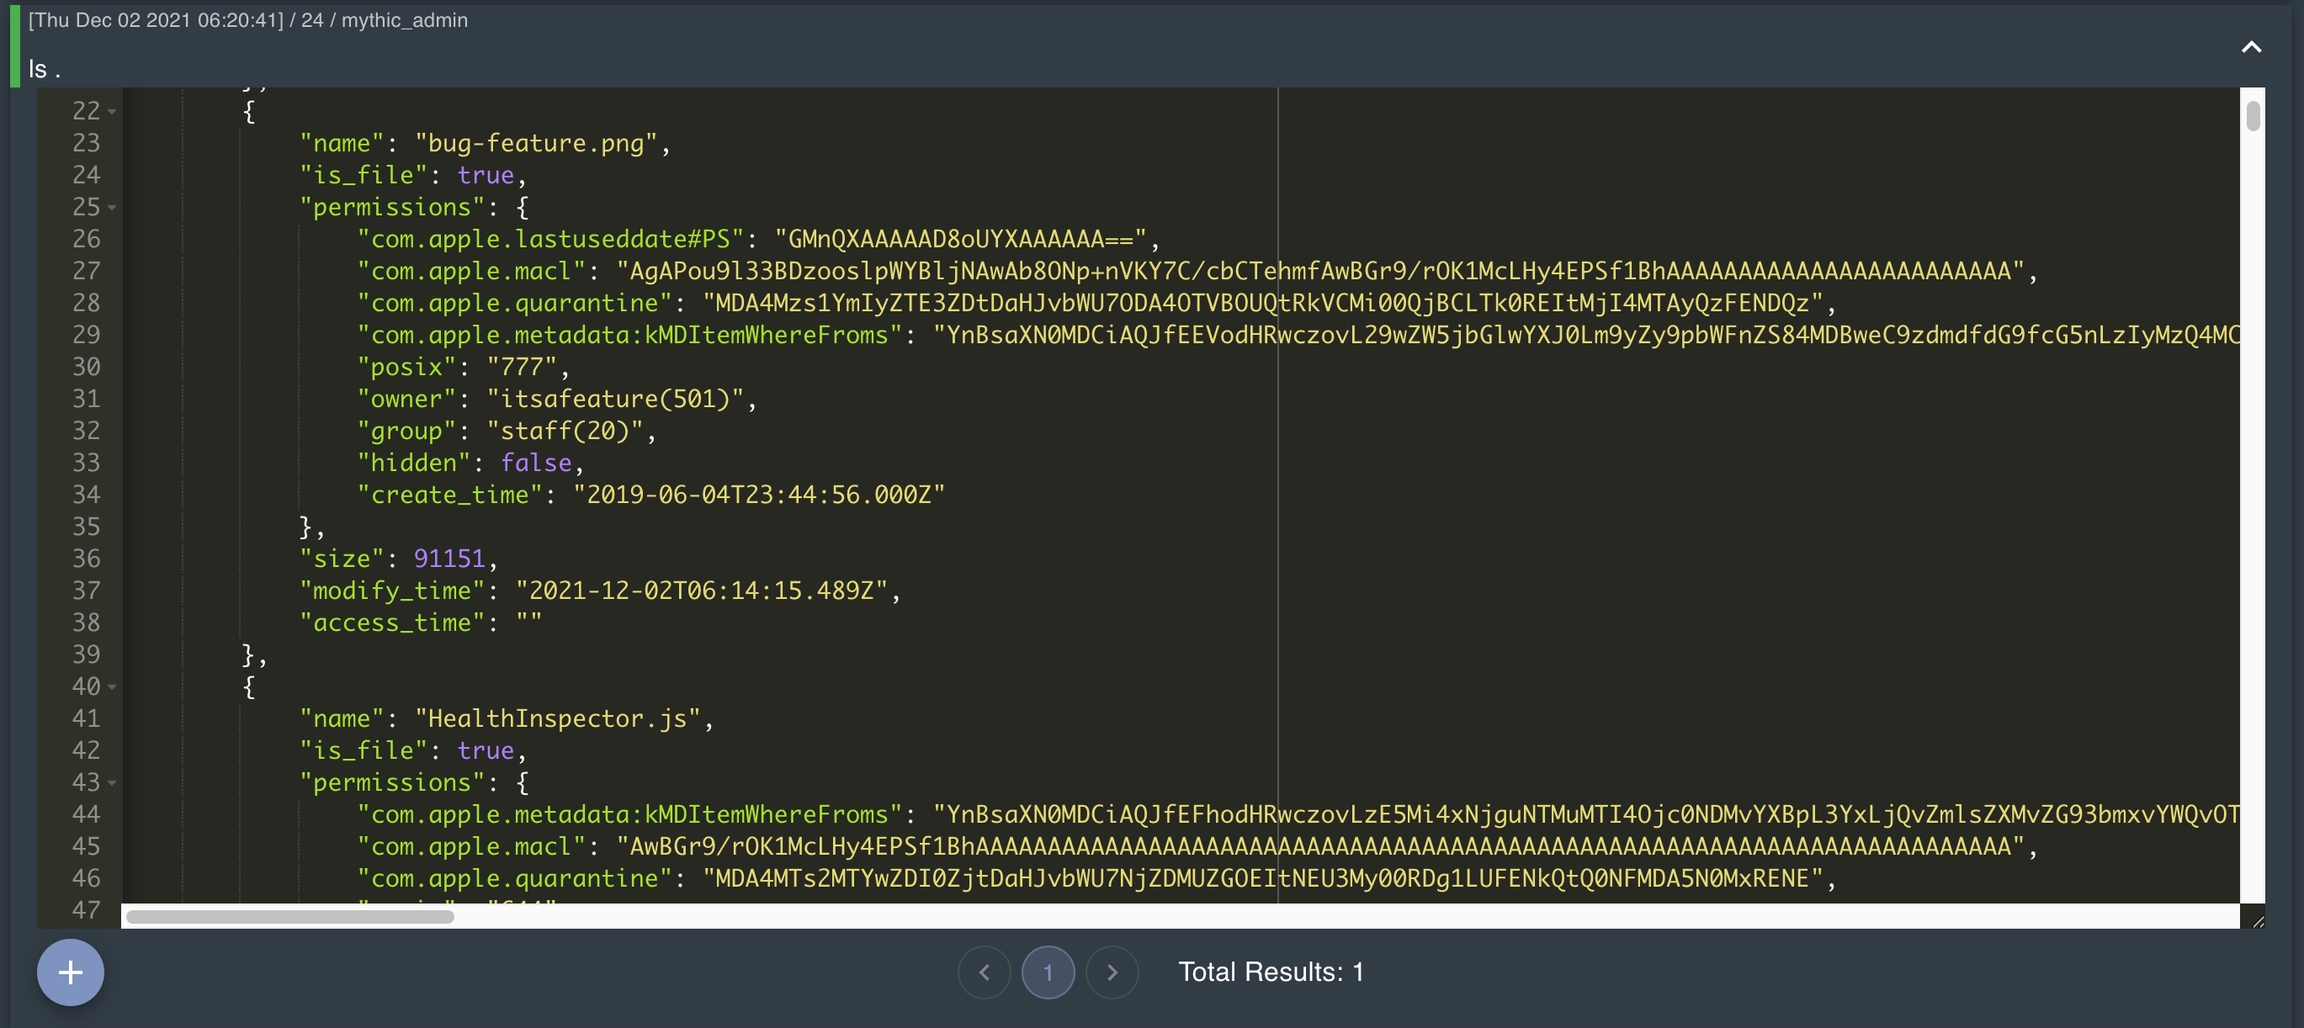
Payload Type information must be set and pulled from a definition either in Python or in GoLang. Below are basic examples in Python and GoLang:
from mythic_container.PayloadBuilder import *
from mythic_container.MythicCommandBase import *
from mythic_container.MythicRPC import *
import json
class Apfell(PayloadType):
name = "apfell"
file_extension = "js"
author = "@its_a_feature_"
supported_os = [SupportedOS.MacOS]
wrapper = False
wrapped_payloads = []
note = """This payload uses JavaScript for Automation (JXA) for execution on macOS boxes."""
supports_dynamic_loading = True
c2_profiles = ["http", "dynamichttp"]
mythic_encrypts = True
translation_container = None # "myPythonTranslation"
build_parameters = []
agent_path = pathlib.Path(".") / "apfell"
agent_icon_path = agent_path / "agent_functions" / "apfell.svg"
agent_code_path = agent_path / "agent_code"
build_steps = [
BuildStep(step_name="Gathering Files", step_description="Making sure all commands have backing files on disk"),
BuildStep(step_name="Configuring", step_description="Stamping in configuration values")
]
async def build(self) -> BuildResponse:
# this function gets called to create an instance of your payload
resp = BuildResponse(status=BuildStatus.Success)
return resp
There are a couple key pieces of information here:
Line 1-2 imports all of basic classes needed for creating an agent
line 7 defines the new class (our agent). This can be called whatever you want, but the important piece is that it extends the PayloadType class as shown with the ().
Lines 8-27 defines the parameters for the payload type that you'd see throughout the UI.
the name is the name of the payload type
supported_os is an array of supported OS versions
supports_dynamic_loading indicates if the agent allows you to select only a subset of commands when creating an agent or not
build_parameters is an array describing all of the build parameters when creating your agent
c2_profiles is an array of c2 profile names that the agent supports
Line 18 defines the name of a "translation container" which we will talk about in another section, but this allows you to support your own, non-mythic message format, custom crypto, etc.
The last piece is the function that's called to build the agent based on all of the information the user provides from the web UI.
The PayloadType base class is in the PayloadBuilder.py file. This is an abstract class, so your instance needs to provide values for all these fields.
package agentfunctions
import (
"bytes"
"encoding/json"
"fmt"
agentstructs "github.com/MythicMeta/MythicContainer/agent_structs"
"github.com/MythicMeta/MythicContainer/mythicrpc"
"os"
"os/exec"
"path/filepath"
"strings"
)
var payloadDefinition = agentstructs.PayloadType{
Name: "basicAgent",
FileExtension: "bin",
Author: "@xorrior, @djhohnstein, @Ne0nd0g, @its_a_feature_",
SupportedOS: []string{agentstructs.SUPPORTED_OS_LINUX, agentstructs.SUPPORTED_OS_MACOS},
Wrapper: false,
CanBeWrappedByTheFollowingPayloadTypes: []string{},
SupportsDynamicLoading: false,
Description: "A fully featured macOS and Linux Golang agent",
SupportedC2Profiles: []string{"http", "websocket", "poseidon_tcp"},
MythicEncryptsData: true,
BuildParameters: []agentstructs.BuildParameter{
{
Name: "mode",
Description: "Choose the build mode option. Select default for executables, c-shared for a .dylib or .so file, or c-archive for a .Zip containing C source code with an archive and header file",
Required: false,
DefaultValue: "default",
Choices: []string{"default", "c-archive", "c-shared"},
ParameterType: agentstructs.BUILD_PARAMETER_TYPE_CHOOSE_ONE,
},
{
Name: "architecture",
Description: "Choose the agent's architecture",
Required: false,
DefaultValue: "AMD_x64",
Choices: []string{"AMD_x64", "ARM_x64"},
ParameterType: agentstructs.BUILD_PARAMETER_TYPE_CHOOSE_ONE,
},
{
Name: "proxy_bypass",
Description: "Ignore HTTP proxy environment settings configured on the target host?",
Required: false,
DefaultValue: false,
ParameterType: agentstructs.BUILD_PARAMETER_TYPE_BOOLEAN,
},
{
Name: "garble",
Description: "Use Garble to obfuscate the output Go executable.\nWARNING - This significantly slows the agent build time.",
Required: false,
DefaultValue: false,
ParameterType: agentstructs.BUILD_PARAMETER_TYPE_BOOLEAN,
},
},
BuildSteps: []agentstructs.BuildStep{
{
Name: "Configuring",
Description: "Cleaning up configuration values and generating the golang build command",
},
{
Name: "Compiling",
Description: "Compiling the golang agent (maybe with obfuscation via garble)",
},
},
}
func build(payloadBuildMsg agentstructs.PayloadBuildMessage) agentstructs.PayloadBuildResponse {
payloadBuildResponse := agentstructs.PayloadBuildResponse{
PayloadUUID: payloadBuildMsg.PayloadUUID,
Success: true,
UpdatedCommandList: &payloadBuildMsg.CommandList,
}
return payloadBuildResponse
}A quick note about wrapper payload types - there's only a few differences between a wrapper payload type and a normal payload type. A configuration variable, wrapper, determines if something is a wrapper or not. A wrapper payload type takes as input the output of a previous build (normal payload type or wrapper payload type) along with build parameters and generates a new payload. A wrapper payload type does NOT have any c2 profiles associated with it because it's simply wrapping an existing payload.
An easy example is thinking of the service_wrapper - this wrapper payload type takes in the shellcode version of another payload and "wraps" it in the execution of a service so that it'll properly respond to the service control manager on windows. A similar example would be to take an agent and wrap it in an MSBuild format. These things don't have their own C2, but rather just package/wrap an existing agent into a new, more generic, format.
To access the payload that you're going to wrap, use the self.wrapped_payload attribute during your build execution. This will be the base64 encoded version of the payload you're going to wrap.
To access the payload that you're going to wrap, use the payloadBuildMsg.WrappedPayload attribute during your build execution. This will be the raw bytes of the payload you're going to wrap. If you want to fetch more details about the payload that's wrapped, you can use the payloadBuildMsg.WrappedPayloadUUID and Mythic Scripting/MythicRPC
When you're done generating the payload, you'll return your new result the exact same way as normal payloads (as part of the build process).
Build parameters define the components shown to the user when creating a payload.
The BuildParameter class has a couple of pieces of information that you can use to customize and validate the parameters supplied to your build:
The most up-to-date code is available in the https://github.com/MythicMeta/MythicContainerPyPi repository.
class BuildParameterType(str, Enum):
"""Types of parameters available for building payloads
Attributes:
String:
A string value
ChooseOne:
A list of choices for the user to select exactly one
ChooseMultiple:
A list of choices for the user to select 0 or more
Array:
The user can supply multiple values in an Array format
Date:
The user can select a Date in YYYY-MM-DD format
Dictionary:
The user can supply a dictionary of values
Boolean:
The user can toggle a switch for True/False
File:
The user can select a file that gets uploaded - a file UUID gets passed in during build
TypedArray:
The user can supply an array where each element also has a drop-down option of choices
"""
String = "String"
ChooseOne = "ChooseOne"
ChooseMultiple = "ChooseMultiple"
Array = "Array"
Date = "Date"
Dictionary = "Dictionary"
Boolean = "Boolean"
File = "File"
TypedArray = "TypedArray"The most up-to-date code is available at https://github.com/MythicMeta/MythicContainer.
type BuildParameterType = string
const (
BUILD_PARAMETER_TYPE_STRING BuildParameterType = "String"
BUILD_PARAMETER_TYPE_BOOLEAN = "Boolean"
BUILD_PARAMETER_TYPE_CHOOSE_ONE = "ChooseOne"
BUILD_PARAMETER_TYPE_CHOOSE_ONE_CUSTOM = "ChooseOneCustom"
BUILD_PARAMETER_TYPE_CHOOSE_MULTIPLE = "ChooseMultiple"
BUILD_PARAMETER_TYPE_DATE = "Date"
BUILD_PARAMETER_TYPE_DICTIONARY = "Dictionary"
BUILD_PARAMETER_TYPE_ARRAY = "Array"
BUILD_PARAMETER_TYPE_NUMBER = "Number"
BUILD_PARAMETER_TYPE_FILE = "File"
BUILD_PARAMETER_TYPE_TYPED_ARRAY = "TypedArray"
)
// BuildParameter - A structure defining the metadata about a build parameter for the user to select when building a payload.
type BuildParameter struct {
// Name - the name of the build parameter for use during the Payload Type's build function
Name string `json:"name"`
// Description - the description of the build parameter to be presented to the user during build
Description string `json:"description"`
// Required - indicate if this requires the user to supply a value or not
Required bool `json:"required"`
// VerifierRegex - if the user is supplying text and it needs to match a specific pattern, specify a regex pattern here and the UI will indicate to the user if the value is valid or not
VerifierRegex string `json:"verifier_regex"`
// DefaultValue - A default value to show the user when building in the Mythic UI. The type here depends on the Parameter Type - ex: for a String, supply a string. For an array, provide an array
DefaultValue interface{} `json:"default_value"`
// ParameterType - The type of parameter this is so that the UI can properly render components for the user to modify
ParameterType BuildParameterType `json:"parameter_type"`
// FormatString - If Randomize is true, this regex format string is used to generate a value when presenting the option to the user
FormatString string `json:"format_string"`
// Randomize - Should this value be randomized each time it's shown to the user so that each payload has a different value
Randomize bool `json:"randomize"`
// IsCryptoType -If this is True, then the value supplied by the user is for determining the _kind_ of crypto keys to generate (if any) and the resulting stored value in the database is a dictionary composed of the user's selected and an enc_key and dec_key value
IsCryptoType bool `json:"crypto_type"`
// Choices - If the ParameterType is ChooseOne or ChooseMultiple, then the options presented to the user are here.
Choices []string `json:"choices"`
// DictionaryChoices - if the ParameterType is Dictionary, then the dictionary choices/preconfigured data is set here
DictionaryChoices []BuildParameterDictionary `json:"dictionary_choices"`
}
// BuildStep - Identification of a step in the build process that's shown to the user to eventually collect start/end time as well as stdout/stderr per step
type BuildStep struct {
Name string `json:"step_name"`
Description string `json:"step_description"`
}name is the name of the parameter, if you don't provide a longer description, then this is what's presented to the user when building your payload
parameter_type describes what is presented to the user - valid types are:
BuildParameterType.String
During build, this is a string
BuildParameterType.ChooseOne
During build, this is a string
BuildParameterType.ChooseOneCustom
During build, this is a string
BuildParameterType.ChooseMultiple
During build, this is an array of strings
BuildParameterType.Array
During build, this is an array of strings
BuildParameterType.Date
During build, this is a string of the format YYYY-MM-DD
BuildParameterType.Dictionary
During build, this is a dictionary
BuildParameterType.Boolean
During build, this is a boolean
BuildParameterType.File
During build, this is a string UUID of the file (so that you can use a MythicRPC call to fetch the contents of the file)
BuildParameterType.TypedArray
During build, this is an arrray of arrays, always in the format [ [ type, value], [type value], [type, value] ...]
required indicates if there must be a value supplied. If no value is supplied by the user and no default value supplied here, then an exception is thrown before execution gets to the build function.
verifier_regex is a regex the web UI can use to provide some information to the user about if they're providing a valid value or not
default_value is the default value used for building if the user doesn't supply anything
choices is where you can supply an array of options for the user to pick from if the parameter_type is ChooseOne
dictionary_choices are the choices and metadata about what to display to the user for key-value pairs that the user might need to supply
value is the component you access when building your payload - this is the final value (either the default value or the value the user supplied)
verifier_func is a function you can provide for additional checks on the value the user supplies to make sure it's what you want. This function should either return nothing or raise an exception if something isn't right
As a recap, where does this come into play? In the first section, we showed a section like:
build_parameters = [
BuildParameter(name="string", parameter_type=BuildParameterType.String,
description="test string", default_value="test"),
BuildParameter(name="choose one", parameter_type=BuildParameterType.ChooseOne,
description="test choose one",
choices=["a", "b"], default_value="a"),
BuildParameter(name="choose one crypto",
parameter_type=BuildParameterType.ChooseOne,
description="choose one crypto",
crypto_type=True, choices=["aes256_hmac", "none"]),
BuildParameter(name="date", parameter_type=BuildParameterType.Date,
default_value=30, description="test date offset from today"),
BuildParameter(name="array", parameter_type=BuildParameterType.Array,
default_value=["a", "b"],
description="test array"),
BuildParameter(name="dict", parameter_type=BuildParameterType.Dictionary,
dictionary_choices=[
DictionaryChoice(name="host", default_value="abc.com", default_show=False),
DictionaryChoice(name="user-agent", default_show=True, default_value="mozilla")
],
description="test dictionary"),
BuildParameter(name="random", parameter_type=BuildParameterType.String,
randomize=True, format_string="[a,b,c]{3}",
description="test randomized string"),
BuildParameter(name="bool", parameter_type=BuildParameterType.Boolean,
default_value=True, description="test boolean")
]
BuildParameters: []agentstructs.BuildParameter{
{
Name: "mode",
Description: "Choose the build mode option. Select default for executables, c-shared for a .dylib or .so file, or c-archive for a .Zip containing C source code with an archive and header file",
Required: false,
DefaultValue: "default",
Choices: []string{"default", "c-archive", "c-shared"},
ParameterType: agentstructs.BUILD_PARAMETER_TYPE_CHOOSE_ONE,
},
{
Name: "architecture",
Description: "Choose the agent's architecture",
Required: false,
DefaultValue: "AMD_x64",
Choices: []string{"AMD_x64", "ARM_x64"},
ParameterType: agentstructs.BUILD_PARAMETER_TYPE_CHOOSE_ONE,
},
{
Name: "proxy_bypass",
Description: "Ignore HTTP proxy environment settings configured on the target host?",
Required: false,
DefaultValue: false,
ParameterType: agentstructs.BUILD_PARAMETER_TYPE_BOOLEAN,
},
{
Name: "garble",
Description: "Use Garble to obfuscate the output Go executable.\nWARNING - This significantly slows the agent build time.",
Required: false,
DefaultValue: false,
ParameterType: agentstructs.BUILD_PARAMETER_TYPE_BOOLEAN,
},
},You have to implement the build function and return an instance of the BuildResponse class. This response has these fields:
status - an instance of BuildStatus (Success or Error)
Specifically, BuildStatus.Success or BuildStatus.Error
payload - the raw bytes of the finished payload (if you failed to build, set this to None or empty bytes like b'' in Python.
build_message - any stdout data you want the user to see
build_stderr - any stderr data you want the user to see
build_stdout - any stdout data you want the user to see
updated_filename - if you want to update the filename to something more appropriate, set it here.
For example: the user supplied a filename of apollo.exe but based on the build parameters, you're actually generating a dll, so you can update the filename to be apollo.dll. This is particularly useful if you're optionally returning a zip of information so that the user doesn't have to change the filename before downloading. If you plan on doing this to update the filename for a wide variety of options, then it might be best to leave the file extension field in your payload type definition blank "" so that you can more easily adjust the extension.
The most basic version of the build function would be:
async def build(self) -> BuildResponse:
# this function gets called to create an instance of your payload
return BuildResponse(status=BuildStatus.Success)func build(payloadBuildMsg agentstructs.PayloadBuildMessage) agentstructs.PayloadBuildResponse {
payloadBuildResponse := agentstructs.PayloadBuildResponse{
PayloadUUID: payloadBuildMsg.PayloadUUID,
Success: true,
}
return payloadBuildResponse
}Once the build function is called, all of your BuildParameters will already be verified (all parameters marked as required will have a value of some form (user supplied or default_value) and all of the verifier functions will be called if they exist). This allows you to know that by the time your build function is called that all of your parameters are valid.
Your build function gets a few pieces of information to help you build the agent (other than the build parameters):
From within your build function, you'll have access to the following pieces of information:
self.uuid - the UUID associated with your payload
This is how your payload identifies itself to Mythic before getting a new Staging and final Callback UUID
self.commands - a wrapper class around the names of all the commands the user selected.
Access this list via self.commands.get_commands()
for cmd in self.commands.get_commands():
command_code += open(self.agent_code_path / "{}.js".format(cmd), 'r').read() + "\n"self.agent_code_path - a pathlib.Path object pointing to the path of the agent_code directory that holds all the code for your payload. This is something you pre-define as part of your agent definition.
To access "test.js" in that "agent_code" folder, simply do:
f = open(self.agent_code_path / "test.js", 'r').
With pathlib.Path objects, the / operator allows you to concatenate paths in an OS agnostic manner. This is the recommended way to access files so that your code can work anywhere.
self.get_parameter("parameter name here")
The build parameters that are validated from the user. If you have a build_parameter with a name of "version", you can access the user supplied or default value with self.get_parameter("version")
self.selected_os - This is the OS that was selected on the first step of creating a payload
self.c2info - this holds a list of dictionaries of the c2 parameters and c2 class information supplied by the user. This is a list because the user can select multiple c2 profiles (maybe they want HTTP and SMB in the payload for example). For each element in self.c2info, you can access the information about the c2 profile with get_c2profile() and access to the parameters via get_parameters_dict(). Both of these return a dictionary of key-value pairs.
the dictionary returned by self.c2info[0].get_c2profile() contains the following:
name - name of the c2 profile
description - description of the profile
is_p2p - boolean of if the profile is marked as a p2p profile or not
the dictionary returned by self.c2info[0].get_parameters_dict()contains the following:
key - value
where each key is the key value defined for the c2 profile's parameters and value is what the user supplied. You might be wondering where to get these keys? Well, it's not too crazy and you can view them right in the UI - Name Fields.
If the C2 parameter has a value of crypto_type=True, then the "value" here will be a bit more than just a string that the user supplied. Instead, it'll be a dictionary with three pieces of information: value - the value that the user supplied, enc_key - a base64 string (or None) of the encryption key to be used, dec_key - a base64 string (or None) of the decryption key to be used. This gives you more flexibility in automatically generating encryption/decryption keys and supporting crypto types/schemas that Mythic isn't aware of. In the HTTP profile, the key AESPSK has this type set to True, so you'd expect that dictionary.
If the C2 parameter has a type of "Dictionary", then things are a little different.
Let's take the "headers" parameter in the http profile for example. This allows you to set header values for your http traffic such as User-Agent, Host, and more. When you get this value on the agent side, you get an array of values that look like the following:
{"User-Agent": "the user agent the user supplied", "MyCustomHeader": "my custom value"}. You get the final "dictionary" that's created from the user supplied fields.
One way to leverage this could be:
for c2 in self.c2info:
c2_code = ""
try:
profile = c2.get_c2profile()
c2_code = open(
self.agent_code_path
/ "c2_profiles"
/ "{}.js".format(profile["name"]),
"r",
).read()
for key, val in c2.get_parameters_dict().items():
if key == "AESPSK":
c2_code = c2_code.replace(key, val["enc_key"] if val["enc_key"] is not None else "")
elif not isinstance(val, str):
c2_code = c2_code.replace(key, json.dumps(val))
else:
c2_code = c2_code.replace(key, val)
except Exception as p:
build_msg += str(p)
pass// PayloadBuildMessage - A structure of the build information the user provided to generate an instance of the payload type.
// This information gets passed to your payload type's build function.
type PayloadBuildMessage struct {
// PayloadType - the name of the payload type for the build
PayloadType string `json:"payload_type" mapstructure:"payload_type"`
// Filename - the name of the file the user originally supplied for this build
Filename string `json:"filename" mapstructure:"filename"`
// CommandList - the list of commands the user selected to include in the build
CommandList []string `json:"commands" mapstructure:"commands"`
// build param name : build value
// BuildParameters - map of param name -> build value from the user for the build parameters defined
// File type build parameters are supplied as a string UUID to use with MythicRPC for fetching file contents
// Array type build parameters are supplied as []string{}
BuildParameters PayloadBuildArguments `json:"build_parameters" mapstructure:"build_parameters"`
// C2Profiles - list of C2 profiles selected to include in the payload and their associated parameters
C2Profiles []PayloadBuildC2Profile `json:"c2profiles" mapstructure:"c2profiles"`
// WrappedPayload - bytes of the wrapped payload if one exists
WrappedPayload *[]byte `json:"wrapped_payload,omitempty" mapstructure:"wrapped_payload"`
// WrappedPayloadUUID - the UUID of the wrapped payload if one exists
WrappedPayloadUUID *string `json:"wrapped_payload_uuid,omitempty" mapstructure:"wrapped_payload_uuid"`
// SelectedOS - the operating system the user selected when building the agent
SelectedOS string `json:"selected_os" mapstructure:"selected_os"`
// PayloadUUID - the Mythic generated UUID for this payload instance
PayloadUUID string `json:"uuid" mapstructure:"uuid"`
// PayloadFileUUID - The Mythic generated File UUID associated with this payload
PayloadFileUUID string `json:"payload_file_uuid" mapstructure:"payload_file_uuid"`
}
// PayloadBuildC2Profile - A structure of the selected C2 Profile information the user selected to build into a payload.
type PayloadBuildC2Profile struct {
Name string `json:"name" mapstructure:"name"`
IsP2P bool `json:"is_p2p" mapstructure:"is_p2p"`
// parameter name: parameter value
// Parameters - this is an interface of parameter name -> parameter value from the associated C2 profile.
// The types for the various parameter names can be found by looking at the build parameters in the Mythic UI.
Parameters map[string]interface{} `json:"parameters" mapstructure:"parameters"`
}
type CryptoArg struct {
Value string `json:"value" mapstructure:"value"`
EncKey string `json:"enc_key" mapstructure:"enc_key"`
DecKey string `json:"dec_key" mapstructure:"dec_key"`
}Finally, when building a payload, it can often be helpful to have both stdout and stderr information captured, especially if you're compiling code. Because of this, you can set the build_message ,build_stderr , and build_stdout fields of the BuildResponse to have this data. For example:
async def build(self) -> BuildResponse:
# this function gets called to create an instance of your payload
resp = BuildResponse(status=BuildStatus.Success)
# create the payload
build_msg = ""
#create_payload = await MythicRPC().execute("create_callback", payload_uuid=self.uuid, c2_profile="http")
try:
command_code = ""
for cmd in self.commands.get_commands():
try:
command_code += (
open(self.agent_code_path / "{}.js".format(cmd), "r").read() + "\n"
)
except Exception as p:
pass
base_code = open(
self.agent_code_path / "base" / "apfell-jxa.js", "r"
).read()
await SendMythicRPCPayloadUpdatebuildStep(MythicRPCPayloadUpdateBuildStepMessage(
PayloadUUID=self.uuid,
StepName="Gathering Files",
StepStdout="Found all files for payload",
StepSuccess=True
))
base_code = base_code.replace("UUID_HERE", self.uuid)
base_code = base_code.replace("COMMANDS_HERE", command_code)
all_c2_code = ""
if len(self.c2info) != 1:
resp.build_stderr = "Apfell only supports one C2 Profile at a time"
resp.set_status(BuildStatus.Error)
return resp
for c2 in self.c2info:
c2_code = ""
try:
profile = c2.get_c2profile()
c2_code = open(
self.agent_code_path
/ "c2_profiles"
/ "{}.js".format(profile["name"]),
"r",
).read()
for key, val in c2.get_parameters_dict().items():
if key == "AESPSK":
c2_code = c2_code.replace(key, val["enc_key"] if val["enc_key"] is not None else "")
elif not isinstance(val, str):
c2_code = c2_code.replace(key, json.dumps(val))
else:
c2_code = c2_code.replace(key, val)
except Exception as p:
build_msg += str(p)
pass
all_c2_code += c2_code
base_code = base_code.replace("C2PROFILE_HERE", all_c2_code)
await SendMythicRPCPayloadUpdatebuildStep(MythicRPCPayloadUpdateBuildStepMessage(
PayloadUUID=self.uuid,
StepName="Configuring",
StepStdout="Stamped in all of the fields",
StepSuccess=True
))
resp.payload = base_code.encode()
if build_msg != "":
resp.build_stderr = build_msg
resp.set_status(BuildStatus.Error)
else:
resp.build_message = "Successfully built!\n"
except Exception as e:
resp.set_status(BuildStatus.Error)
resp.build_stderr = "Error building payload: " + str(e)
return respDepending on the status of your build (success or error), either the message or build_stderr values will be presented to the user via the UI notifications. However, at any time you can go back to the Created Payloads page and view the build message, build errors, and build stdout for any payload.
The last thing to mention are build steps. These are defined as part of the agent and are simply descriptions of what is happening during your build process. The above example makes some RPC calls for SendMythicRPCPayloadUpdatebuildStep to update the build steps back to Mythic while the build process is happening. For something as fast as the apfell agent, it'll appear as though all of these happen at the same time. For something that's more computationally intensive though, it's helpful to provide information back to the user about what's going on - stamping in values? obfuscating? compiling? more obfuscation? opsec checks? etc. Whatever it is that's going on, you can provide this data back to the operator complete with stdout and stderr.
So, what's the actual, end-to-end execution flow that goes on? A diagram can be found here: Message Flow.
PayloadType container is started, it connects to Mythic and sends over its data (by parsing all these python files or GoLang structs)
An operator wants to create a payload from it, so they click the hazard icon at the top of Mythic, click the "Actions" dropdown and select "Generate New Payload".
The operator selects an OS type that the agent supports (ex. Linux, macOS, Windows)
The operator selects the payload type they want to build (this one)
edits all build parameters as needed
The operator selects all commands they want included in the payload
The operator selects all c2 profiles they want included
and for each c2 selected, provides any c2 required parameters
Mythic takes all of this information and sends it to the payload type container
The container sends the BuildResponse message back to the Mythic server.
Starting with Mythic v3.2.12, PyPi version 0.4.1, and MythicContainer version 1.3.1, there's a new function you can define as part of your Payload Type definition. In addition to defining a build process, you can also define a on_new_callback (or onNewCallbackFunction) function that will get executed whenever there's a new callback based on this payload type.
Below are examples in Python and in Golang for how to define and leverage this new functionality. One of the great things about this is that you can use this to automatically issue tasking for new callbacks. The below examples will automatically issue a shell command with parameters of whoami.
These function calls get almost all the same data that you'll see in your Create Tasking calls, except they're missing information about a Task. That's simply because there's no task yet, this is the moment that a new callback is created.
Mythic tracks an operator for all issued tasking. Since there's no operator directly typing out and issuing these tasks, Mythic associates the operator that built the payload with any tasks automatically created in this function.
class Apfell(PayloadType):
name = "apfell"
...
async def build ...
async def on_new_callback(self, newCallback: PTOnNewCallbackAllData) -> PTOnNewCallbackResponse:
new_task_resp = await SendMythicRPCTaskCreate(MythicRPCTaskCreateMessage(
AgentCallbackUUID=newCallback.Callback.AgentCallbackID,
CommandName="shell",
Params="whoami",
))
if new_task_resp.Success:
return PTOnNewCallbackResponse(AgentCallbackUUID=newCallback.Callback.AgentCallbackID, Success=True)
return PTOnNewCallbackResponse(AgentCallbackUUID=newCallback.Callback.AgentCallbackID, Success=False,
Error=new_task_resp.Error)func onNewBuild(data agentstructs.PTOnNewCallbackAllData) agentstructs.PTOnNewCallbackResponse {
newTasking, err := mythicrpc.SendMythicRPCTaskCreate(mythicrpc.MythicRPCTaskCreateMessage{
AgentCallbackID: data.Callback.AgentCallbackID,
CommandName: "shell",
Params: "whoami",
})
if err != nil {
logging.LogError(err, "failed to create new task")
}
if newTasking.Success {
logging.LogInfo("created new task")
} else {
logging.LogError(err, "failed to create new tasking")
}
return agentstructs.PTOnNewCallbackResponse{
AgentCallbackID: data.Callback.AgentCallbackID,
Success: true,
Error: "",
}
}
func Initialize() {
agentstructs.AllPayloadData.Get("poseidon").AddPayloadDefinition(payloadDefinition)
agentstructs.AllPayloadData.Get("poseidon").AddBuildFunction(build)
agentstructs.AllPayloadData.Get("poseidon").AddOnNewCallbackFunction(onNewBuild)
agentstructs.AllPayloadData.Get("poseidon").AddIcon(filepath.Join(".", "poseidon", "agentfunctions", "poseidon.svg"))
}Payload types have an optional field that can be defined:
class PTOtherServiceRPCMessage:
"""Request to call an RPC function of another C2 Profile or Payload Type
Attributes:
ServiceName (str): Name of the C2 Profile or Payload Type
ServiceRPCFunction (str): Name of the function to call
ServiceRPCFunctionArguments (dict): Arguments to that function
Functions:
to_json(self): return dictionary form of class
"""
def __init__(self,
ServiceName: str = None,
service_name: str = None,
ServiceRPCFunction: str = None,
service_function: str = None,
ServiceRPCFunctionArguments: dict = None,
service_arguments: dict = None,
**kwargs):
self.ServiceName = ServiceName
if self.ServiceName is None:
self.ServiceName = service_name
self.ServiceRPCFunction = ServiceRPCFunction
if self.ServiceRPCFunction is None:
self.ServiceRPCFunction = service_function
self.ServiceRPCFunctionArguments = ServiceRPCFunctionArguments
if self.ServiceRPCFunctionArguments is None:
self.ServiceRPCFunctionArguments = service_arguments
for k, v in kwargs.items():
logger.error(f"unknown kwarg {k} {v}")
def to_json(self):
return {
"service_name": self.ServiceName,
"service_function": self.ServiceRPCFunction,
"service_arguments": self.ServiceRPCFunctionArguments
}
def __str__(self):
return json.dumps(self.to_json(), sort_keys=True, indent=2)
class PTOtherServiceRPCMessageResponse:
"""Result of running an RPC call from another service
Attributes:
Success (bool): Did the RPC succeed or fail
Error (str): Error message if the RPC check failed
Result (dict): Result from the RPC
Functions:
to_json(self): return dictionary form of class
"""
def __init__(self,
success: bool = None,
error: str = None,
result: dict = None,
Success: bool = None,
Error: str = None,
Result: dict = None,
**kwargs):
self.Success = Success
if self.Success is None:
self.Success = success
self.Error = Error
if self.Error is None:
self.Error = error
self.Result = Result
if self.Result is None:
self.Result = result
for k, v in kwargs.items():
logger.error(f"unknown kwarg {k} {v}")
def to_json(self):
return {
"success": self.Success,
"error": self.Error,
"result": self.Result
}
def __str__(self):
return json.dumps(self.to_json(), sort_keys=True, indent=2)
custom_rpc_functions: dict[
str, Callable[[PTOtherServiceRPCMessage], Awaitable[PTOtherServiceRPCMessageResponse]]] = {}// PTRPCOtherServiceRPCMessage - A message to call RPC functionality exposed by another Payload Type or C2 Profile
type PTRPCOtherServiceRPCMessage struct {
// Name - The name of the remote Payload type or C2 Profile
Name string `json:"service_name"` //required
// RPCFunction - The name of the function to call for that remote service
RPCFunction string `json:"service_function"`
// RPCFunctionArguments - A map of arguments to supply to that remote function
RPCFunctionArguments map[string]interface{} `json:"service_arguments"`
}
// PTRPCOtherServiceRPCMessageResponse - The result of calling RPC functionality exposed by another Payload Type or C2 Profile
type PTRPCOtherServiceRPCMessageResponse struct {
// Success - An indicator if the call was successful or not
Success bool `json:"success"`
// Error - If the call was unsuccessful, this is an error message about what happened
Error string `json:"error"`
// Result - The result returned by the remote service
Result map[string]interface{} `json:"result"`
}
CustomRPCFunctions map[string]func(message PTRPCOtherServiceRPCMessage) PTRPCOtherServiceRPCMessageResponse `json:"-"`This dictionary of functions is a way for a Payload Type/C2 Profile to define custom RPC functions that are callable from other containers. This can be particularly handy if you have a Payload Build function that needs to ask a C2 Profile to configure something in a specific way on its behalf. The same thing also applies to C2 Profiles - C2 Profiles can ask Payload Type containers to do things.
The definitions are particularly vague in the arguments needed (ex: a generic dictionary/map) because it's up to the function to define what is needed.
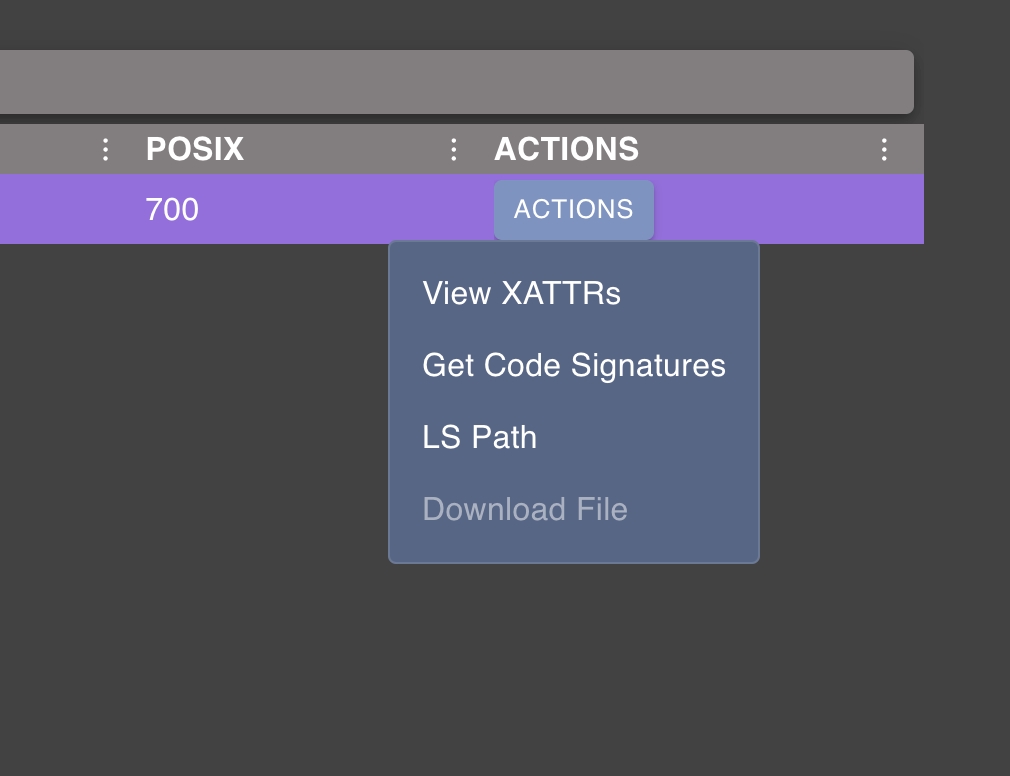


Unexpected error with integration github-files: Integration is not installed on this space